# Welcome

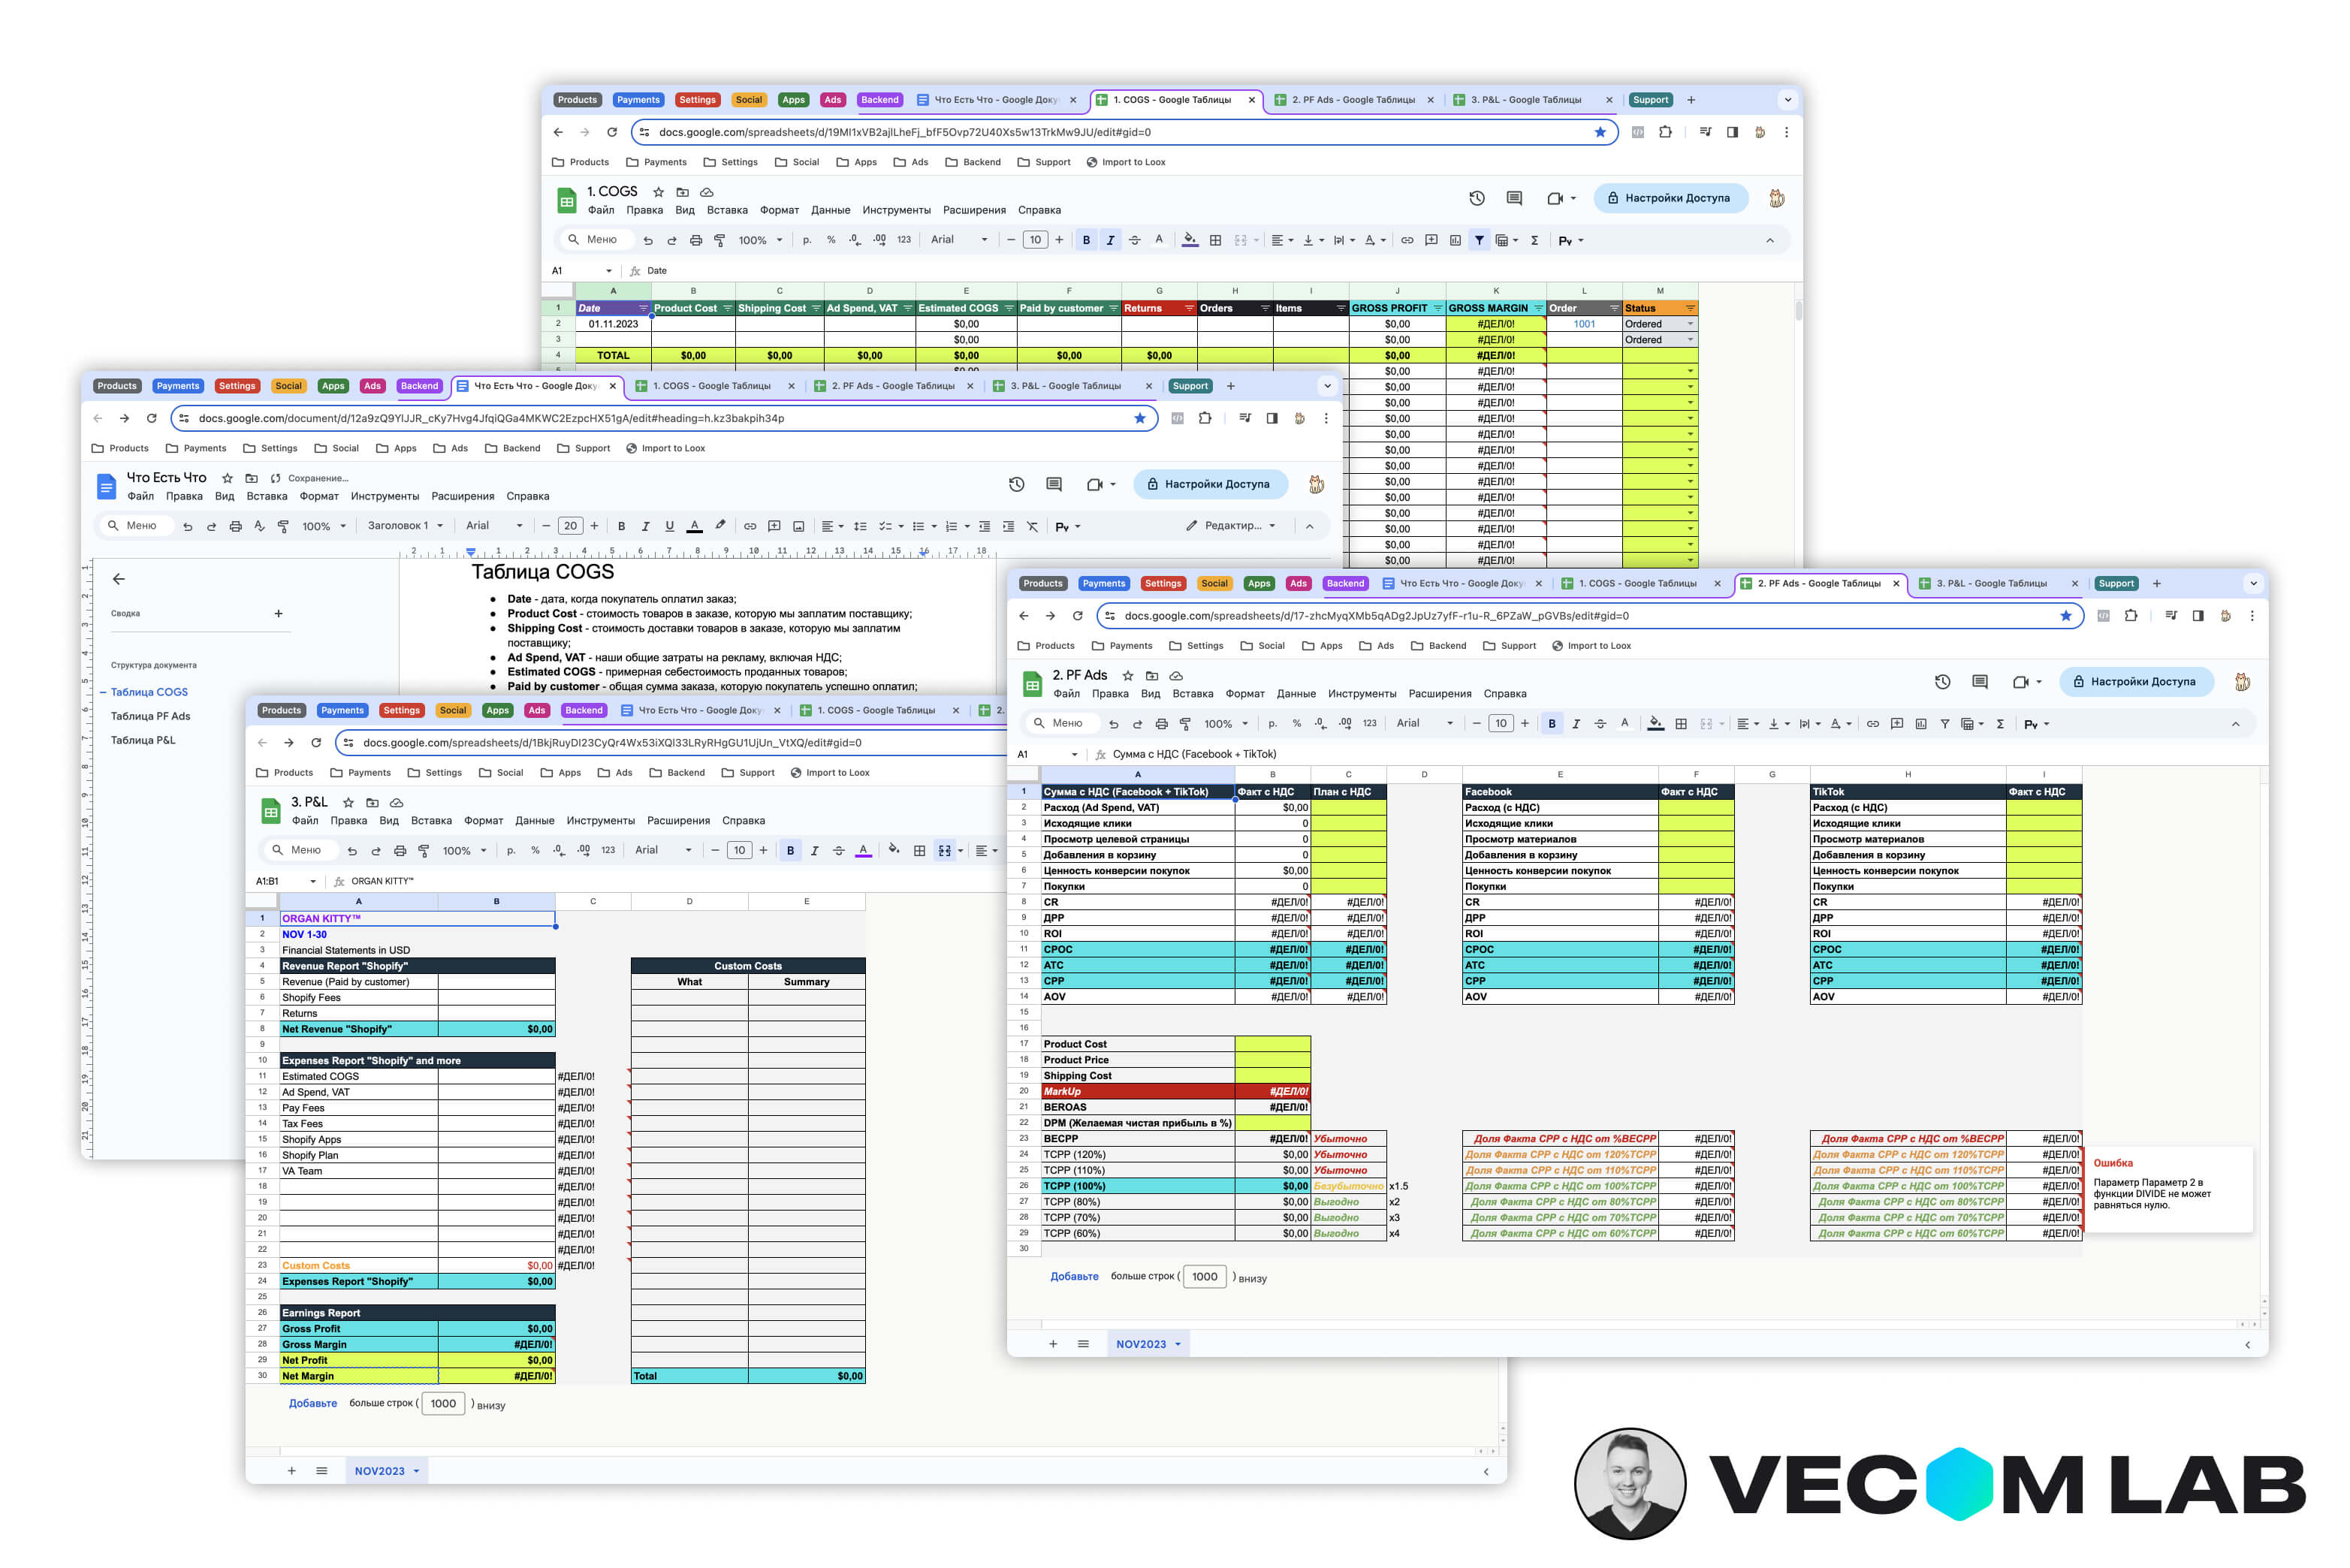
Official documentation for the VecomLab community.

VecomLab has been helping build and scale online stores since 2023.

<a href="https://vecomlab.com/" class="button primary">Our website</a>

### Make it easy <a href="#make-it-easy" id="make-it-easy"></a>

<table data-view="cards" data-full-width="false"><thead><tr><th></th><th></th><th></th><th data-hidden data-type="content-ref"></th><th data-hidden data-card-cover data-type="files"></th><th data-hidden data-card-target data-type="content-ref"></th></tr></thead><tbody><tr><td><strong>Shopify and Facebook</strong></td><td>Creating a store, ads, and much more with VecomLab.</td><td><a href="/ecom-foundations/overview">Learn more</a></td><td><a href="/ecom-foundations/overview">Shopify and Facebook Foundations</a></td><td><a href="https://755362860-files.gitbook.io/~/files/v0/b/gitbook-x-prod.appspot.com/o/spaces%2Fxa9ueiMPkj0LsrVay0aB%2Fuploads%2FVP6iUMEsVYhmD25bpMjQ%2Fvecomlab-ecom.jpg?alt=media&amp;token=12796dcc-7b8c-448b-a1fe-e8aeea212e4e">vecomlab-ecom.jpg</a></td><td><a href="/ecom-foundations/overview">Overview</a></td></tr><tr><td><strong>Level up Shopify without code</strong></td><td>Multi-functional themes and apps that truly convert.</td><td><a href="/upgrade-shopify-no-code/shrinesolutions">Learn more</a></td><td></td><td><a href="https://755362860-files.gitbook.io/~/files/v0/b/gitbook-x-prod.appspot.com/o/spaces%2Fxa9ueiMPkj0LsrVay0aB%2Fuploads%2FzovJGZxegVCO7Vlz05K3%2Fvecomlab-shrine.jpg?alt=media&amp;token=1e00269e-a2ee-4d5a-8d24-120359659e76">vecomlab-shrine.jpg</a></td><td><a href="/upgrade-shopify-no-code/shrinesolutions">Upgrade Shopify no code</a></td></tr><tr><td><strong>Shopify Theme Setup</strong></td><td>Free Shopify theme guides for more conversions.</td><td><a href="/shopify-theme-setup/dawn">Learn more</a></td><td></td><td><a href="https://755362860-files.gitbook.io/~/files/v0/b/gitbook-x-prod.appspot.com/o/spaces%2Fxa9ueiMPkj0LsrVay0aB%2Fuploads%2FpktSt4XuDFPqwlMkbmlL%2Fvecomlab-dev.jpg?alt=media&amp;token=4178c260-7374-4e8b-95f5-6df18b7aa8b0">vecomlab-dev.jpg</a></td><td><a href="/shopify-theme-setup/dawn">shopify theme setup</a></td></tr></tbody></table>

### Help <a href="#help" id="help"></a>

You can reach us through our [contact](https://vecomlab.com/pages/contact) page. Simply fill out the form, and we will get back to you as soon as possible. You can also ask the [community](https://vecomlab.com/pages/community) a question.


# How to Create a Redirect in Shopify and Track Clicks with Redira – Step-by-Step Guide

Learn how to create redirects in Shopify and track clicks with Redira. Step-by-step guide to installation, setup, and redirect tracking.

In this guide, you’ll learn how to install the **Redira** app in Shopify, create a redirect, and start tracking link clicks to analyze traffic and marketing performance.

{% hint style="info" %}
[Redira](https://redira.app/) is an app created by the [founder](https://www.linkedin.com/in/volkovecom/) of **Vecomlab** that allows you to create redirects and track clicks for traffic and marketing analytics.

Install app: <https://apps.shopify.com/redira>

X: <https://x.com/redira_app>

LinkedId: <https://www.linkedin.com/company/redira-app>

Telegram: <https://t.me/redira_app>

Discord: <https://discord.gg/TCRTpTY59H>

Support: <support@redira.app>

Docs: <https://docs.redira.app/>
{% endhint %}

### Main scenario: creating a new redirect

Follow these steps if you want to create a new redirect and track clicks with Redira.

#### Step 1. Go to the app installation page

<figure><img src="https://755362860-files.gitbook.io/~/files/v0/b/gitbook-x-prod.appspot.com/o/spaces%2Fxa9ueiMPkj0LsrVay0aB%2Fuploads%2F5Z41XGDKPx1QMGqYdFiZ%2Fvecomlab-redira-1.jpg?alt=media&amp;token=74de9e63-32db-45c7-b1e1-874c2fbfac16" alt=""><figcaption></figcaption></figure>

Open the Shopify App Store and search for **Redira**\
or go directly via the official link:

👉 <https://apps.shopify.com/redira>

#### Step 2. Install the app

<div><figure><img src="https://755362860-files.gitbook.io/~/files/v0/b/gitbook-x-prod.appspot.com/o/spaces%2Fxa9ueiMPkj0LsrVay0aB%2Fuploads%2FqtK133kIDhLqAC5aLM13%2Fvecomlab-redira-2.jpg?alt=media&amp;token=92f31e89-4aa3-4f48-ad8e-c5ca3396144a" alt=""><figcaption></figcaption></figure> <figure><img src="https://755362860-files.gitbook.io/~/files/v0/b/gitbook-x-prod.appspot.com/o/spaces%2Fxa9ueiMPkj0LsrVay0aB%2Fuploads%2FcWHAwhLQdLy3gQxLl2DB%2Fvecomlab-redira-3.jpg?alt=media&amp;token=f53f747f-7298-41ba-973a-da519ceba253" alt=""><figcaption></figcaption></figure></div>

Click **Install** and complete the installation in Shopify.

After installation, you’ll see the Redira welcome screen.

#### Step 3. Pin the app in Shopify

<figure><img src="https://755362860-files.gitbook.io/~/files/v0/b/gitbook-x-prod.appspot.com/o/spaces%2Fxa9ueiMPkj0LsrVay0aB%2Fuploads%2FwFsDpsg5tadeFIB2dAVb%2Fvecomlab-redira-4.jpg?alt=media&amp;token=d642ac64-4330-4a1a-b7fb-29e61320722a" alt=""><figcaption></figcaption></figure>

To speed up access and avoid potential issues:

* Go to your apps list in Shopify
* Click **Pin** next to Redira

This makes it easier to access the app and manage your redirects.

#### Step 4. Create a redirect

<div><figure><img src="https://755362860-files.gitbook.io/~/files/v0/b/gitbook-x-prod.appspot.com/o/spaces%2Fxa9ueiMPkj0LsrVay0aB%2Fuploads%2FerOoesb1cHZABnZq1CRc%2Fvecomlab-redira-5.jpg?alt=media&amp;token=0662682d-e02c-456b-9637-03622ffb04a0" alt=""><figcaption></figcaption></figure> <figure><img src="https://755362860-files.gitbook.io/~/files/v0/b/gitbook-x-prod.appspot.com/o/spaces%2Fxa9ueiMPkj0LsrVay0aB%2Fuploads%2FGIwaRdYC0WFIeir4NdYd%2Fvecomlab-redira-6.jpg?alt=media&amp;token=f98e3a1c-82a9-432a-bd33-1073b6979260" alt=""><figcaption></figcaption></figure> <figure><img src="https://755362860-files.gitbook.io/~/files/v0/b/gitbook-x-prod.appspot.com/o/spaces%2Fxa9ueiMPkj0LsrVay0aB%2Fuploads%2F65ne60KYQ3a2hTZ9DTpR%2Fvecomlab-redira-7.jpg?alt=media&amp;token=05272dd1-60b2-45aa-a247-d6462596a472" alt=""><figcaption></figcaption></figure> <figure><img src="https://755362860-files.gitbook.io/~/files/v0/b/gitbook-x-prod.appspot.com/o/spaces%2Fxa9ueiMPkj0LsrVay0aB%2Fuploads%2F3xzjgKQWXxD0mysBGXUk%2Fvecomlab-redira-8.jpg?alt=media&amp;token=223eae13-7e9d-4fac-b734-64ba1f0221ae" alt=""><figcaption></figcaption></figure></div>

Click **Create redirect**

A modal window will appear where you need to fill in:

* **Redirect from** — a short slug (e.g. `shopify`)
* **Redirect to** — the destination URL

Click **Create redirect** once done.

{% hint style="warning" %}
The **Redirect from** field cannot be changed after creation. If you make a mistake, you’ll need to create a new redirect.
{% endhint %}

#### Step 5. Test the redirect

<div><figure><img src="https://755362860-files.gitbook.io/~/files/v0/b/gitbook-x-prod.appspot.com/o/spaces%2Fxa9ueiMPkj0LsrVay0aB%2Fuploads%2FNG3gYJUUXPZvaEwgEAt5%2Fvecomlab-redira-9.jpg?alt=media&amp;token=c49081c2-5a9d-406a-a3f4-55e6beedc6db" alt=""><figcaption></figcaption></figure> <figure><img src="https://755362860-files.gitbook.io/~/files/v0/b/gitbook-x-prod.appspot.com/o/spaces%2Fxa9ueiMPkj0LsrVay0aB%2Fuploads%2FlxLmQPZlVNCWW2HKAxFf%2Fvecomlab-redira-10.jpg?alt=media&amp;token=fa6257fd-c61b-41ab-96c3-b7ccd0edb16d" alt=""><figcaption></figcaption></figure> <figure><img src="https://755362860-files.gitbook.io/~/files/v0/b/gitbook-x-prod.appspot.com/o/spaces%2Fxa9ueiMPkj0LsrVay0aB%2Fuploads%2FqXS01BacOBj9DzD2aCxh%2Fvecomlab-redira-11.jpg?alt=media&amp;token=7d1f847a-f1e7-4aa7-a2f5-eee4256d9c03" alt=""><figcaption></figcaption></figure> <figure><img src="https://755362860-files.gitbook.io/~/files/v0/b/gitbook-x-prod.appspot.com/o/spaces%2Fxa9ueiMPkj0LsrVay0aB%2Fuploads%2FZsmMhlhJnlIRMyisKFHo%2Fvecomlab-redira-12.jpg?alt=media&amp;token=afcd03a3-c488-4cd7-bd8b-b85a8f45a6d2" alt=""><figcaption></figcaption></figure></div>

After creating the redirect, make sure everything works correctly:

You can:

* click **Open** — the link will open in a new tab
* or copy the link and open it manually

The redirect should automatically take you to the destination URL.

{% hint style="info" %}
Redirect URL format:

`https://your-store-domain/apps/redira/r/{slug}`

Example:

`https://your-store-domain/apps/redira/r/shopify`
{% endhint %}

#### Step 6. Check clicks

<div><figure><img src="https://755362860-files.gitbook.io/~/files/v0/b/gitbook-x-prod.appspot.com/o/spaces%2Fxa9ueiMPkj0LsrVay0aB%2Fuploads%2FQHc4NyhEaR1lYnIxeHMX%2Fvecomlab-redira-13.jpg?alt=media&amp;token=faa9d798-9605-4411-a246-76cf8e813f36" alt=""><figcaption></figcaption></figure> <figure><img src="https://755362860-files.gitbook.io/~/files/v0/b/gitbook-x-prod.appspot.com/o/spaces%2Fxa9ueiMPkj0LsrVay0aB%2Fuploads%2FtfHCDeD6y0fuIlRR6mbb%2Fvecomlab-redira-14.jpg?alt=media&amp;token=73eaa016-505d-4b8c-a62d-6a5723e3d571" alt=""><figcaption></figcaption></figure></div>

After testing:

* go back to the Redira app
* refresh the page

You’ll see the number of clicks for your redirect.

### Additional scenario: connecting an existing Shopify redirect

If you already have a redirect created using Shopify’s native tools, you can connect it to Redira to track clicks.

**Step 1**

<div><figure><img src="https://755362860-files.gitbook.io/~/files/v0/b/gitbook-x-prod.appspot.com/o/spaces%2Fxa9ueiMPkj0LsrVay0aB%2Fuploads%2FJivOJljcD5PEeAKa3Eaw%2Fvecomlab-redira-15.jpg?alt=media&amp;token=98b2ed36-df72-46f1-9ad0-a311bb2e6db3" alt=""><figcaption></figcaption></figure> <figure><img src="https://755362860-files.gitbook.io/~/files/v0/b/gitbook-x-prod.appspot.com/o/spaces%2Fxa9ueiMPkj0LsrVay0aB%2Fuploads%2Fk2xtHKIsMSoNED8PP5ai%2Fvecomlab-redira-16.jpg?alt=media&amp;token=3f989ff4-d79a-4d39-b057-f1b9368cffc6" alt=""><figcaption></figcaption></figure></div>

Copy the short Redira URL, for example:

```
/apps/redira/r/shopify
```

**Step 2**

<div><figure><img src="https://755362860-files.gitbook.io/~/files/v0/b/gitbook-x-prod.appspot.com/o/spaces%2Fxa9ueiMPkj0LsrVay0aB%2Fuploads%2FHooqd9YpjXHc9rtfA0hY%2Fvecomlab-redira-17.jpg?alt=media&amp;token=76113180-4d9a-4b7d-8fad-73fb0f269ae5" alt=""><figcaption></figcaption></figure> <figure><img src="https://755362860-files.gitbook.io/~/files/v0/b/gitbook-x-prod.appspot.com/o/spaces%2Fxa9ueiMPkj0LsrVay0aB%2Fuploads%2FTvNHiLoMv6gPD8jxeP4i%2Fvecomlab-redira-18.jpg?alt=media&amp;token=8c6e5f9e-0a3e-4822-90ea-65dfa76f40ca" alt=""><figcaption></figcaption></figure></div>

Go to your existing Shopify redirect and:

* replace the **Redirect to** field with:

```
/apps/redira/r/shopify
```

**Step 3**

<div><figure><img src="https://755362860-files.gitbook.io/~/files/v0/b/gitbook-x-prod.appspot.com/o/spaces%2Fxa9ueiMPkj0LsrVay0aB%2Fuploads%2F8FlI1ofNoMFfvbzQxnuC%2Fvecomlab-redira-19.jpg?alt=media&amp;token=b5bb0cc7-fa1f-4ba3-8b62-a0a6d63af60b" alt=""><figcaption></figcaption></figure> <figure><img src="https://755362860-files.gitbook.io/~/files/v0/b/gitbook-x-prod.appspot.com/o/spaces%2Fxa9ueiMPkj0LsrVay0aB%2Fuploads%2Frio2XE5oT7QERUHgKgPd%2Fvecomlab-redira-20.jpg?alt=media&amp;token=08f4f6c6-3fae-4531-b624-dc6750cf4469" alt=""><figcaption></figcaption></figure></div>

Now open your original link, for example:

```
https://vecomlab.com/shopify
```

**Step 4**

<div><figure><img src="https://755362860-files.gitbook.io/~/files/v0/b/gitbook-x-prod.appspot.com/o/spaces%2Fxa9ueiMPkj0LsrVay0aB%2Fuploads%2FJAzgWTl0pxrrEPggwGd1%2Fvecomlab-redira-21.jpg?alt=media&amp;token=79a6ce00-6ed4-4e25-93ef-2503ecec5d81" alt=""><figcaption></figcaption></figure> <figure><img src="https://755362860-files.gitbook.io/~/files/v0/b/gitbook-x-prod.appspot.com/o/spaces%2Fxa9ueiMPkj0LsrVay0aB%2Fuploads%2Fn7X9K6Nv291j6fgVgqqv%2Fvecomlab-redira-22.jpg?alt=media&amp;token=85936b2a-a8a4-4d1f-8b36-56d4d5686189" alt=""><figcaption></figcaption></figure></div>

After visiting the link:

* return to Redira
* refresh the page

The click will be recorded in the analytics.

### Important

* Redirects start working immediately after creation (if active)
* Always test your redirect after setup

### What’s next

After setting up Redira, you can use it to track:

* ad campaign links
* influencer links
* email campaigns
* QR codes
* seasonal promotions


# Shrine – Themes for Shopify

Multi-functional Shopify themes with no-code setup. 120+ built-in tools to boost sales without extra apps or hidden costs.

{% hint style="info" %}
Use promo code **VECOMLAB** to get **15% off** everything from [Shrine Solutions](https://vecomlab.com/shrine).

<a href="https://vecomlab.com/shrine" class="button primary" data-icon="torii-gate">Use Shrine − 15% OFF</a>
{% endhint %}

<figure><img src="https://755362860-files.gitbook.io/~/files/v0/b/gitbook-x-prod.appspot.com/o/spaces%2Fxa9ueiMPkj0LsrVay0aB%2Fuploads%2FOw8ehAj4N0RuSZEYiAqW%2Fthe-dojo.gif?alt=media&amp;token=488f170f-9d31-4149-93ba-ae9c2322ec3b" alt=""><figcaption></figcaption></figure>

### All Shrine solutions <a href="#all" id="all"></a>

Modern themes from Shrine help you quickly launch profitable Shopify stores, with over 120 built-in features — from cart timers to upsell blocks and bundles. Everything is customizable without code or the need for third-party apps.

<table data-card-size="large" data-view="cards"><thead><tr><th></th><th></th><th></th><th data-hidden data-card-cover data-type="image">Cover image</th><th data-hidden data-card-target data-type="content-ref"></th></tr></thead><tbody><tr><td><strong>Shrine</strong></td><td>Perfect for new and growing stores</td><td><a href="https://vecomlab.com/shrine">View</a></td><td><a href="https://755362860-files.gitbook.io/~/files/v0/b/gitbook-x-prod.appspot.com/o/spaces%2Fxa9ueiMPkj0LsrVay0aB%2Fuploads%2FrNFSeSSO7dVptVAc8I0c%2Fshrine-growth.jpg?alt=media&amp;token=68910401-137e-4bc3-82ca-b7c2b986f859">shrine-growth.jpg</a></td><td><a href="https://vecomlab.com/shrine">https://vecomlab.com/shrine</a></td></tr><tr><td><strong>Shrine Pro</strong></td><td>For maximizing store conversions</td><td><a href="https://vecomlab.com/shrine">View</a></td><td><a href="https://755362860-files.gitbook.io/~/files/v0/b/gitbook-x-prod.appspot.com/o/spaces%2Fxa9ueiMPkj0LsrVay0aB%2Fuploads%2FuZB1al9rdgI3eN7f1nfF%2Fshrine-pro.jpg?alt=media&amp;token=47bec214-1b0b-4bbc-a15c-2f36946d5fc6">shrine-pro.jpg</a></td><td><a href="https://vecomlab.com/shrine">https://vecomlab.com/shrine</a></td></tr></tbody></table>

### FAQs <a href="#faq" id="faq"></a>

<details>

<summary>Is there a working promo code?</summary>

Yes! A promo code **VECOMLAB** is available for the VecomLab community, giving you a **15% discount** on all [Shrine Solutions](https://vecomlab.com/shrine) products.

</details>

<details>

<summary>How do Shrine solutions differ from other Shopify themes?</summary>

Shrine offers over 120 built-in features that help improve conversion rates and increase the average order value, without the need to configure additional apps or pay for subscriptions. Everything is customizable without code, saving you time and resources.

</details>

<details>

<summary>Do you have to pay monthly for using the theme?</summary>

No! All Shrine themes (Shrine, Shrine Pro) are a one-time license purchase. You get lifetime access to the theme, along with free updates for the first year, with no hidden monthly fees.

</details>

<details>

<summary>What’s the difference between Shrine and Shrine Pro?</summary>

You can find the full list of features on the [Shrine Solutions](https://vecomlab.com/shrine) website.

</details>

<details>

<summary>Can I upgrade from Shrine to or Shrine Pro?</summary>

Yes, you can easily upgrade to a more advanced version at any time by paying only the difference in price. All your settings will be preserved.

</details>

<details>

<summary>Are Shrine themes suitable for beginners?</summary>

Absolutely! Shrine themes are designed with ease of use in mind, so even beginners can create a professional store without any programming knowledge. The Shrine team has prepared educational materials and demo stores for you. Additionally, 24/7 support is available.

</details>

<details>

<summary>Do Shrine themes slow down the store?</summary>

No! Shrine themes are optimized for fast loading, which is crucial for retaining customers and increasing conversion rates.

</details>

<details>

<summary>Do you need to install additional apps with Shrine?</summary>

No! Shrine themes already include a wide range of built-in features that replace many popular Shopify apps. This helps reduce subscription costs and allows you to launch your store faster.

</details>

<details>

<summary>Does this include support?</summary>

Of course! The Shrine team provides 24/7 support, access to the community, and educational materials. If you have any questions or need help with setup, you'll always receive a prompt response.

</details>


# Loox – Product Reviews App for Shopify

Visual reviews for Shopify that increase revenue by 30%. Easy no-code setup with ready-to-use sliders, pop-ups, and badges.

{% hint style="info" %}
Install the app via the VecomLab [link](https://loox.io/app/VECOMLAB) and activate any plan for **free for 30 days**.

<a href="https://loox.io/app/VECOMLAB" class="button primary" data-icon="infinity">Use Loox − 30 Days Free</a>
{% endhint %}

<figure><img src="https://755362860-files.gitbook.io/~/files/v0/b/gitbook-x-prod.appspot.com/o/spaces%2Fxa9ueiMPkj0LsrVay0aB%2Fuploads%2FX2CQLtIXDBdFA8TFSJ7r%2Fthe-social-proof.jpg?alt=media&amp;token=09928c52-2d6d-4a8a-ac00-cfe8d374ea1d" alt=""><figcaption></figcaption></figure>

### All Loox solutions <a href="#all" id="all"></a>

The Loox app for Shopify helps boost your online store’s conversion rate with visual reviews. Sliders, pop-ups, and badges easily fit any design and won’t slow down your site.

[Install now](https://loox.io/app/VECOMLAB)

### How to get the free version <a href="#free" id="free"></a>

{% stepper %}
{% step %}

### Use the VecomLab link

<https://loox.io/app/VECOMLAB>
{% endstep %}

{% step %}

### Install the app

You can activate any plan for free for 30 days.
{% endstep %}
{% endstepper %}

### FAQs <a href="#faq" id="faq"></a>

<details>

<summary>What is Loox?</summary>

[Loox](https://loox.io/app/VECOMLAB) is a Shopify app that helps collect visual reviews with photos and videos from customers and displays them on your site to build trust and increase conversions.

</details>

<details>

<summary>Can I try Loox for free?</summary>

Yes, members of the VecomLab community can activate any Loox plan [free for 30 days](https://loox.io/app/VECOMLAB) to explore all the features the app has to offer.

</details>

<details>

<summary>How does Loox help increase conversions?</summary>

Loox boosts conversions through visual reviews—photos and videos displayed in sliders, pop-ups, and badges—which build customer trust and drive more sales.

</details>

<details>

<summary>Do I need to know how to code to set up Loox?</summary>

No, setting up Loox doesn’t require any coding skills. Everything is configured through a simple interface, and the ready-made widgets fit seamlessly into any design.

</details>

<details>

<summary>What types of widgets does Loox offer?</summary>

Loox provides sliders, pop-ups, badges, and other widgets for displaying reviews, all of which can be easily customized to match the style of any store.

</details>

<details>

<summary>How do I install Loox on my Shopify store?</summary>

The app is easy to install through the [Shopify App Store](https://loox.io/app/VECOMLAB). Simply download it and follow the on-screen instructions for a quick setup.

</details>

<details>

<summary>Does Loox support multiple languages?</summary>

Yes, Loox supports multiple languages, making it suitable for stores around the world.

</details>


# Dawn Theme Shopify

Free guides to optimize Shopify’s Dawn theme for higher conversions and sales. Simple steps to improve your store’s performance.


# How to Add Your Own Social Media Icons

A free guide on how to add Discord, Telegram, or LinkedIn icons to the settings section of the Shopify Dawn theme.

*Relevant for Dawn theme version 15.3.0*

***

{% hint style="info" %}
If you want to avoid coding, try the [Shrine](https://vecomlab.com/shrine) theme.

[Shrine](https://vecomlab.com/shrine) offers over 120 built-in features that help improve conversion rates and increase the average order value, without the need to configure additional apps or pay for subscriptions. Everything is customizable without code, saving you time and resources.

<a href="https://vecomlab.com/shrine" class="button primary" data-icon="torii-gate">Use Shrine − 15% OFF</a>

Your discount code: `VECOMLAB`
{% endhint %}

<figure><img src="https://755362860-files.gitbook.io/~/files/v0/b/gitbook-x-prod.appspot.com/o/spaces%2Fxa9ueiMPkj0LsrVay0aB%2Fuploads%2FzkLzPo86ourAeqnfnzo9%2Fvecomlab-dev-1.jpg?alt=media&amp;token=0354e345-58d8-4c27-9a38-5207e4c602fe" alt=""><figcaption></figcaption></figure>

### 1. Prepare the Icon in SVG Format

{% embed url="<https://www.figma.com/design/22VEAlzexlszqkYruae5jw/Social-Media-Icons?node-id=0-1&t=0kW6OIlOxohbGF65-1>" %}

Go to [Figma](https://www.figma.com/design/22VEAlzexlszqkYruae5jw/Social-Media-Icons?node-id=0-1\&t=0kW6OIlOxohbGF65-1) and download the icon in SVG format.

### 2. Go to the code editor

<figure><img src="https://755362860-files.gitbook.io/~/files/v0/b/gitbook-x-prod.appspot.com/o/spaces%2Fxa9ueiMPkj0LsrVay0aB%2Fuploads%2FuBp2PmlNX41DVfV0D9SI%2Fvecomlab-custom-social-media-icons-1.jpg?alt=media&amp;token=c13f13c1-a0f5-4171-a06e-4944d96b94e3" alt=""><figcaption></figcaption></figure>

Online Store → Themes → Edit code.

### 3. Upload the SVG Icon to the `assets` Folder

<figure><img src="https://755362860-files.gitbook.io/~/files/v0/b/gitbook-x-prod.appspot.com/o/spaces%2Fxa9ueiMPkj0LsrVay0aB%2Fuploads%2Fq5VOcNc8oL7m5XtatQ9M%2Fvecomlab-custom-social-media-icons-2.jpg?alt=media&amp;token=736600c1-f0b8-42bb-a6bb-5e989edff10c" alt=""><figcaption></figcaption></figure>

Make sure the file is named **`icon-discord.svg`**

Once uploaded, the image code will look something like this:

```
<svg width="264" height="200" viewBox="0 0 264 200" fill="none" xmlns="http://www.w3.org/2000/svg">
<path d="M223.542 16.748C206.205 8.81383 187.9 3.17544 169.103 0C166.534 4.60043 164.203 9.33281 162.127 14.1795C142.098 11.1624 121.735 11.1624 101.706 14.1795C99.6299 9.33281 97.3076 4.60043 94.7303 0C75.9152 3.21063 57.6014 8.84901 40.2465 16.792C5.79161 67.7662 -3.54999 117.474 1.12081 166.478C21.2994 181.387 43.8793 192.726 67.893 200C73.3027 192.726 78.0791 185.011 82.1957 176.936C74.3847 174.016 66.8551 170.418 59.6773 166.187C61.5685 164.815 63.4157 163.408 65.2014 162.035C107.476 181.915 156.418 181.915 198.702 162.035C200.505 163.513 202.352 164.921 204.226 166.187C197.039 170.436 189.483 174.034 181.664 176.963C185.771 185.038 190.557 192.743 195.966 200C219.998 192.752 242.595 181.422 262.782 166.504C268.262 109.671 253.414 60.4213 223.542 16.748ZM88.1156 136.342C75.1059 136.342 64.3481 124.528 64.3481 110.006C64.3481 95.4831 74.7277 83.5642 88.0716 83.5642C101.415 83.5642 112.085 95.4743 111.857 110.006C111.628 124.537 101.372 136.342 88.1156 136.342ZM175.788 136.342C162.752 136.342 152.047 124.528 152.047 110.006C152.047 95.4831 162.426 83.5642 175.788 83.5642C189.149 83.5642 199.74 95.4743 199.511 110.006C199.282 124.537 189.052 136.342 175.788 136.342Z" fill="#1C1C1C"/>
</svg>
```

You’ll need to edit the SVG code to match the theme’s style (color, size, animation). To do this:

1. Remove the `width="264"` and `height="200"` attributes — these set fixed dimensions and may break responsiveness.
2. Add the attribute `class="icon icon-discord"` — this ensures the icon uses the shared social media icon styles.
3. Remove `fill="none"` and immediately after the `<path` tag, add `fill="currentColor"` — this lets the icon automatically adapt to the parent element’s color.

Updated SVG Code (copy and paste this into Shopify, replacing the original code):

<figure><img src="https://755362860-files.gitbook.io/~/files/v0/b/gitbook-x-prod.appspot.com/o/spaces%2Fxa9ueiMPkj0LsrVay0aB%2Fuploads%2FQszKTW8VxWehXsd27PbG%2Fvecomlab-custom-social-media-icons-3.jpg?alt=media&amp;token=5dc93eaa-8030-41a7-b042-cce9eea10bd7" alt=""><figcaption></figcaption></figure>

```
<svg class="icon icon-discord" viewBox="0 0 264 200" xmlns="http://www.w3.org/2000/svg">
<path fill="currentColor" d="M223.542 16.748C206.205 8.81383 187.9 3.17544 169.103 0C166.534 4.60043 164.203 9.33281 162.127 14.1795C142.098 11.1624 121.735 11.1624 101.706 14.1795C99.6299 9.33281 97.3076 4.60043 94.7303 0C75.9152 3.21063 57.6014 8.84901 40.2465 16.792C5.79161 67.7662 -3.54999 117.474 1.12081 166.478C21.2994 181.387 43.8793 192.726 67.893 200C73.3027 192.726 78.0791 185.011 82.1957 176.936C74.3847 174.016 66.8551 170.418 59.6773 166.187C61.5685 164.815 63.4157 163.408 65.2014 162.035C107.476 181.915 156.418 181.915 198.702 162.035C200.505 163.513 202.352 164.921 204.226 166.187C197.039 170.436 189.483 174.034 181.664 176.963C185.771 185.038 190.557 192.743 195.966 200C219.998 192.752 242.595 181.422 262.782 166.504C268.262 109.671 253.414 60.4213 223.542 16.748ZM88.1156 136.342C75.1059 136.342 64.3481 124.528 64.3481 110.006C64.3481 95.4831 74.7277 83.5642 88.0716 83.5642C101.415 83.5642 112.085 95.4743 111.857 110.006C111.628 124.537 101.372 136.342 88.1156 136.342ZM175.788 136.342C162.752 136.342 152.047 124.528 152.047 110.006C152.047 95.4831 162.426 83.5642 175.788 83.5642C189.149 83.5642 199.74 95.4743 199.511 110.006C199.282 124.537 189.052 136.342 175.788 136.342Z" fill="#1C1C1C"/>
</svg>
```

### 4. Open the `social-icons.liquid` File in the `snippets` Folder

<figure><img src="https://755362860-files.gitbook.io/~/files/v0/b/gitbook-x-prod.appspot.com/o/spaces%2Fxa9ueiMPkj0LsrVay0aB%2Fuploads%2Fo60dKsPFvRzqF2J9qelh%2Fvecomlab-custom-social-media-icons-4.jpg?alt=media&amp;token=67600eef-68b8-49dc-9d66-e6f5ba8baa5a" alt=""><figcaption></figcaption></figure>

Paste the following code before the `</ul>` tag and save the changes:

```
{%- if settings.social_discord_link != blank -%}
  <li class="list-social__item">
    <a href="{{ settings.social_discord_link }}" class="link list-social__link">
      <span class="svg-wrapper">
        {{- 'icon-discord.svg' | inline_asset_content -}}
      </span>
      <span class="visually-hidden">{{ 'general.social.links.discord' | t }}</span>
    </a>
  </li>
{%- endif -%}
```

### 5. Open the `settings_schema.json` File in the `config` Folder

<figure><img src="https://755362860-files.gitbook.io/~/files/v0/b/gitbook-x-prod.appspot.com/o/spaces%2Fxa9ueiMPkj0LsrVay0aB%2Fuploads%2FbWXpFJ0bvNatN3Q57wfo%2Fvecomlab-custom-social-media-icons-5.jpg?alt=media&amp;token=24597ca0-53fb-4fdb-834f-040e3480c5b9" alt=""><figcaption></figcaption></figure>

In the file, locate the following line:

```
"name": "t:settings_schema.social-media.name",
```

Next, find the block `"settings": [` — this array contains all available social media platforms.

Paste your code at the **end of the list**, just before the closing bracket `]`.

```
{
    "type": "text",
    "id": "social_discord_link",
    "label": "t:settings_schema.social-media.settings.social_discord_link.label",
    "placeholder": "t:settings_schema.social-media.settings.social_discord_link.info"
}
```

{% hint style="danger" %}
**Important:** Don’t forget to add a **comma** before your inserted code if it’s the last item in the list! Otherwise, you'll get a saving error. This is shown with an arrow in the screenshot.
{% endhint %}

### 6. Open the `en.default.json` File in the `locales` Folder

<figure><img src="https://755362860-files.gitbook.io/~/files/v0/b/gitbook-x-prod.appspot.com/o/spaces%2Fxa9ueiMPkj0LsrVay0aB%2Fuploads%2FCmdyqc9GSTzZrwrf6Xhc%2Fvecomlab-custom-social-media-icons-6.jpg?alt=media&amp;token=48c4b1f5-db77-4bd0-a94a-fbb0aed5eb85" alt=""><figcaption></figcaption></figure>

Find the **first occurrence** of the `"links": {` block — this is where all available social media platforms are listed.

```
"links": {
```

Inside this block, you'll see entries for each platform.

Insert the following line:

```
"discord": "Discord"
```

{% hint style="danger" %}
**Make sure to add a comma** before the new line if you’re not adding it as the first item in the list. This is shown with an arrow in the screenshot.
{% endhint %}

### 7. Open the `en.default.schema.json` File in the `locales` Folder

<figure><img src="https://755362860-files.gitbook.io/~/files/v0/b/gitbook-x-prod.appspot.com/o/spaces%2Fxa9ueiMPkj0LsrVay0aB%2Fuploads%2F2LPdWIGwOLjaOclXh9Wb%2Fvecomlab-custom-social-media-icons-7.jpg?alt=media&amp;token=aad9bc64-3f19-47f1-8c3b-69474dcc72dd" alt=""><figcaption></figcaption></figure>

Find the following block in the file:

```
"social-media": {
```

Paste the following code:

```
"social_discord_link": {
    "label": "Discord",
    "info": "https://discord.gg/z952Javh5V"
}
```

{% hint style="danger" %}
Note:

```
"info": "https://discord.gg/z952Javh5V"
```

This text is **only visible in the theme editor interface** — your store visitors **will not see it** on the live site.
{% endhint %}

### 8. Open the Theme Settings

<figure><img src="https://755362860-files.gitbook.io/~/files/v0/b/gitbook-x-prod.appspot.com/o/spaces%2Fxa9ueiMPkj0LsrVay0aB%2Fuploads%2FjQAZTXxwHRH1Tsct8Zg5%2Fvecomlab-custom-social-media-icons-8.jpg?alt=media&amp;token=cf8df7b2-22a2-4cc7-baa7-8a2604f77bda" alt=""><figcaption></figcaption></figure>

Go to **Theme settings → Social media → Discord**.

Add the link to your Discord server and save the changes.

### 9. Open the `header.liquid` File in the `sections` Folder

<div><figure><img src="https://755362860-files.gitbook.io/~/files/v0/b/gitbook-x-prod.appspot.com/o/spaces%2Fxa9ueiMPkj0LsrVay0aB%2Fuploads%2FnJXFYEf0XGVCLrKFmQQy%2Fvecomlab-custom-social-media-icons-9.jpg?alt=media&amp;token=9bb991f3-05b3-44da-b13c-9408cfa914c1" alt=""><figcaption></figcaption></figure> <figure><img src="https://755362860-files.gitbook.io/~/files/v0/b/gitbook-x-prod.appspot.com/o/spaces%2Fxa9ueiMPkj0LsrVay0aB%2Fuploads%2FNFnhfQQBir9NsGtHmtUd%2Fvecomlab-custom-social-media-icons-10.jpg?alt=media&amp;token=68817f18-582a-4cd7-8f45-3d191efe311f" alt=""><figcaption></figcaption></figure></div>

You might encounter an issue where the new icon **doesn’t appear in the site header**.

To fix this:

1. Find the line that starts with:

```
{% if settings.social
```

2. At the **end of this line**, add the following code:

```
or settings.social_discord_link != blank
```

3. Then, find the line:

```
"logo": {{ settings.logo | image_url: width: 500 | prepend: "https:" | json }},
```

4. **Insert** the following code **after** that line:

```
{{ settings.social_discord_link | json }}
```

5. Finally, **save the changes**.

### 10. Open the `header-drawer.liquid` File in the `sections` Folder

<figure><img src="https://755362860-files.gitbook.io/~/files/v0/b/gitbook-x-prod.appspot.com/o/spaces%2Fxa9ueiMPkj0LsrVay0aB%2Fuploads%2FQN5liuSeHTJ730QN5YNi%2Fvecomlab-custom-social-media-icons-11.jpg?alt=media&amp;token=c073ae9c-9df1-4149-b2d8-1da7d2b51979" alt=""><figcaption></figcaption></figure>

You might also encounter an issue where the new icon **doesn’t appear in the mobile version of the site** — specifically in the menu that opens when clicking the hamburger icon.

To fix this:

1. Find the following line in the file:

```
<ul class="list list-social list-unstyled" role="list">
```

2. **Insert** the following code **before** the closing `</ul>` tag:

```
{%- if settings.social_discord_link != blank -%}
    <li class="list-social__item">
        <a href="{{ settings.social_discord_link }}" class="list-social__link link">
            <span class="svg-wrapper">
                {{- 'icon-discord.svg' | inline_asset_content -}}
            </span>
            <span class="visually-hidden">{{ 'general.social.links.discord' | t }}</span>
        </a>
    </li>
{%- endif -%}
```

3. Save the changes.

Your new icon is now successfully added to the site.

### FAQs

<details>

<summary>How can I add other icons?</summary>

You can do it in the same way. Simply replace `discord` or `Discord` with the name of the social media platform you want to add in the corresponding parts of the code.

</details>

***

*Need help with setup?* [*Contact us*](https://vecomlab.com/pages/contact) *— we’ll handle everything for you.*


# How to Add Payment Method Icons to the Cart Drawer

A free guide on how to add payment method icons to the cart drawer, including enabling them via a checkbox directly in the Shopify Dawn theme settings.

*Relevant for Dawn theme version 15.3.0*

***

{% hint style="info" %}
If you want to avoid coding, try the [Shrine](https://vecomlab.com/shrine) theme.

[Shrine](https://vecomlab.com/shrine) offers over 120 built-in features that help improve conversion rates and increase the average order value, without the need to configure additional apps or pay for subscriptions. Everything is customizable without code, saving you time and resources.

<a href="https://vecomlab.com/shrine" class="button primary" data-icon="torii-gate">Use Shrine − 15% OFF</a>

Your discount code: `VECOMLAB`
{% endhint %}

<figure><img src="https://755362860-files.gitbook.io/~/files/v0/b/gitbook-x-prod.appspot.com/o/spaces%2Fxa9ueiMPkj0LsrVay0aB%2Fuploads%2FnFibMtmoQbxdz5vwZ1Bw%2Fvecomlab-dev-2.jpg?alt=media&amp;token=1bcb540e-f42d-440b-8ed9-8eed7b5235f2" alt=""><figcaption></figcaption></figure>

### 1. Prepare the Icon in SVG Format

<figure><img src="https://755362860-files.gitbook.io/~/files/v0/b/gitbook-x-prod.appspot.com/o/spaces%2Fxa9ueiMPkj0LsrVay0aB%2Fuploads%2FuBp2PmlNX41DVfV0D9SI%2Fvecomlab-custom-social-media-icons-1.jpg?alt=media&amp;token=c13f13c1-a0f5-4171-a06e-4944d96b94e3" alt=""><figcaption></figcaption></figure>

Online Store → Themes → Edit code.

### 2. Open the `cart-drawer.liquid` File in the `snippets` Folder

<figure><img src="https://755362860-files.gitbook.io/~/files/v0/b/gitbook-x-prod.appspot.com/o/spaces%2Fxa9ueiMPkj0LsrVay0aB%2Fuploads%2FcFtv0yeZYyJ7Gedxw56F%2Fvecomlab-cart-drawer-payment-1.jpg?alt=media&amp;token=f407c946-7e15-4137-98fa-540325f78ebb" alt=""><figcaption></figcaption></figure>

Find the following line:

```
<div class="drawer__footer">
```

**Paste the following code before the closing `</div>` tag**, as shown in the screenshot:

```
<!-- Cart Drawer List Payment -->

{%- if settings.payment_enable -%}
  <div class="footer__payment">
    <span class="visually-hidden">{{ 'sections.footer.payment' | t }}</span>
    <ul class="list list-payment CartDrawer-list-payment" role="list">
      {%- for type in shop.enabled_payment_types -%}
        <li class="list-payment__item">
          {{ type | payment_type_svg_tag: class: 'icon icon--full-color' }}
        </li>
      {%- endfor -%}
    </ul>
 </div>
{%- endif -%}
```

<figure><img src="https://755362860-files.gitbook.io/~/files/v0/b/gitbook-x-prod.appspot.com/o/spaces%2Fxa9ueiMPkj0LsrVay0aB%2Fuploads%2F1YvXEk0qXNE6LY7uKphu%2Fvecomlab-cart-drawer-payment-2.jpg?alt=media&amp;token=aa5fecc0-159c-4c7d-8066-129f10ce67bb" alt=""><figcaption></figcaption></figure>

Next, locate the `<style>` tag in this file and **insert the following CSS code before the closing `</style>` tag**, as shown in the screenshot:

```
.list-payment.CartDrawer-list-payment {
  display: flex;
  justify-content: center;
  margin-top: 10px;       /* adds top margin */
  margin-bottom: 0.5rem;  /* adds bottom margin */
  /* gap: 10px; */        /* can be enabled if you want spacing between the icons */
}
```

If you want to adjust the spacing between the icons, simply **remove the `/*` and `*/`** around the line `gap: 10px;`.

{% hint style="danger" %}
**What does `gap: 10px;` do?**

It adds a small space between the payment icons, making the layout look cleaner. You can remove it or change the value to suit your design.

If you want to keep it simple, these styles are enough:

```
.list-payment.CartDrawer-list-payment {
  display: flex;
  justify-content: center;
}
```

{% endhint %}

### 2. Open the `settings_schema.json` File in the `config` Folder

<figure><img src="https://755362860-files.gitbook.io/~/files/v0/b/gitbook-x-prod.appspot.com/o/spaces%2Fxa9ueiMPkj0LsrVay0aB%2Fuploads%2FToMMmMEAk1Tvoe7Tlq0B%2Fvecomlab-cart-drawer-payment-3.jpg?alt=media&amp;token=f4ea283b-0611-4064-849a-659f335632f6" alt=""><figcaption></figcaption></figure>

Find the line:

```
"name": "t:settings_schema.cart.name",
```

**Paste the following code**, as shown in the screenshot.

```
{
  "type": "checkbox",
  "id": "payment_enable",
  "default": true,
  "label": "t:sections.footer.settings.payment_enable.label"
},
```

Save the changes.

### 3. Enable the Checkbox in Theme Settings

<figure><img src="https://755362860-files.gitbook.io/~/files/v0/b/gitbook-x-prod.appspot.com/o/spaces%2Fxa9ueiMPkj0LsrVay0aB%2Fuploads%2FYZ1zyeq0jwvQMWb4tJaK%2Fvecomlab-cart-drawer-payment-4.jpg?alt=media&amp;token=ea1b954b-c699-40a6-a5d8-bafa98629073" alt=""><figcaption></figcaption></figure>

Go to **Theme settings → Cart → Payment method icons**.

{% hint style="danger" %}
Make sure the cart type is set to **Drawer**.
{% endhint %}

***

*Need help with setup?* [*Contact us*](https://vecomlab.com/pages/contact) *— we’ll handle everything for you.*


# How to Change the (Continue Shopping) Link

Learn how to change the «Continue Shopping» link in the Shopify Dawn theme by editing the Liquid files.

*Relevant for Dawn theme version 15.3.0*

***

{% hint style="info" %}
If you want to avoid coding, try the [Shrine](https://vecomlab.com/shrine) theme.

[Shrine](https://vecomlab.com/shrine) offers over 120 built-in features that help improve conversion rates and increase the average order value, without the need to configure additional apps or pay for subscriptions. Everything is customizable without code, saving you time and resources.

<a href="https://vecomlab.com/shrine" class="button primary" data-icon="torii-gate">Use Shrine − 15% OFF</a>

Your discount code: `VECOMLAB`
{% endhint %}

<figure><img src="https://755362860-files.gitbook.io/~/files/v0/b/gitbook-x-prod.appspot.com/o/spaces%2Fxa9ueiMPkj0LsrVay0aB%2Fuploads%2FfUCFHDJSEjI9q1BKJygC%2Fvecomlab-dev-3.jpg?alt=media&amp;token=794e3c7f-fd88-4ad0-aeb5-701cc1ca5c86" alt=""><figcaption></figcaption></figure>

### 1. Prepare the Icon in SVG Format

<figure><img src="https://755362860-files.gitbook.io/~/files/v0/b/gitbook-x-prod.appspot.com/o/spaces%2Fxa9ueiMPkj0LsrVay0aB%2Fuploads%2FuBp2PmlNX41DVfV0D9SI%2Fvecomlab-custom-social-media-icons-1.jpg?alt=media&amp;token=c13f13c1-a0f5-4171-a06e-4944d96b94e3" alt=""><figcaption></figcaption></figure>

Online Store → Themes → Edit code.

### 2. Open the `main-cart-items.liquid` File in the `sections` Folder

<div><figure><img src="https://755362860-files.gitbook.io/~/files/v0/b/gitbook-x-prod.appspot.com/o/spaces%2Fxa9ueiMPkj0LsrVay0aB%2Fuploads%2FumQxbFmPJQyX2pxEKjdG%2Fvecomlab-continue-shopping-button-1.jpg?alt=media&amp;token=3863abc9-92f3-445a-8849-b81ffb23dc3e" alt=""><figcaption></figcaption></figure> <figure><img src="https://755362860-files.gitbook.io/~/files/v0/b/gitbook-x-prod.appspot.com/o/spaces%2Fxa9ueiMPkj0LsrVay0aB%2Fuploads%2FzliZLsPcfLnIkKxZTrhP%2Fvecomlab-continue-shopping-button-2.jpg?alt=media&amp;token=bc9c5b31-2e60-47ad-9a6b-705456419675" alt=""><figcaption></figcaption></figure></div>

Find the line containing `{{ routes.all_products_collection_url }}` and replace it with `{{ routes.root_url }}`.

### 3. Open the `cart-drawer.liquid` File in the `snippets` Folder

<div><figure><img src="https://755362860-files.gitbook.io/~/files/v0/b/gitbook-x-prod.appspot.com/o/spaces%2Fxa9ueiMPkj0LsrVay0aB%2Fuploads%2FFcjB2ujg7EBCtVeGQ4Pl%2Fvecomlab-continue-shopping-button-3.jpg?alt=media&amp;token=99697ba5-b31e-4458-ae1e-e4e10a2ad309" alt=""><figcaption></figcaption></figure> <figure><img src="https://755362860-files.gitbook.io/~/files/v0/b/gitbook-x-prod.appspot.com/o/spaces%2Fxa9ueiMPkj0LsrVay0aB%2Fuploads%2FkzvHdwfxy2EFRuCjA6TU%2Fvecomlab-continue-shopping-button-4.jpg?alt=media&amp;token=e8ccafb1-7854-4c07-b16d-309e80789457" alt=""><figcaption></figcaption></figure></div>

Find the line containing `{{ routes.all_products_collection_url }}` and replace it with `{{ routes.root_url }}`.

***

*Need help with setup?* [*Contact us*](https://vecomlab.com/pages/contact) *— we’ll handle everything for you.*


# How to Add a Video (Video With Text)

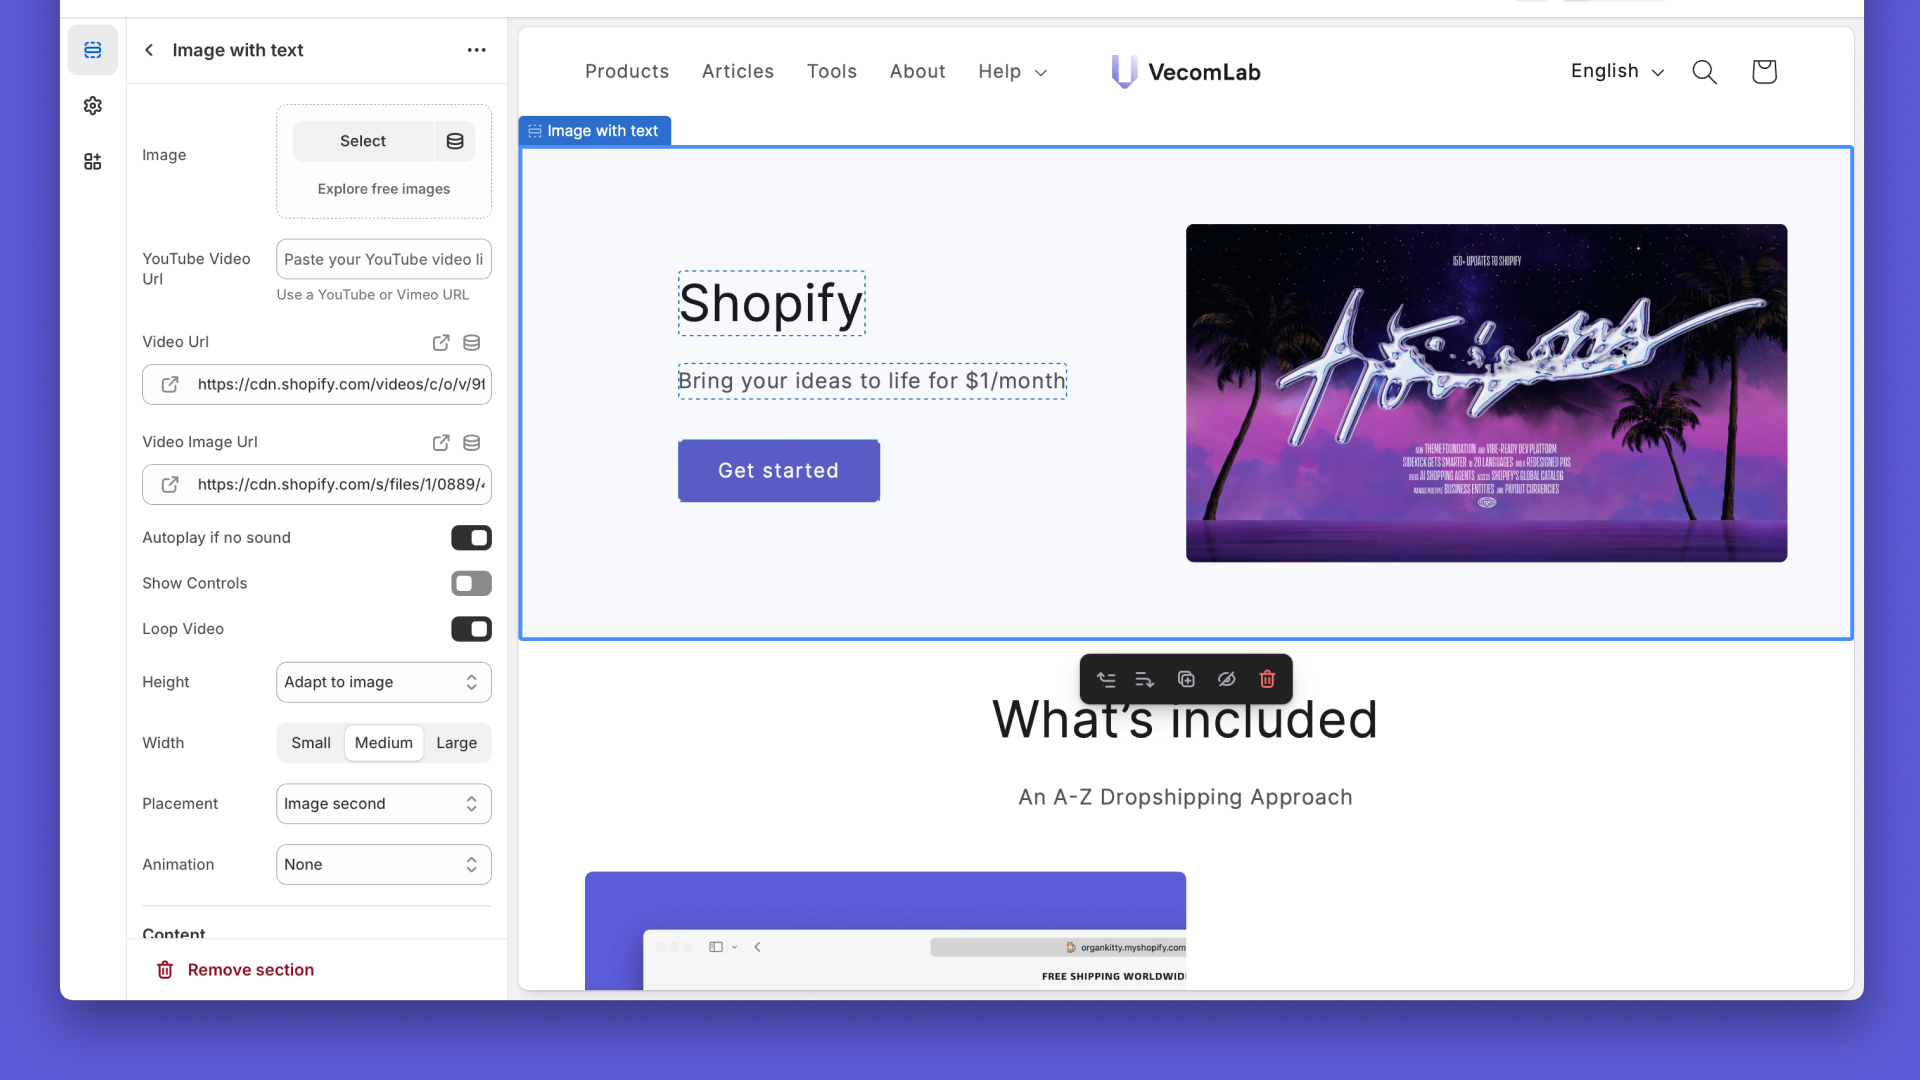
A step-by-step guide on how to add a video to the “Image with Text” section in the Dawn theme for Shopify using code — free and without any apps.

*Relevant for Dawn theme version 15.3.0*

***

{% hint style="info" %}
If you want to avoid coding, try the [Shrine](https://vecomlab.com/shrine) theme.

[Shrine](https://vecomlab.com/shrine) offers over 120 built-in features that help improve conversion rates and increase the average order value, without the need to configure additional apps or pay for subscriptions. Everything is customizable without code, saving you time and resources.

<a href="https://vecomlab.com/shrine" class="button primary" data-icon="torii-gate">Use Shrine − 15% OFF</a>

Your discount code: `VECOMLAB`
{% endhint %}

<figure><img src="https://755362860-files.gitbook.io/~/files/v0/b/gitbook-x-prod.appspot.com/o/spaces%2Fxa9ueiMPkj0LsrVay0aB%2Fuploads%2FSrgNejsdOjwQtQaDNsin%2Fvecomlab-dev-4.jpg?alt=media&amp;token=fe28e557-b9b6-4bd8-997e-4d14fa34804b" alt=""><figcaption></figcaption></figure>

### 1. Go to the code editor

<figure><img src="https://755362860-files.gitbook.io/~/files/v0/b/gitbook-x-prod.appspot.com/o/spaces%2Fxa9ueiMPkj0LsrVay0aB%2Fuploads%2FuBp2PmlNX41DVfV0D9SI%2Fvecomlab-custom-social-media-icons-1.jpg?alt=media&amp;token=c13f13c1-a0f5-4171-a06e-4944d96b94e3" alt=""><figcaption></figcaption></figure>

Online Store → Themes → Edit code.

### 2. Open the file `image-with-text.liquid` in the `sections` folder

<figure><img src="https://755362860-files.gitbook.io/~/files/v0/b/gitbook-x-prod.appspot.com/o/spaces%2Fxa9ueiMPkj0LsrVay0aB%2Fuploads%2F8gzhdwdhx7SD30FXc7C4%2Fvecomlab-continue-video-with-text-1.jpg?alt=media&amp;token=3a8cceb7-8663-45bc-b251-f2408bd4f3de" alt=""><figcaption></figcaption></figure>

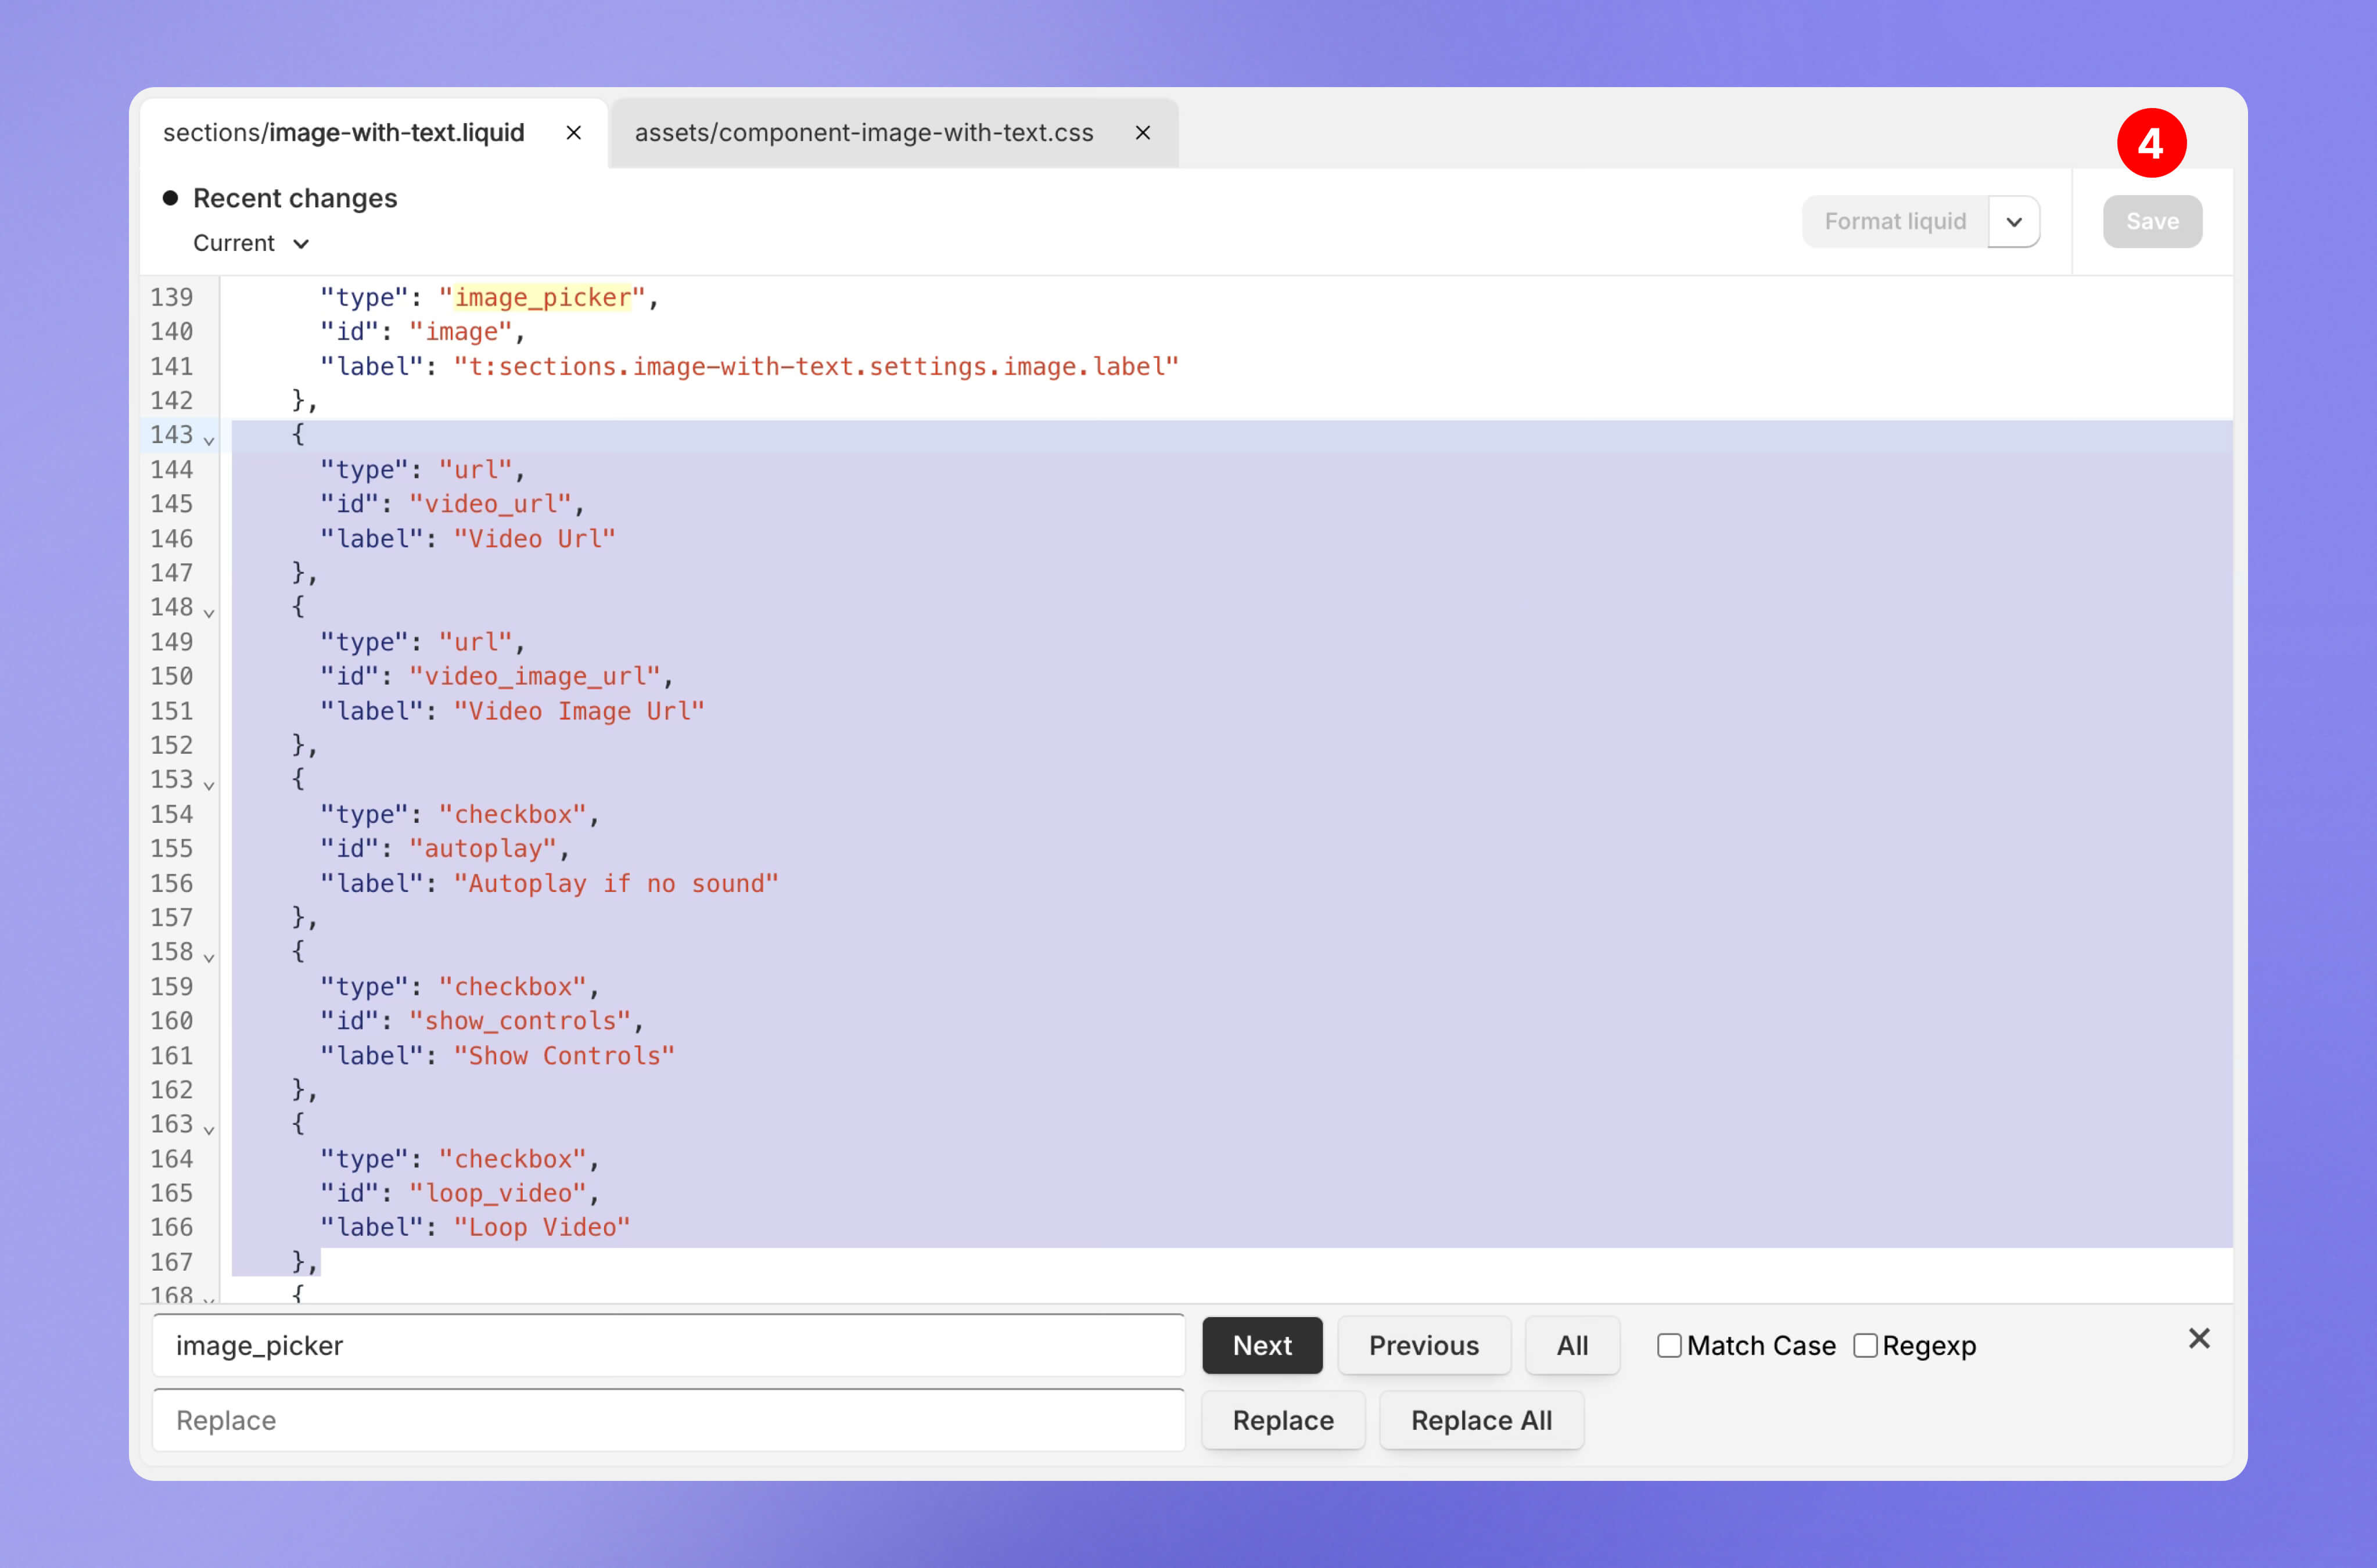
Find the `image_picker` and insert the code.

```
{
  "type": "url",
  "id": "video_url",
  "label": "Video Url"
},
{
  "type": "url",
  "id": "video_image_url",
  "label": "Video Image Url"
},
{
  "type": "checkbox",
  "id": "autoplay",
  "label": "Autoplay if no sound"
},
{
  "type": "checkbox",
  "id": "show_controls",
  "label": "Show Controls"
},
{
  "type": "checkbox",
  "id": "loop_video",
  "label": "Loop Video"
},

```

<figure><img src="https://755362860-files.gitbook.io/~/files/v0/b/gitbook-x-prod.appspot.com/o/spaces%2Fxa9ueiMPkj0LsrVay0aB%2Fuploads%2FBhGjcAaX4yTnQNtuutoO%2Fvecomlab-continue-video-with-text-2.jpg?alt=media&amp;token=26f31162-207d-47f8-9e11-ade088716fcf" alt=""><figcaption></figcaption></figure>

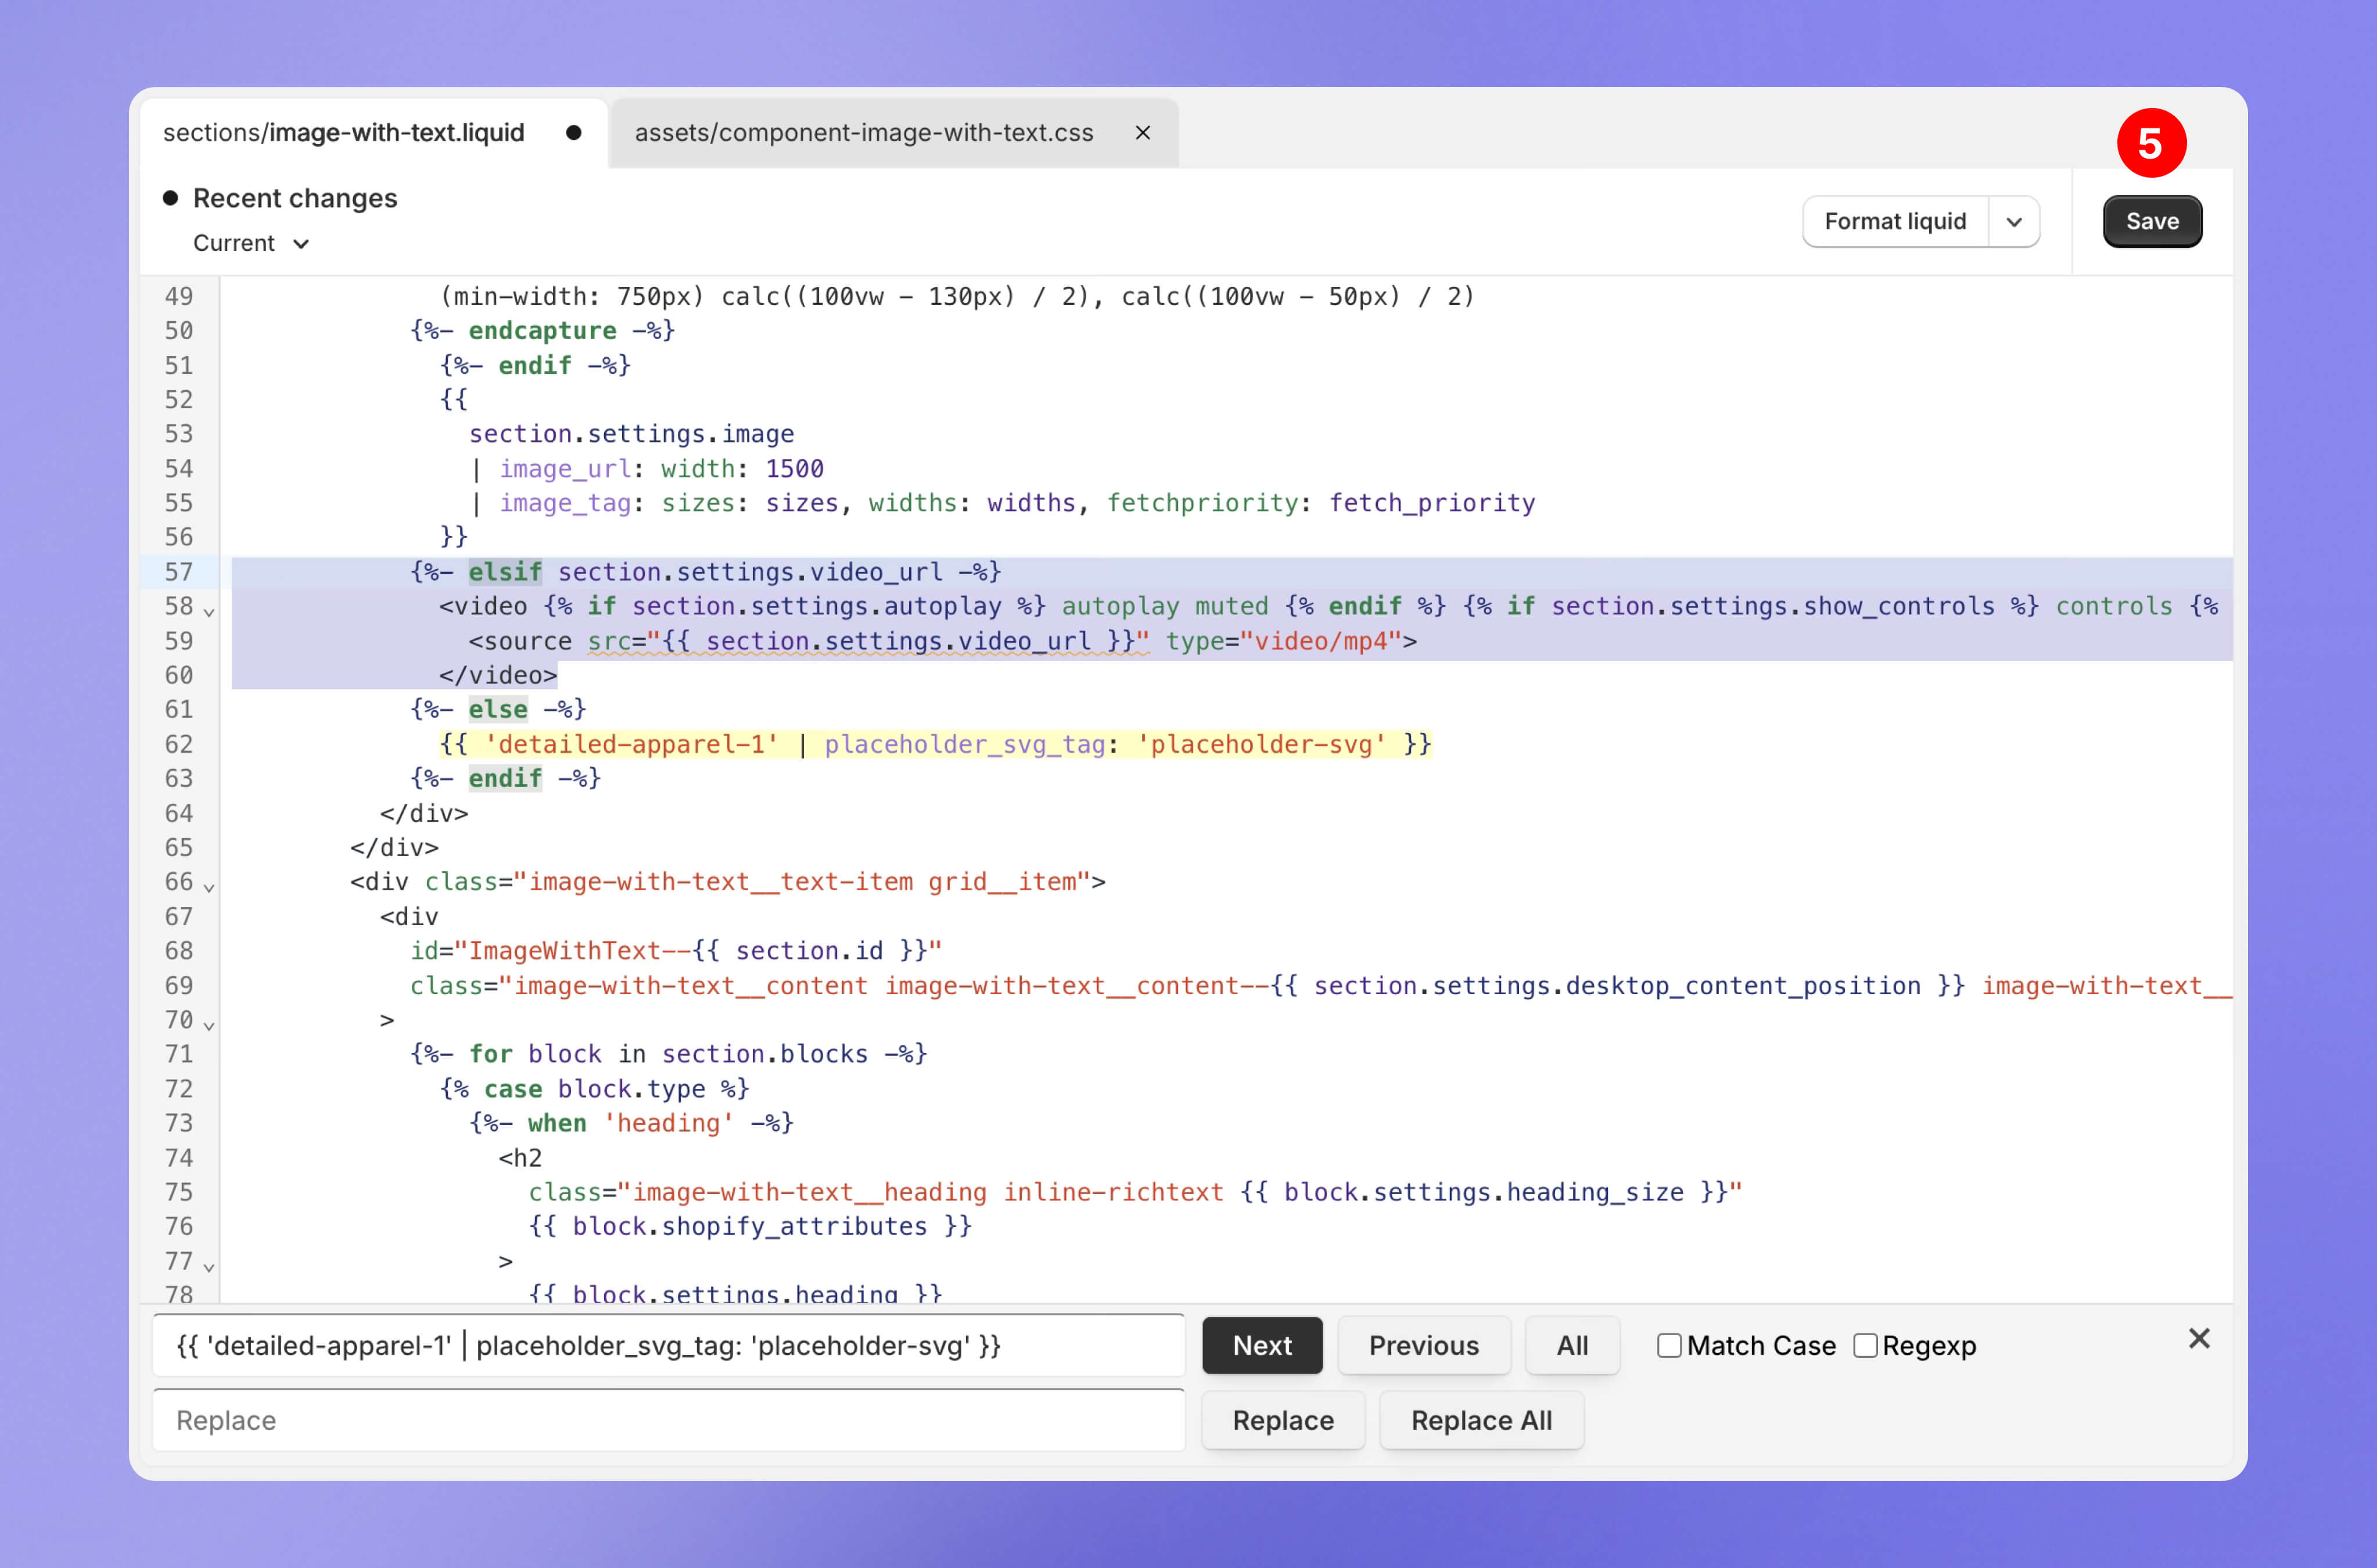
Find `{{ 'detailed-apparel-1' | placeholder_svg_tag: 'placeholder-svg' }}` and insert the code.

```
{%- elsif section.settings.video_url -%}
  <video {% if section.settings.autoplay %} autoplay muted {% endif %} {% if section.settings.show_controls %} controls {% endif %} {% if section.settings.loop_video %} loop {% endif %} playsinline poster="{{ section.settings.video_image_url }}">
    <source src="{{ section.settings.video_url }}" type="video/mp4">
  </video>
```

<figure><img src="https://755362860-files.gitbook.io/~/files/v0/b/gitbook-x-prod.appspot.com/o/spaces%2Fxa9ueiMPkj0LsrVay0aB%2Fuploads%2FthKfRJM8BiCdK4PUYWLD%2Fvecomlab-continue-video-with-text-3.jpg?alt=media&amp;token=04012922-8e4f-43a7-aa99-aa1859a9209a" alt=""><figcaption></figcaption></figure>

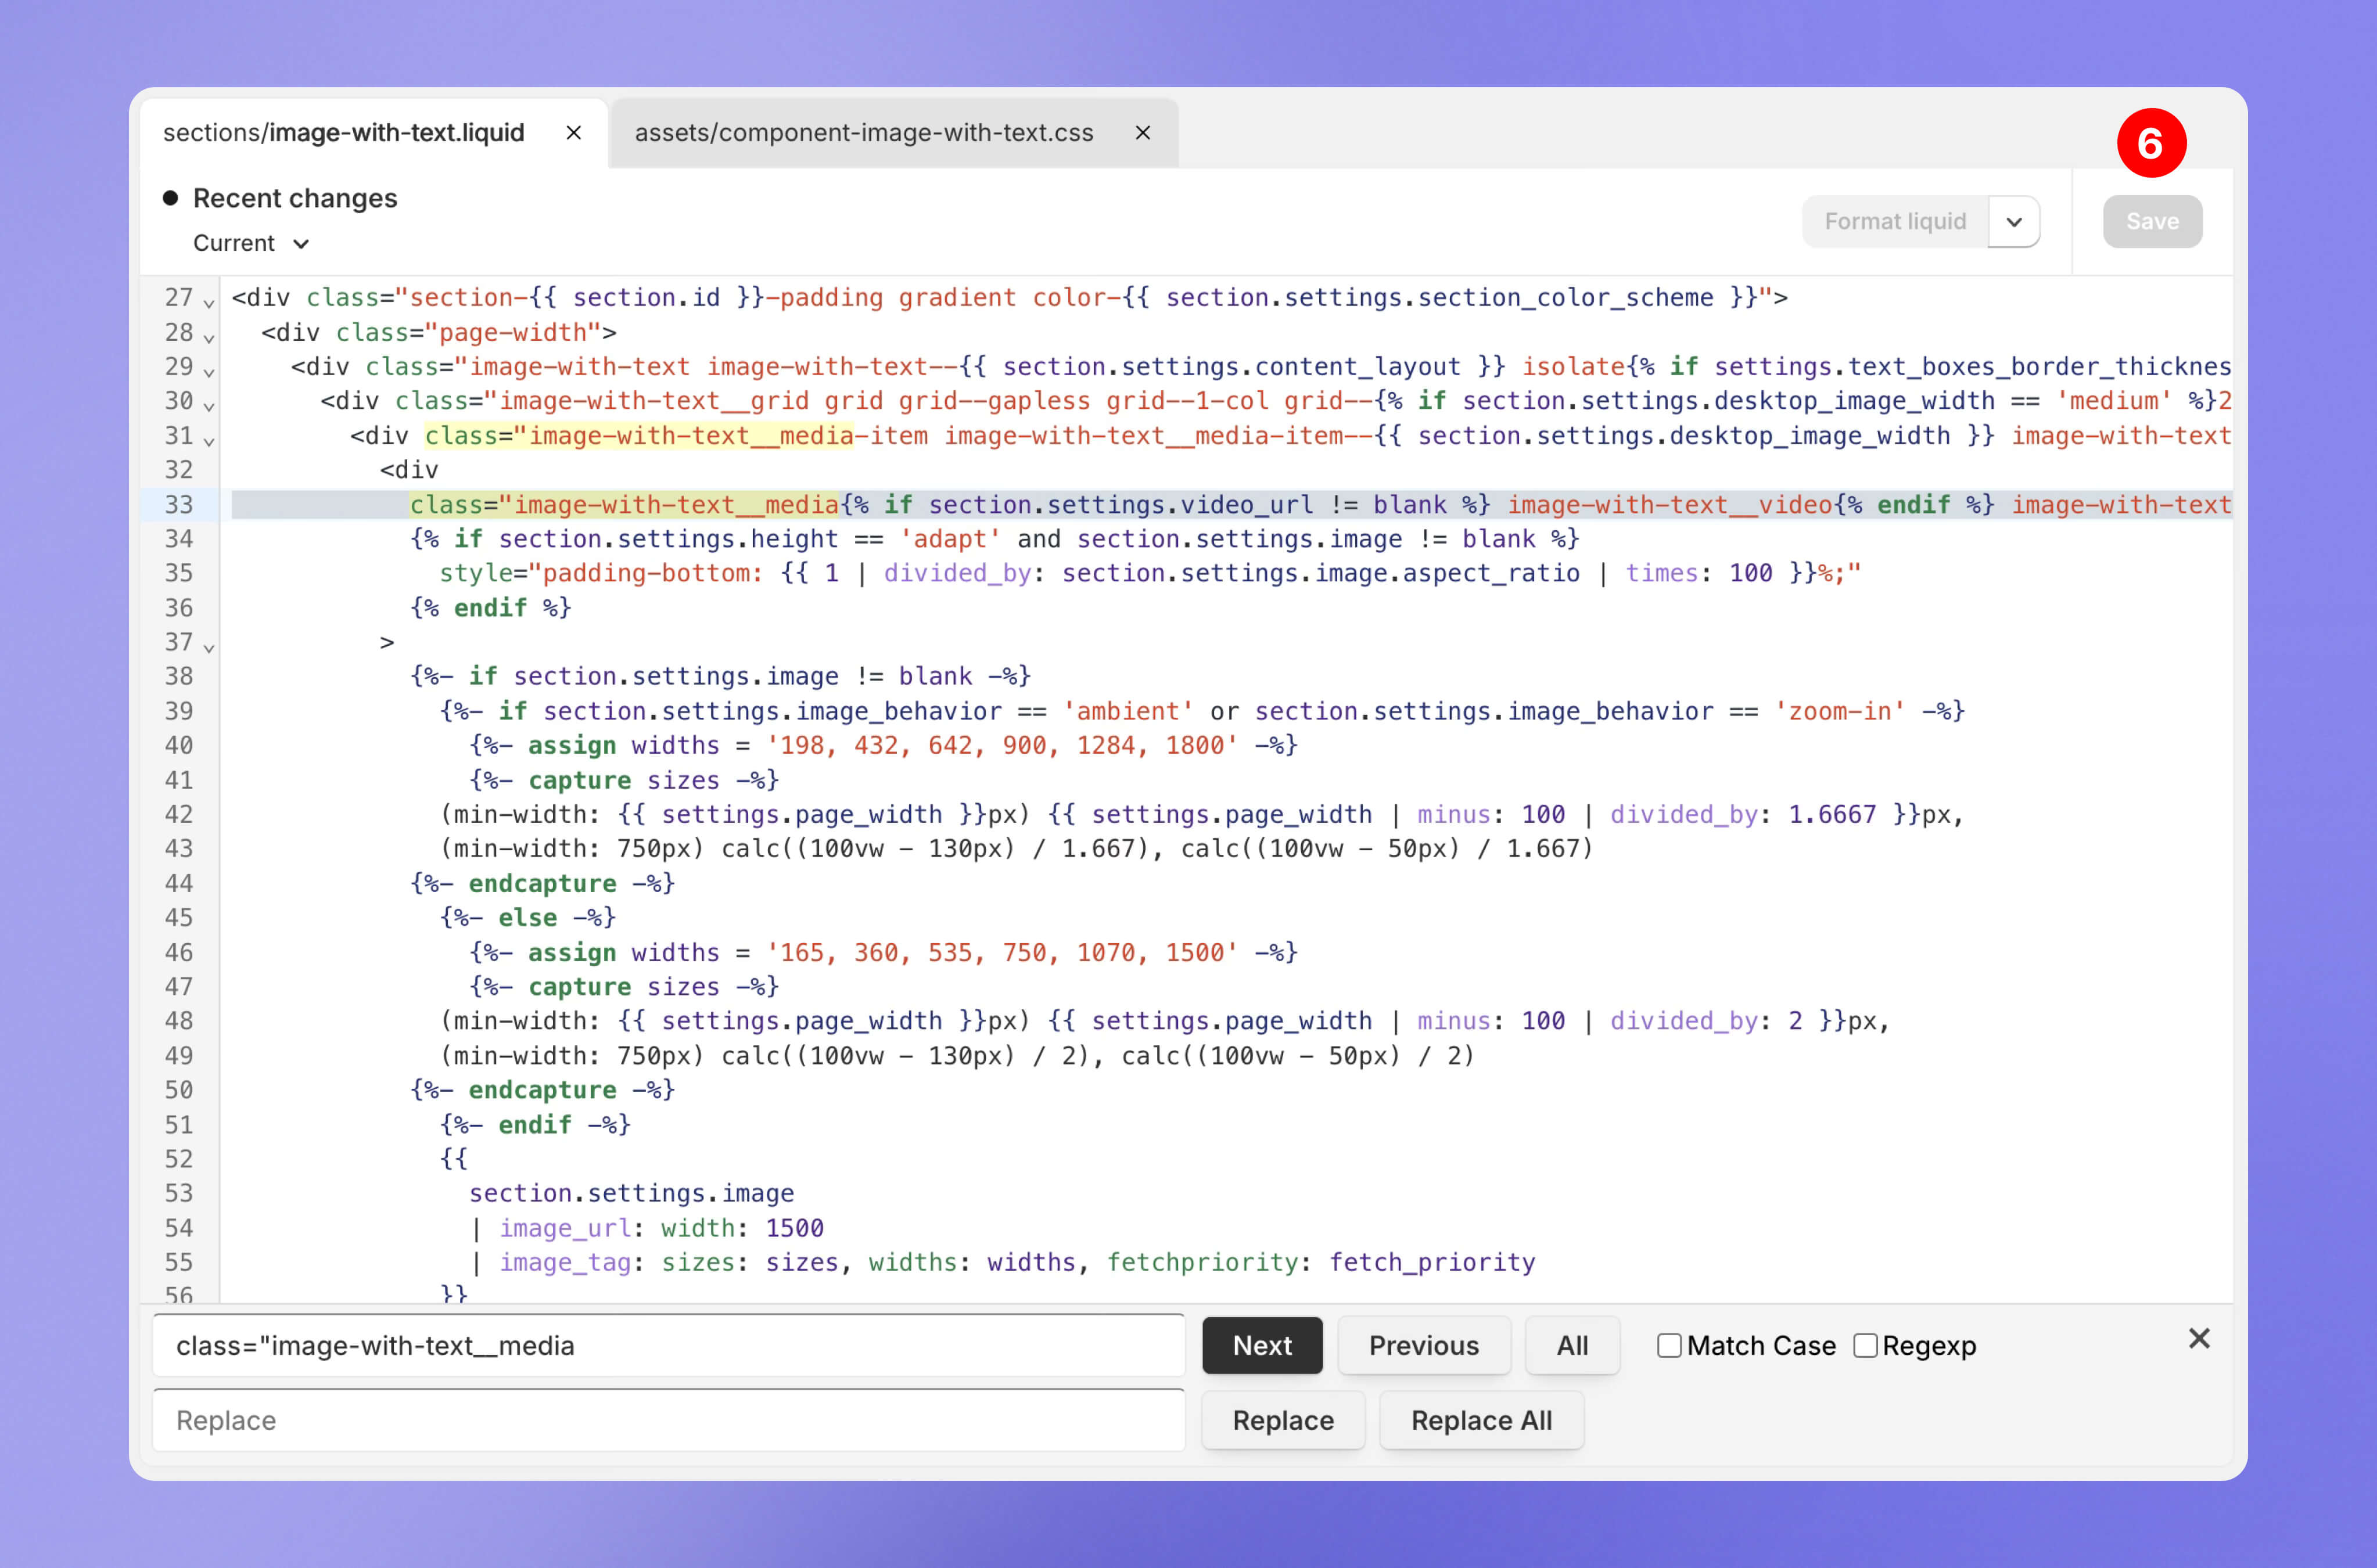
Find the line with `class="image-with-text__media-item"` and replace it.

```
class="image-with-text__media{% if section.settings.video_url != blank %} image-with-text__video{% endif %} image-with-text__media--{{ section.settings.height }}{% unless remove_color_classes %} gradient color-{{ section.settings.color_scheme }}{% else %} background-transparent{% endunless %}{% if section.settings.image != blank or section.settings.video_url != blank %} global-media-settings{% endif %}{% if section.settings.image != blank %} media{% elsif section.settings.video_url == blank %} image-with-text__media--placeholder placeholder{% endif %}{% if section.settings.image_behavior != 'none' %} animate--{{ section.settings.image_behavior }}{% endif %}"
```

### 3. Open the file `component-image-with-text.css` in the `assets` folder

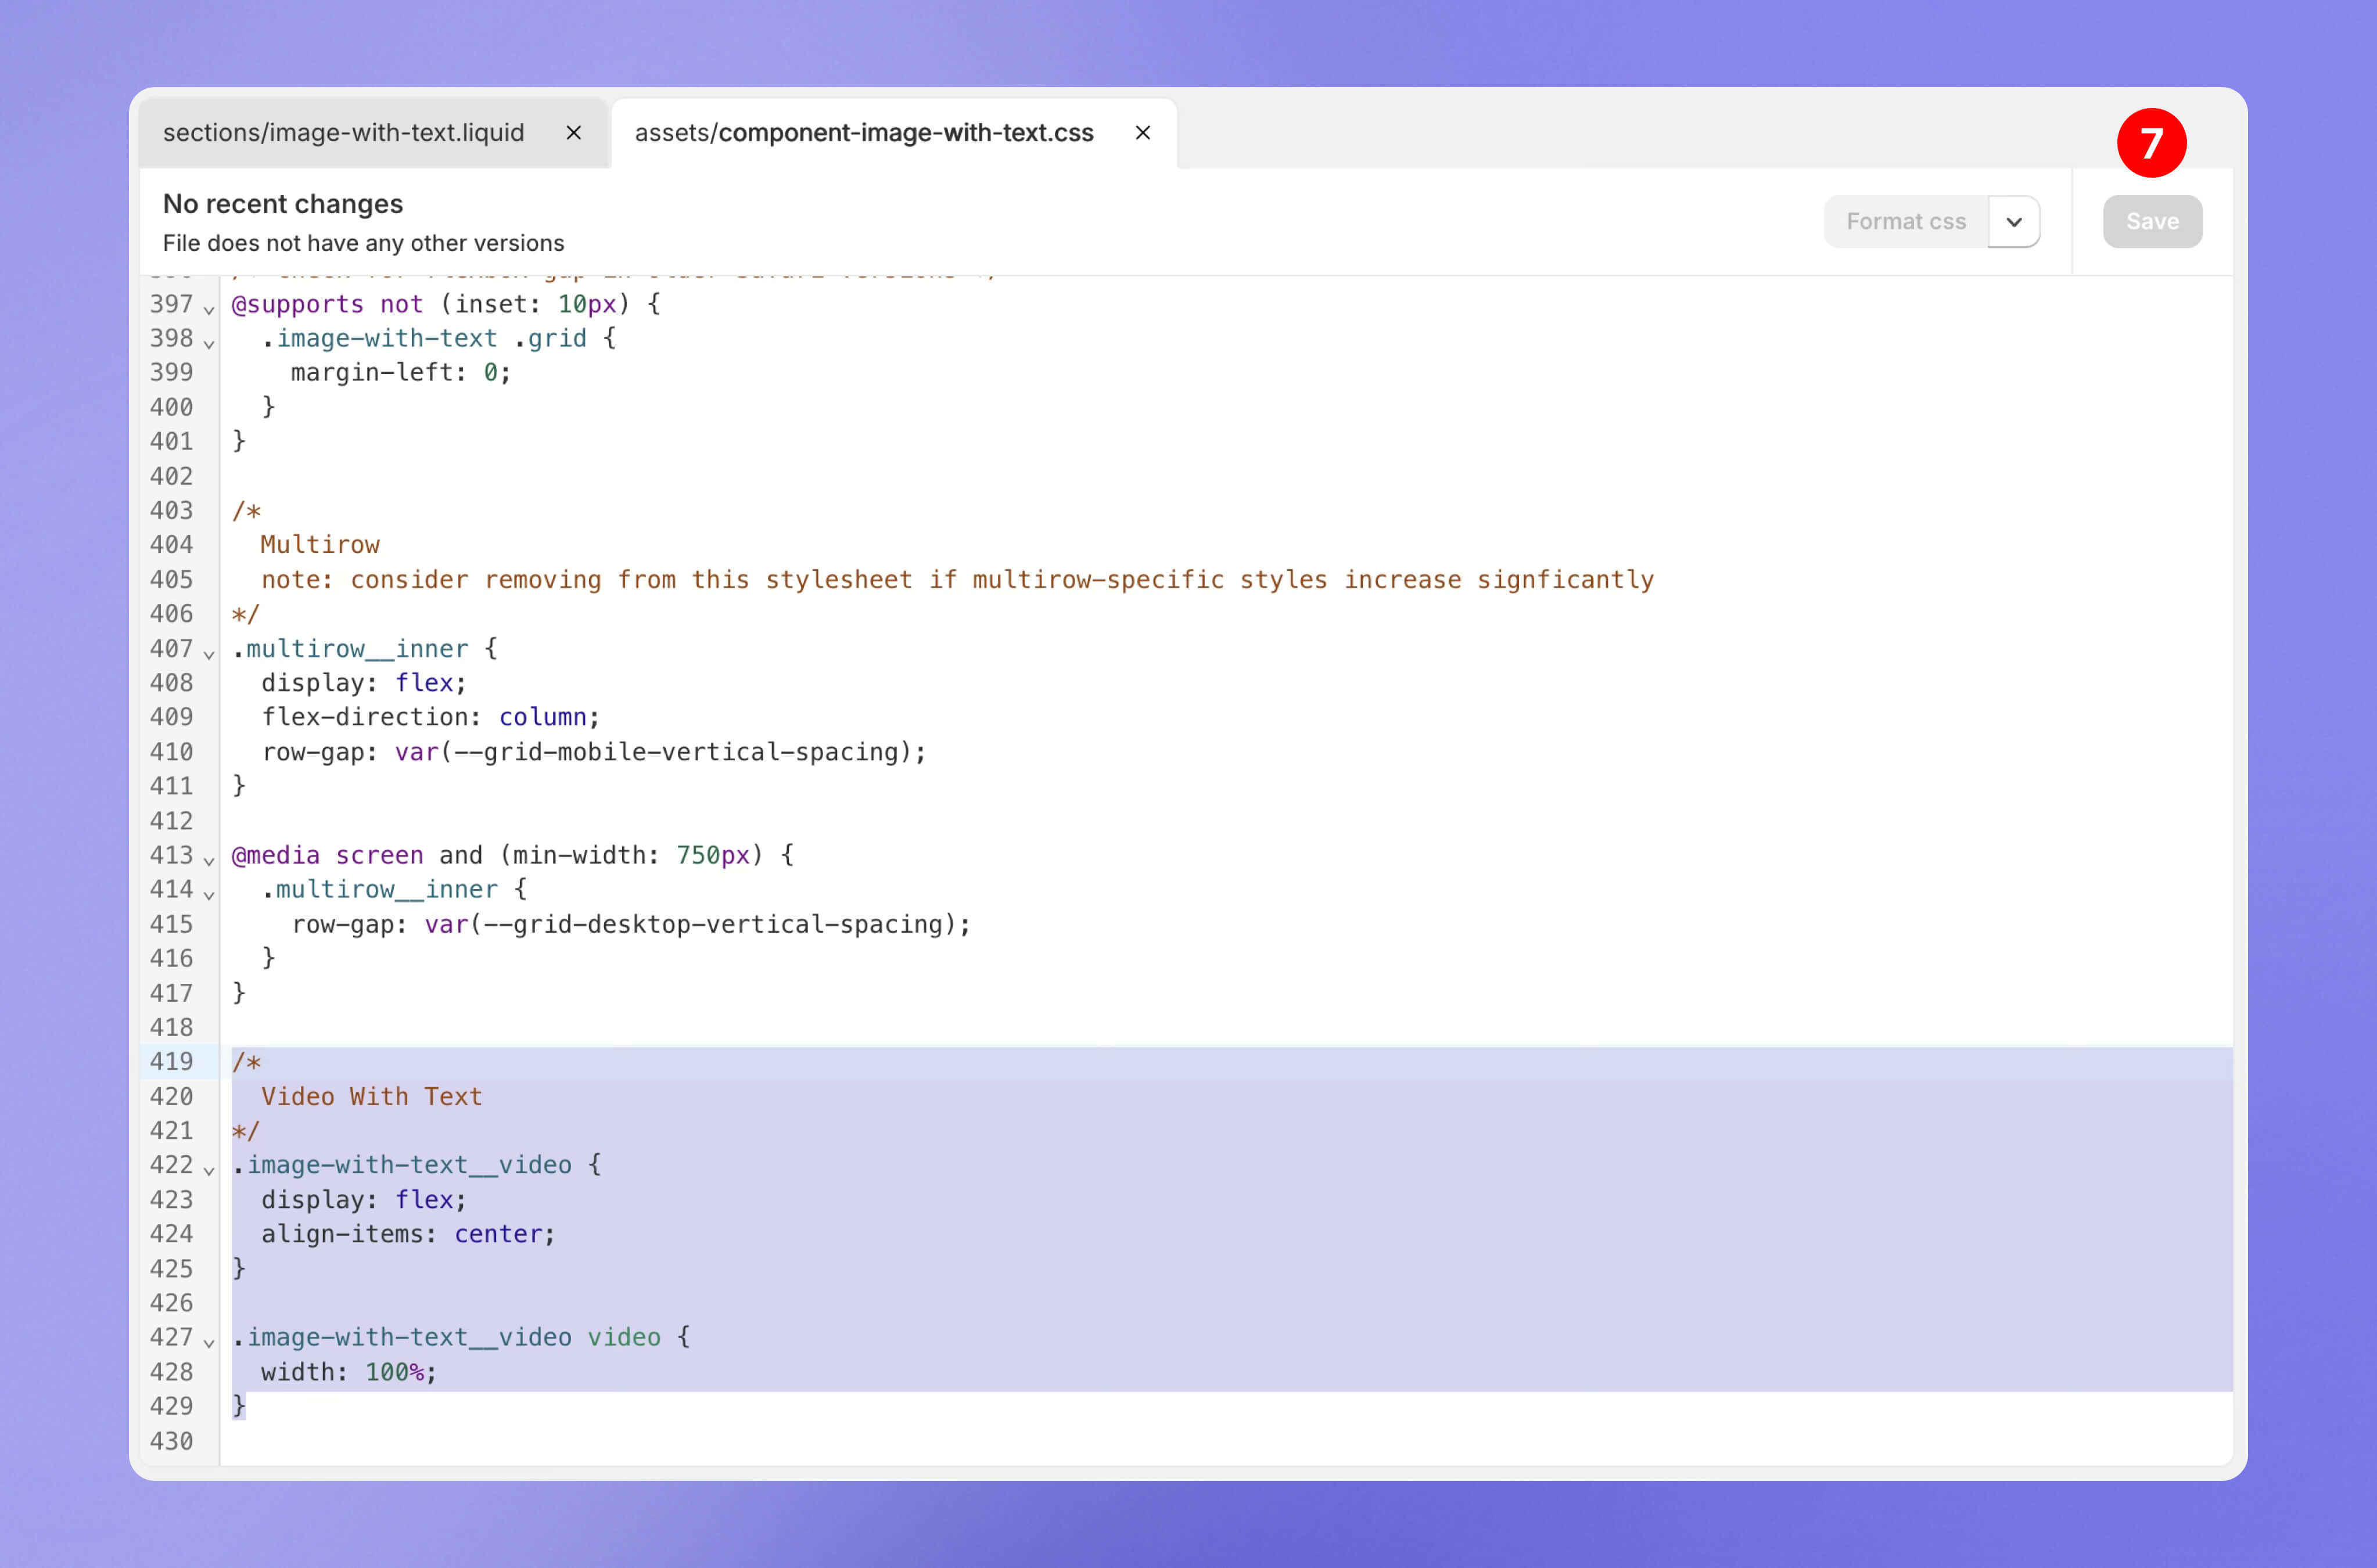
<figure><img src="https://755362860-files.gitbook.io/~/files/v0/b/gitbook-x-prod.appspot.com/o/spaces%2Fxa9ueiMPkj0LsrVay0aB%2Fuploads%2F2mDiqZB7bLeYLKF6Egaa%2Fvecomlab-continue-video-with-text-4.jpg?alt=media&amp;token=cc9ed784-4cb2-4570-a0f3-a45a0a6de0cb" alt=""><figcaption></figcaption></figure>

Paste the styles at the end of the file.

```
/*
  Video With Text
*/
.image-with-text__video {
  display: flex;
  align-items: center;
}

.image-with-text__video video {
  width: 100%;
}
```

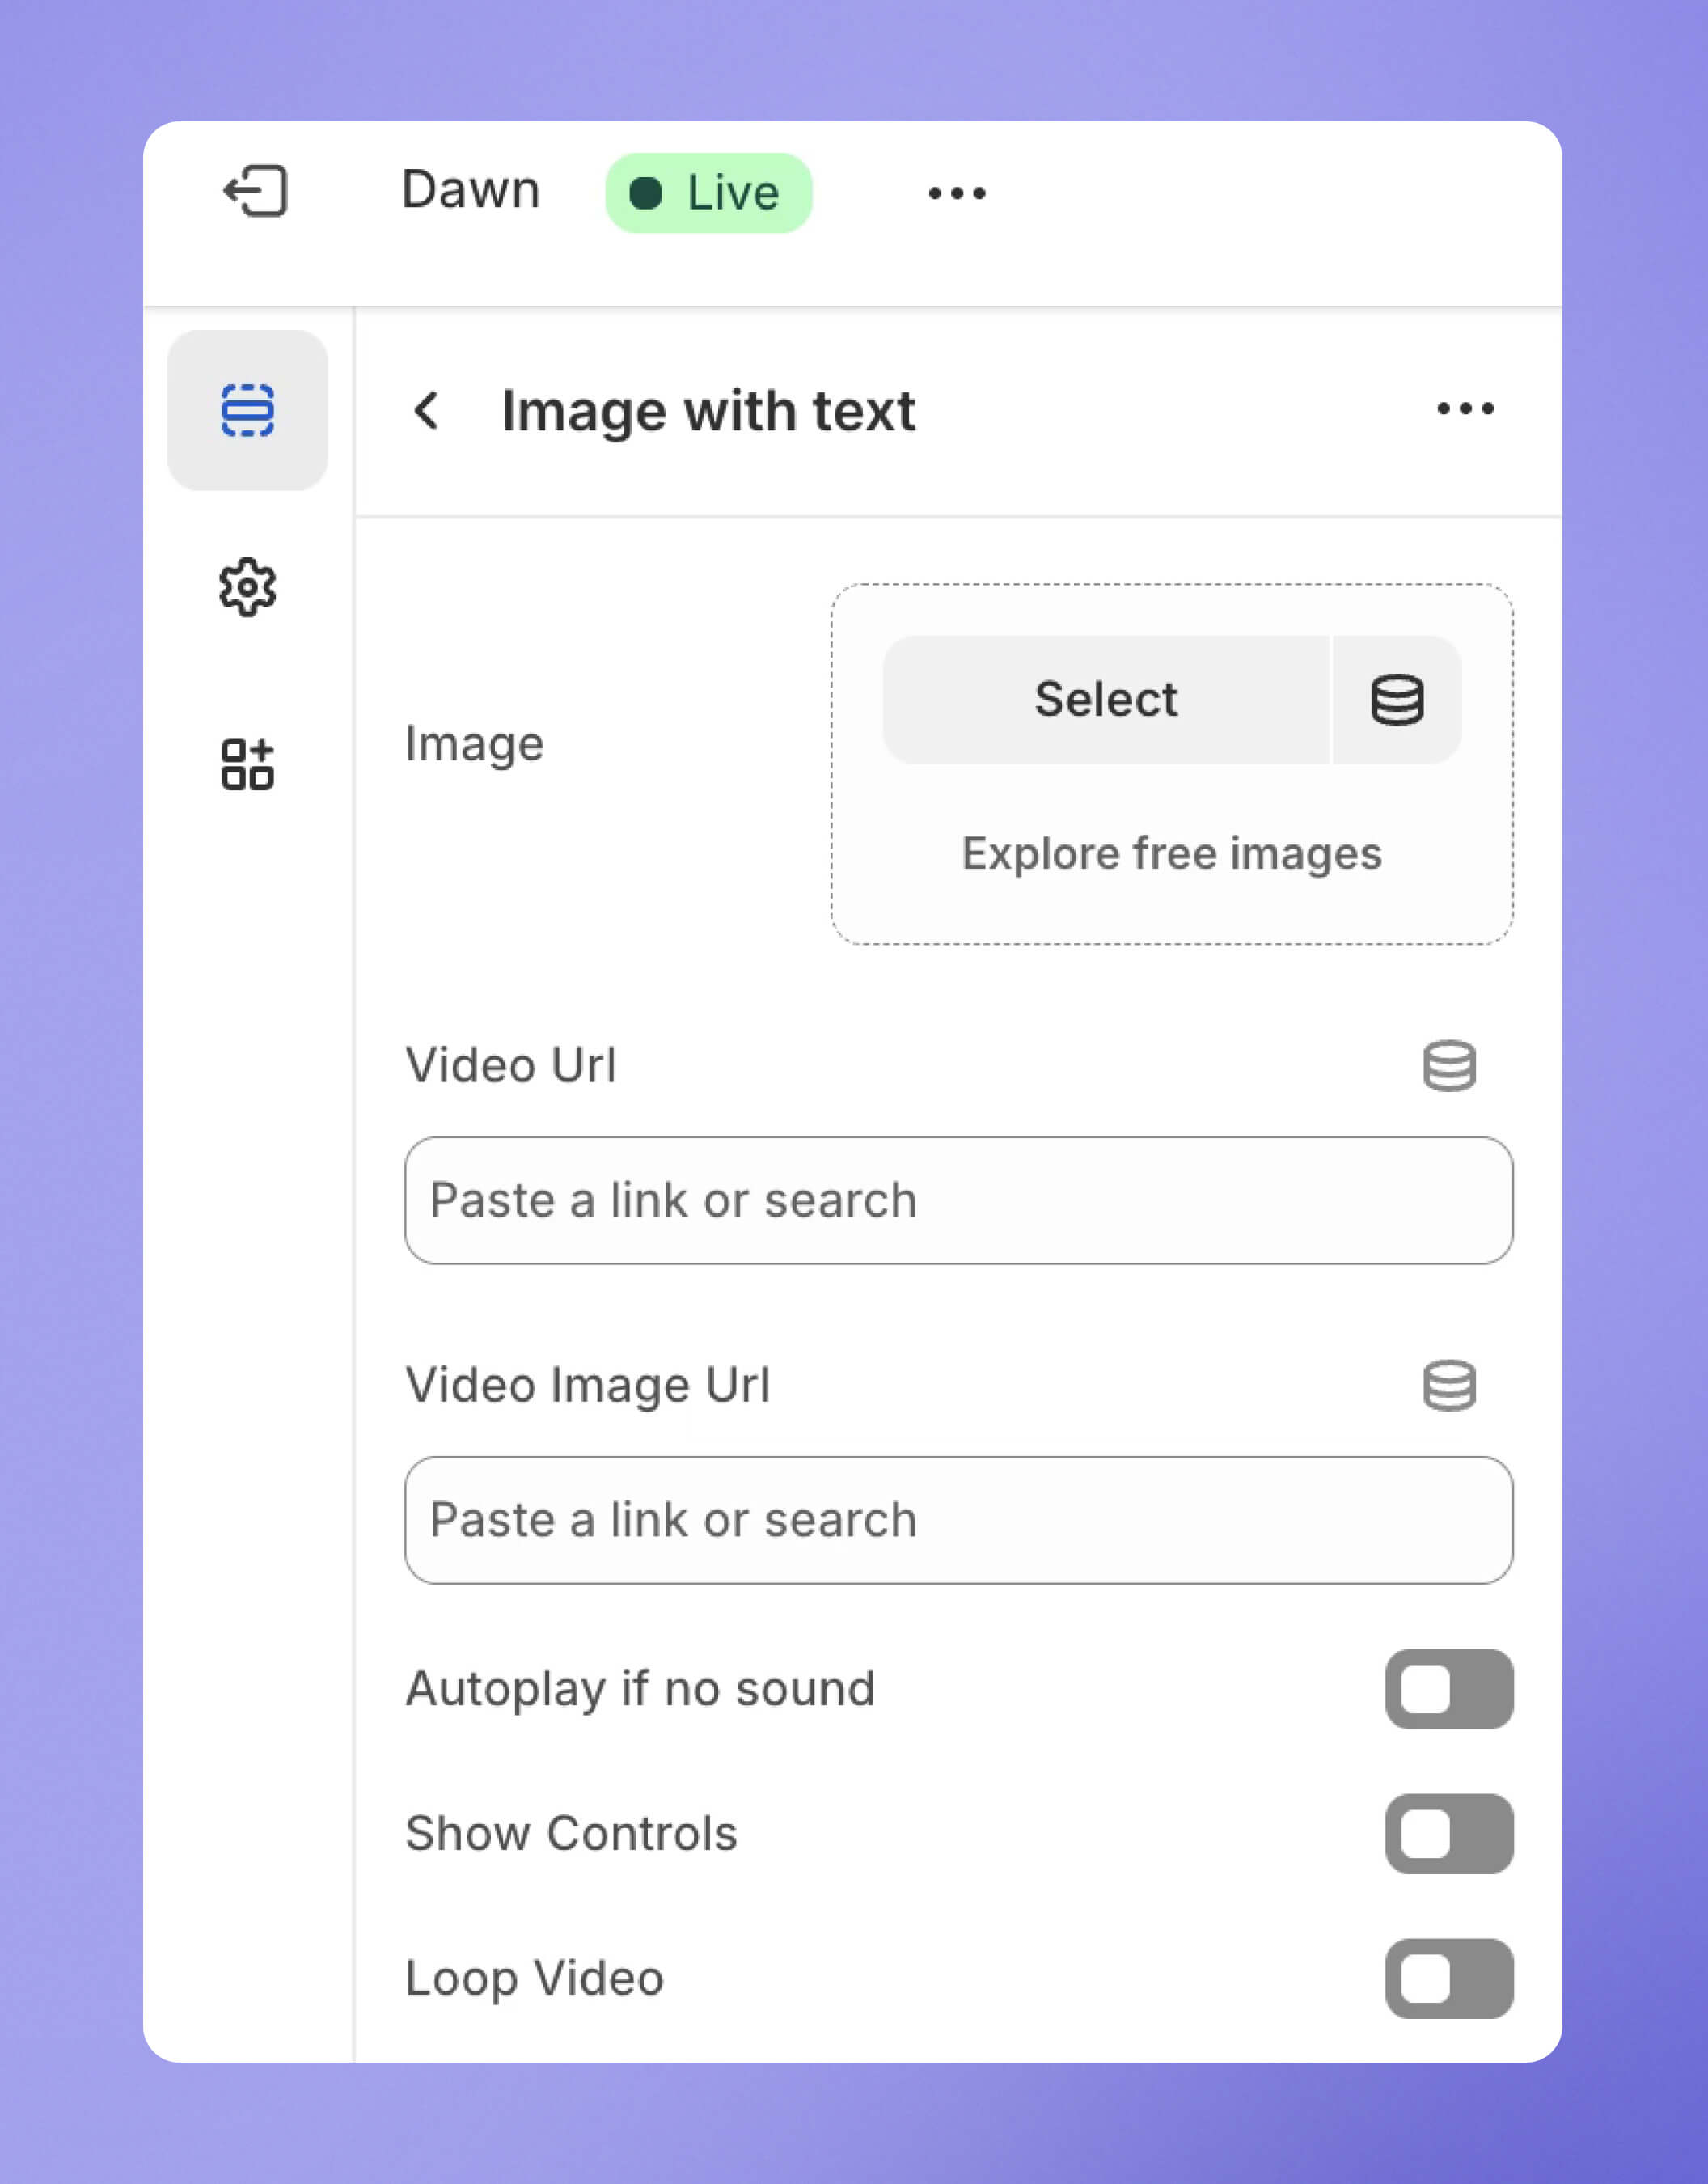
<div align="left"><figure><img src="https://755362860-files.gitbook.io/~/files/v0/b/gitbook-x-prod.appspot.com/o/spaces%2Fxa9ueiMPkj0LsrVay0aB%2Fuploads%2FkSwDpOTHADs9q0O6Z0Q9%2Fvecomlab-continue-video-with-text-5.jpg?alt=media&amp;token=744c8abe-47a8-427b-ab78-740f22134d32" alt="" width="375"><figcaption></figcaption></figure></div>

***

*Need help with setup?* [*Contact us*](https://vecomlab.com/pages/contact) *— we’ll handle everything for you.*


# How to Add a Video (YouTube Video With Text)

A step-by-step guide on how to add a YouTube video to the “Image with Text” section in the Dawn theme for Shopify using code — free and without any apps.

*Relevant for Dawn theme version 15.3.0*

***

{% hint style="info" %}
If you want to avoid coding, try the [Shrine](https://vecomlab.com/shrine) theme.

[Shrine](https://vecomlab.com/shrine) offers over 120 built-in features that help improve conversion rates and increase the average order value, without the need to configure additional apps or pay for subscriptions. Everything is customizable without code, saving you time and resources.

<a href="https://vecomlab.com/shrine" class="button primary" data-icon="torii-gate">Use Shrine − 15% OFF</a>

Your discount code: `VECOMLAB`
{% endhint %}

<figure><img src="https://755362860-files.gitbook.io/~/files/v0/b/gitbook-x-prod.appspot.com/o/spaces%2Fxa9ueiMPkj0LsrVay0aB%2Fuploads%2Foo5GWxHNyVLjvoxh8pCv%2Fvecomlab-dev-5.jpg?alt=media&amp;token=70bd9718-19db-4602-b07f-6ac14c5f2a9d" alt=""><figcaption></figcaption></figure>

### 1. Go to the code editor

<figure><img src="https://755362860-files.gitbook.io/~/files/v0/b/gitbook-x-prod.appspot.com/o/spaces%2Fxa9ueiMPkj0LsrVay0aB%2Fuploads%2FuBp2PmlNX41DVfV0D9SI%2Fvecomlab-custom-social-media-icons-1.jpg?alt=media&amp;token=c13f13c1-a0f5-4171-a06e-4944d96b94e3" alt=""><figcaption></figcaption></figure>

Online Store → Themes → Edit code.

### 2. Open the file `image-with-text.liquid` in the `sections` folder

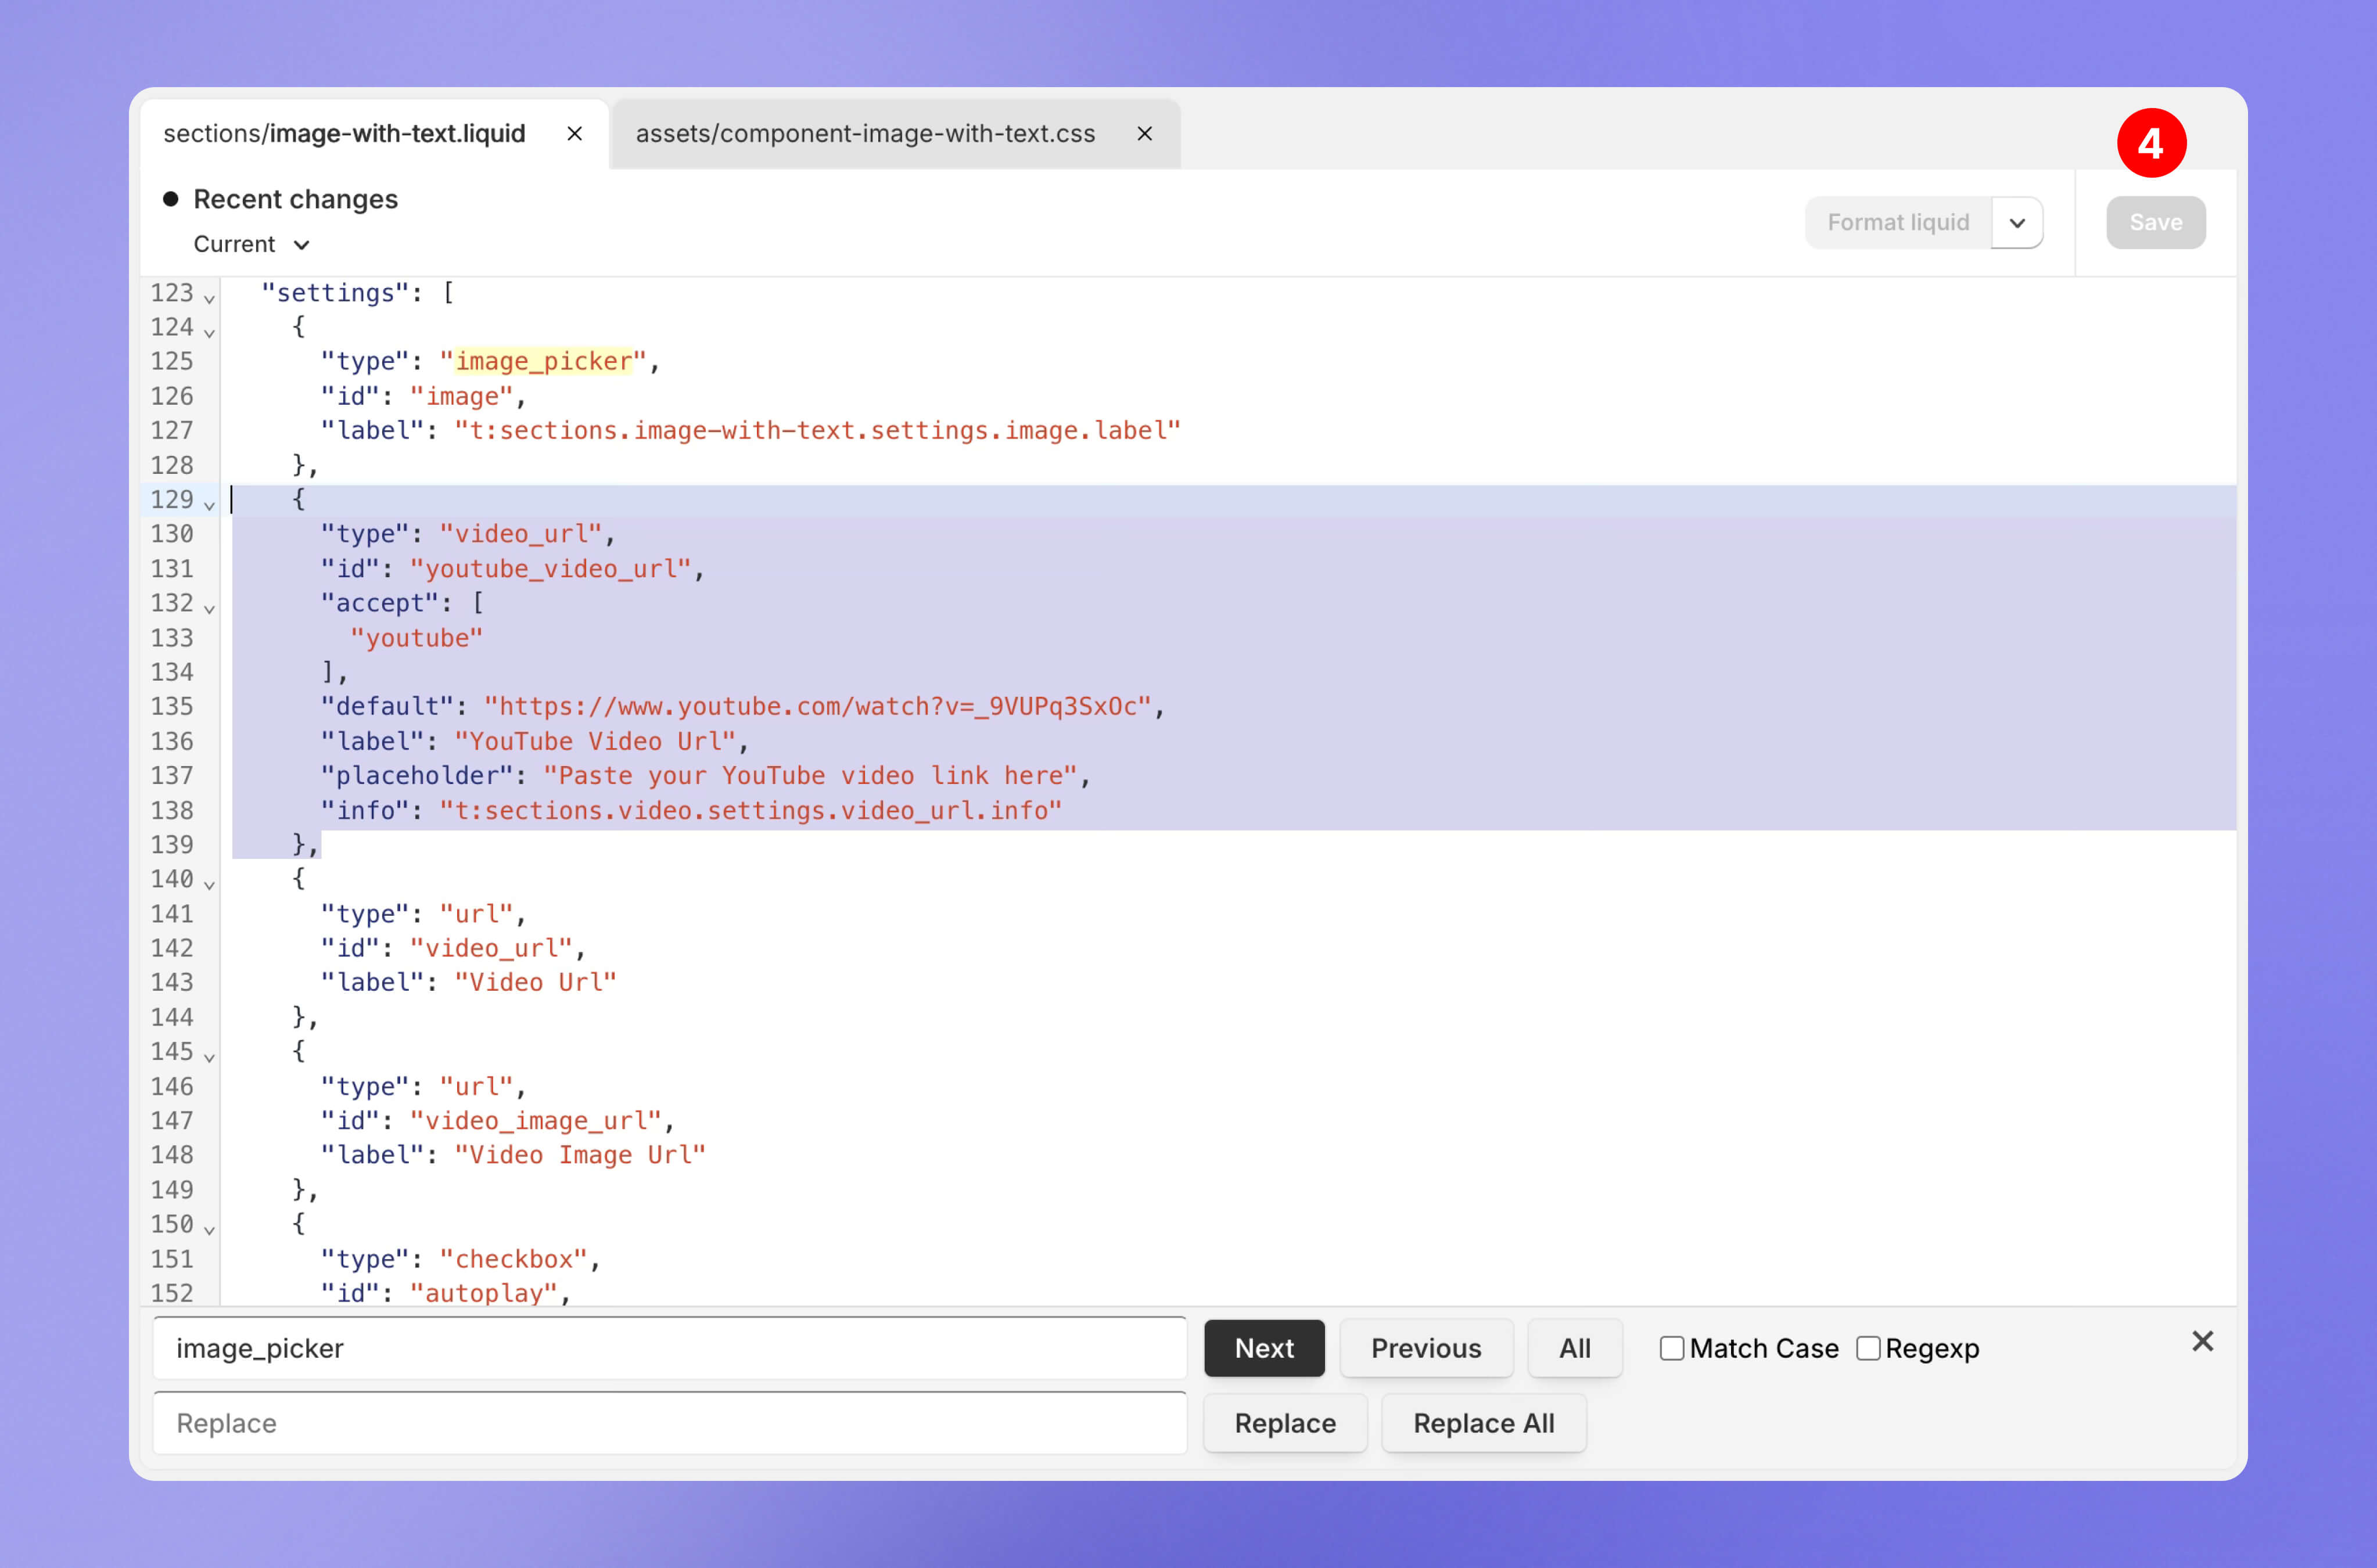
<figure><img src="https://755362860-files.gitbook.io/~/files/v0/b/gitbook-x-prod.appspot.com/o/spaces%2Fxa9ueiMPkj0LsrVay0aB%2Fuploads%2FDQlB8BrfQEBSaXVU5J34%2Fvecomlab-youtube-video-with-text-1.jpg?alt=media&amp;token=443e32dc-abc0-4f6f-b6c2-dfda67042926" alt=""><figcaption></figcaption></figure>

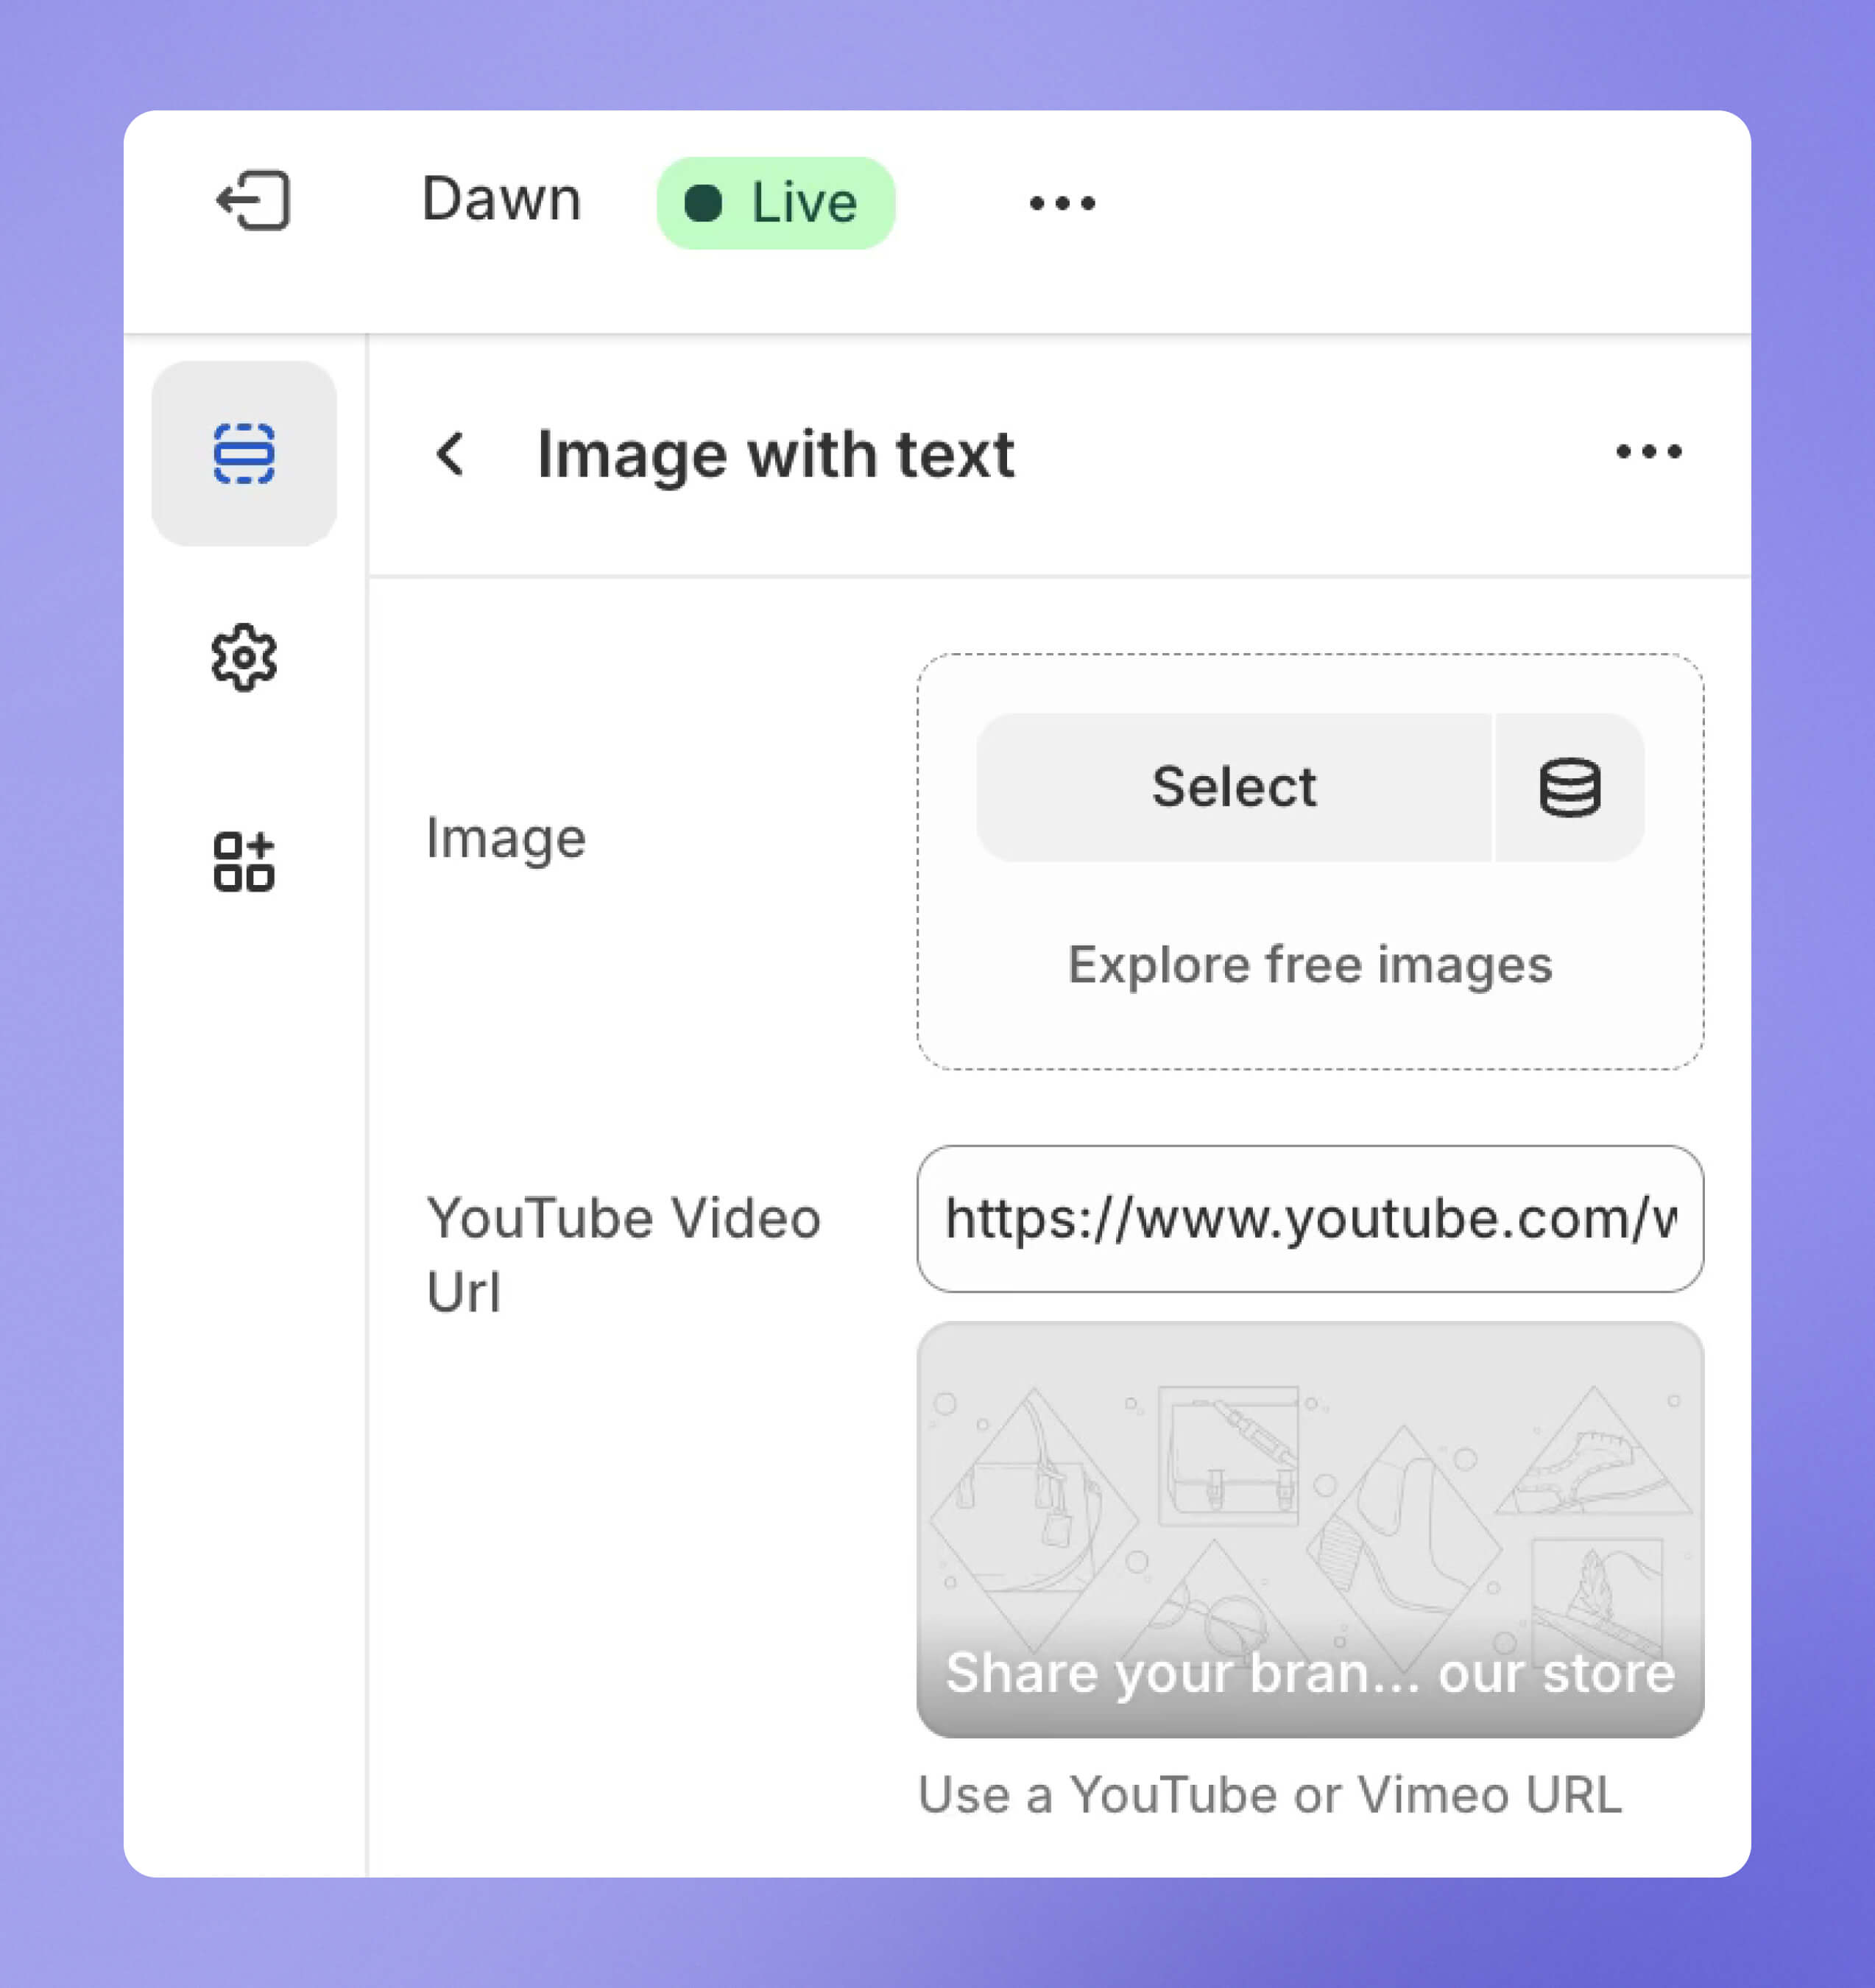
Find `image_picker` and insert the code.

```
{
  "type": "video_url",
  "id": "youtube_video_url",
  "accept": [
    "youtube"
  ],
  "default": "https://www.youtube.com/watch?v=_9VUPq3SxOc",
  "label": "YouTube Video Url",
  "placeholder": "Paste your YouTube video link here",
  "info": "t:sections.video.settings.video_url.info"
},
```

<figure><img src="https://755362860-files.gitbook.io/~/files/v0/b/gitbook-x-prod.appspot.com/o/spaces%2Fxa9ueiMPkj0LsrVay0aB%2Fuploads%2FoEfJ5EaZSItxkkjZqqeN%2Fvecomlab-youtube-video-with-text-2.jpg?alt=media&amp;token=d0dff789-90e0-4e9f-8561-c6ec4dd16619" alt=""><figcaption></figcaption></figure>

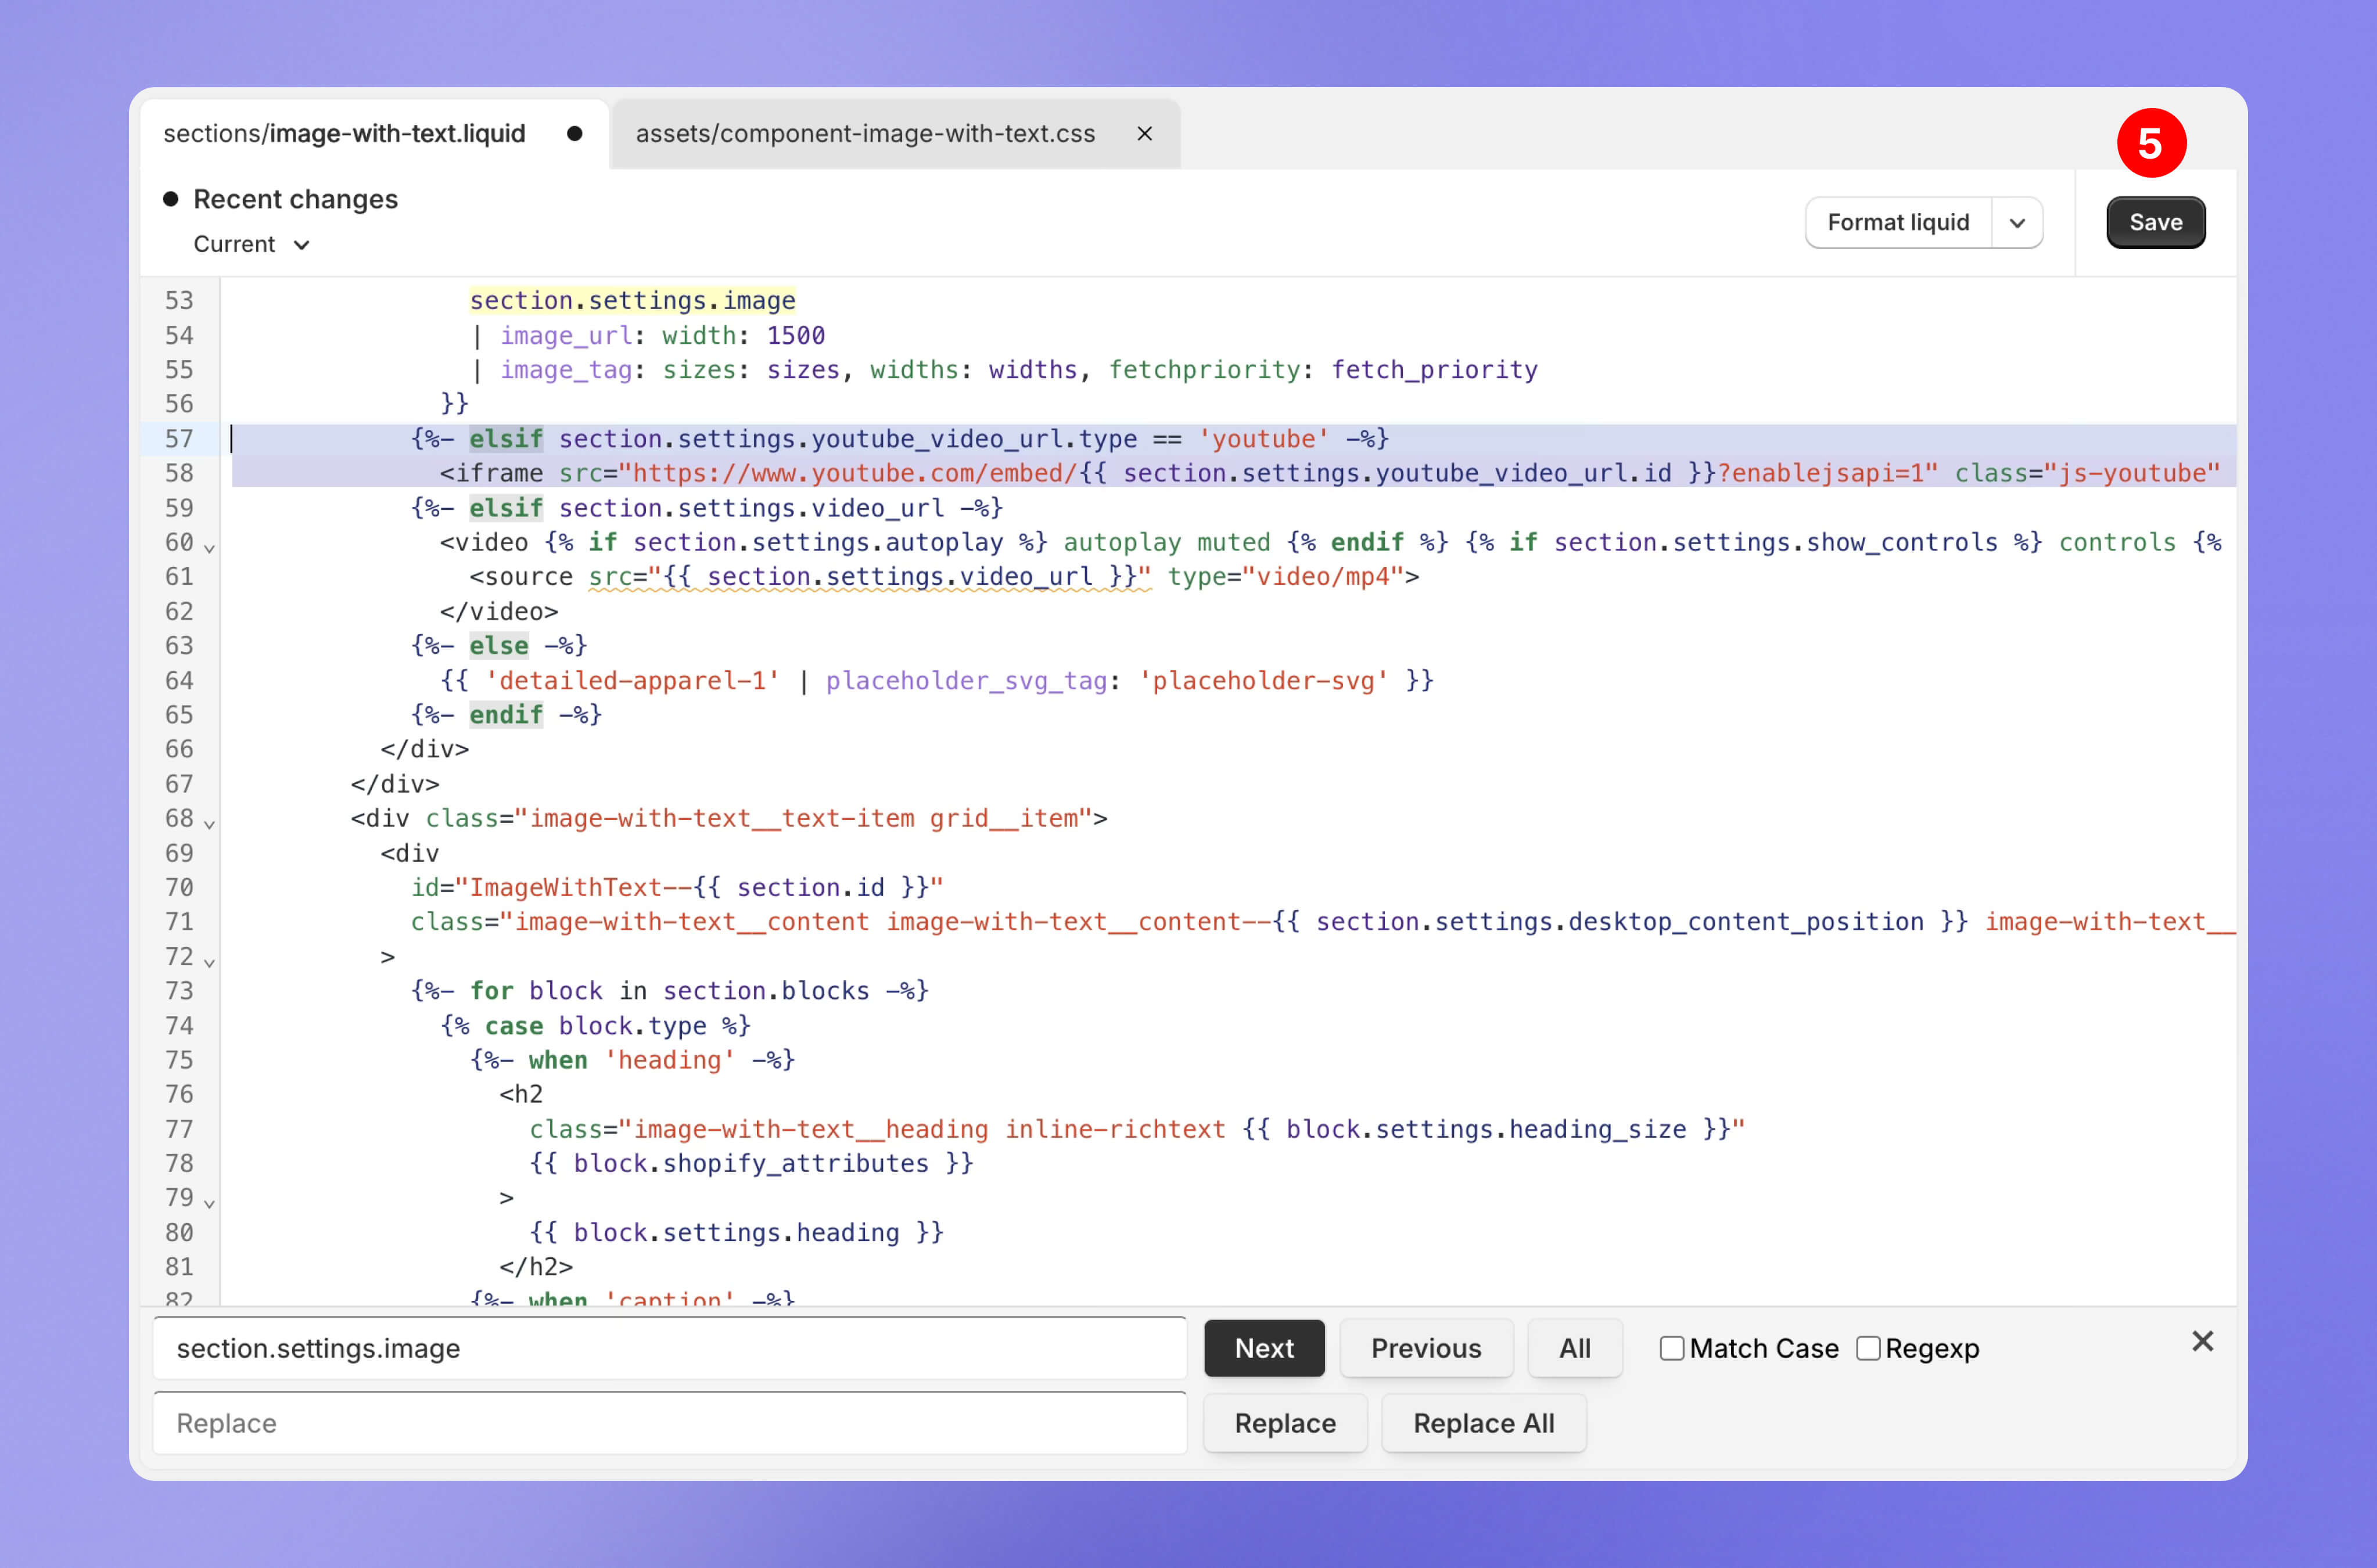
Find `section.settings.image` and insert the code.

```
{%- elsif section.settings.youtube_video_url.type == 'youtube' -%}
  <iframe src="https://www.youtube.com/embed/{{ section.settings.youtube_video_url.id }}?enablejsapi=1" class="js-youtube" allow="autoplay; encrypted-media" allowfullscreen title="{{ section.settings.description | escape }}"></iframe>
```

<figure><img src="https://755362860-files.gitbook.io/~/files/v0/b/gitbook-x-prod.appspot.com/o/spaces%2Fxa9ueiMPkj0LsrVay0aB%2Fuploads%2FjKmmJfrmYGJRliJ8zSnI%2Fvecomlab-youtube-video-with-text-3.jpg?alt=media&amp;token=9626f853-38be-466e-ae2e-9e3489b4ba24" alt=""><figcaption></figcaption></figure>

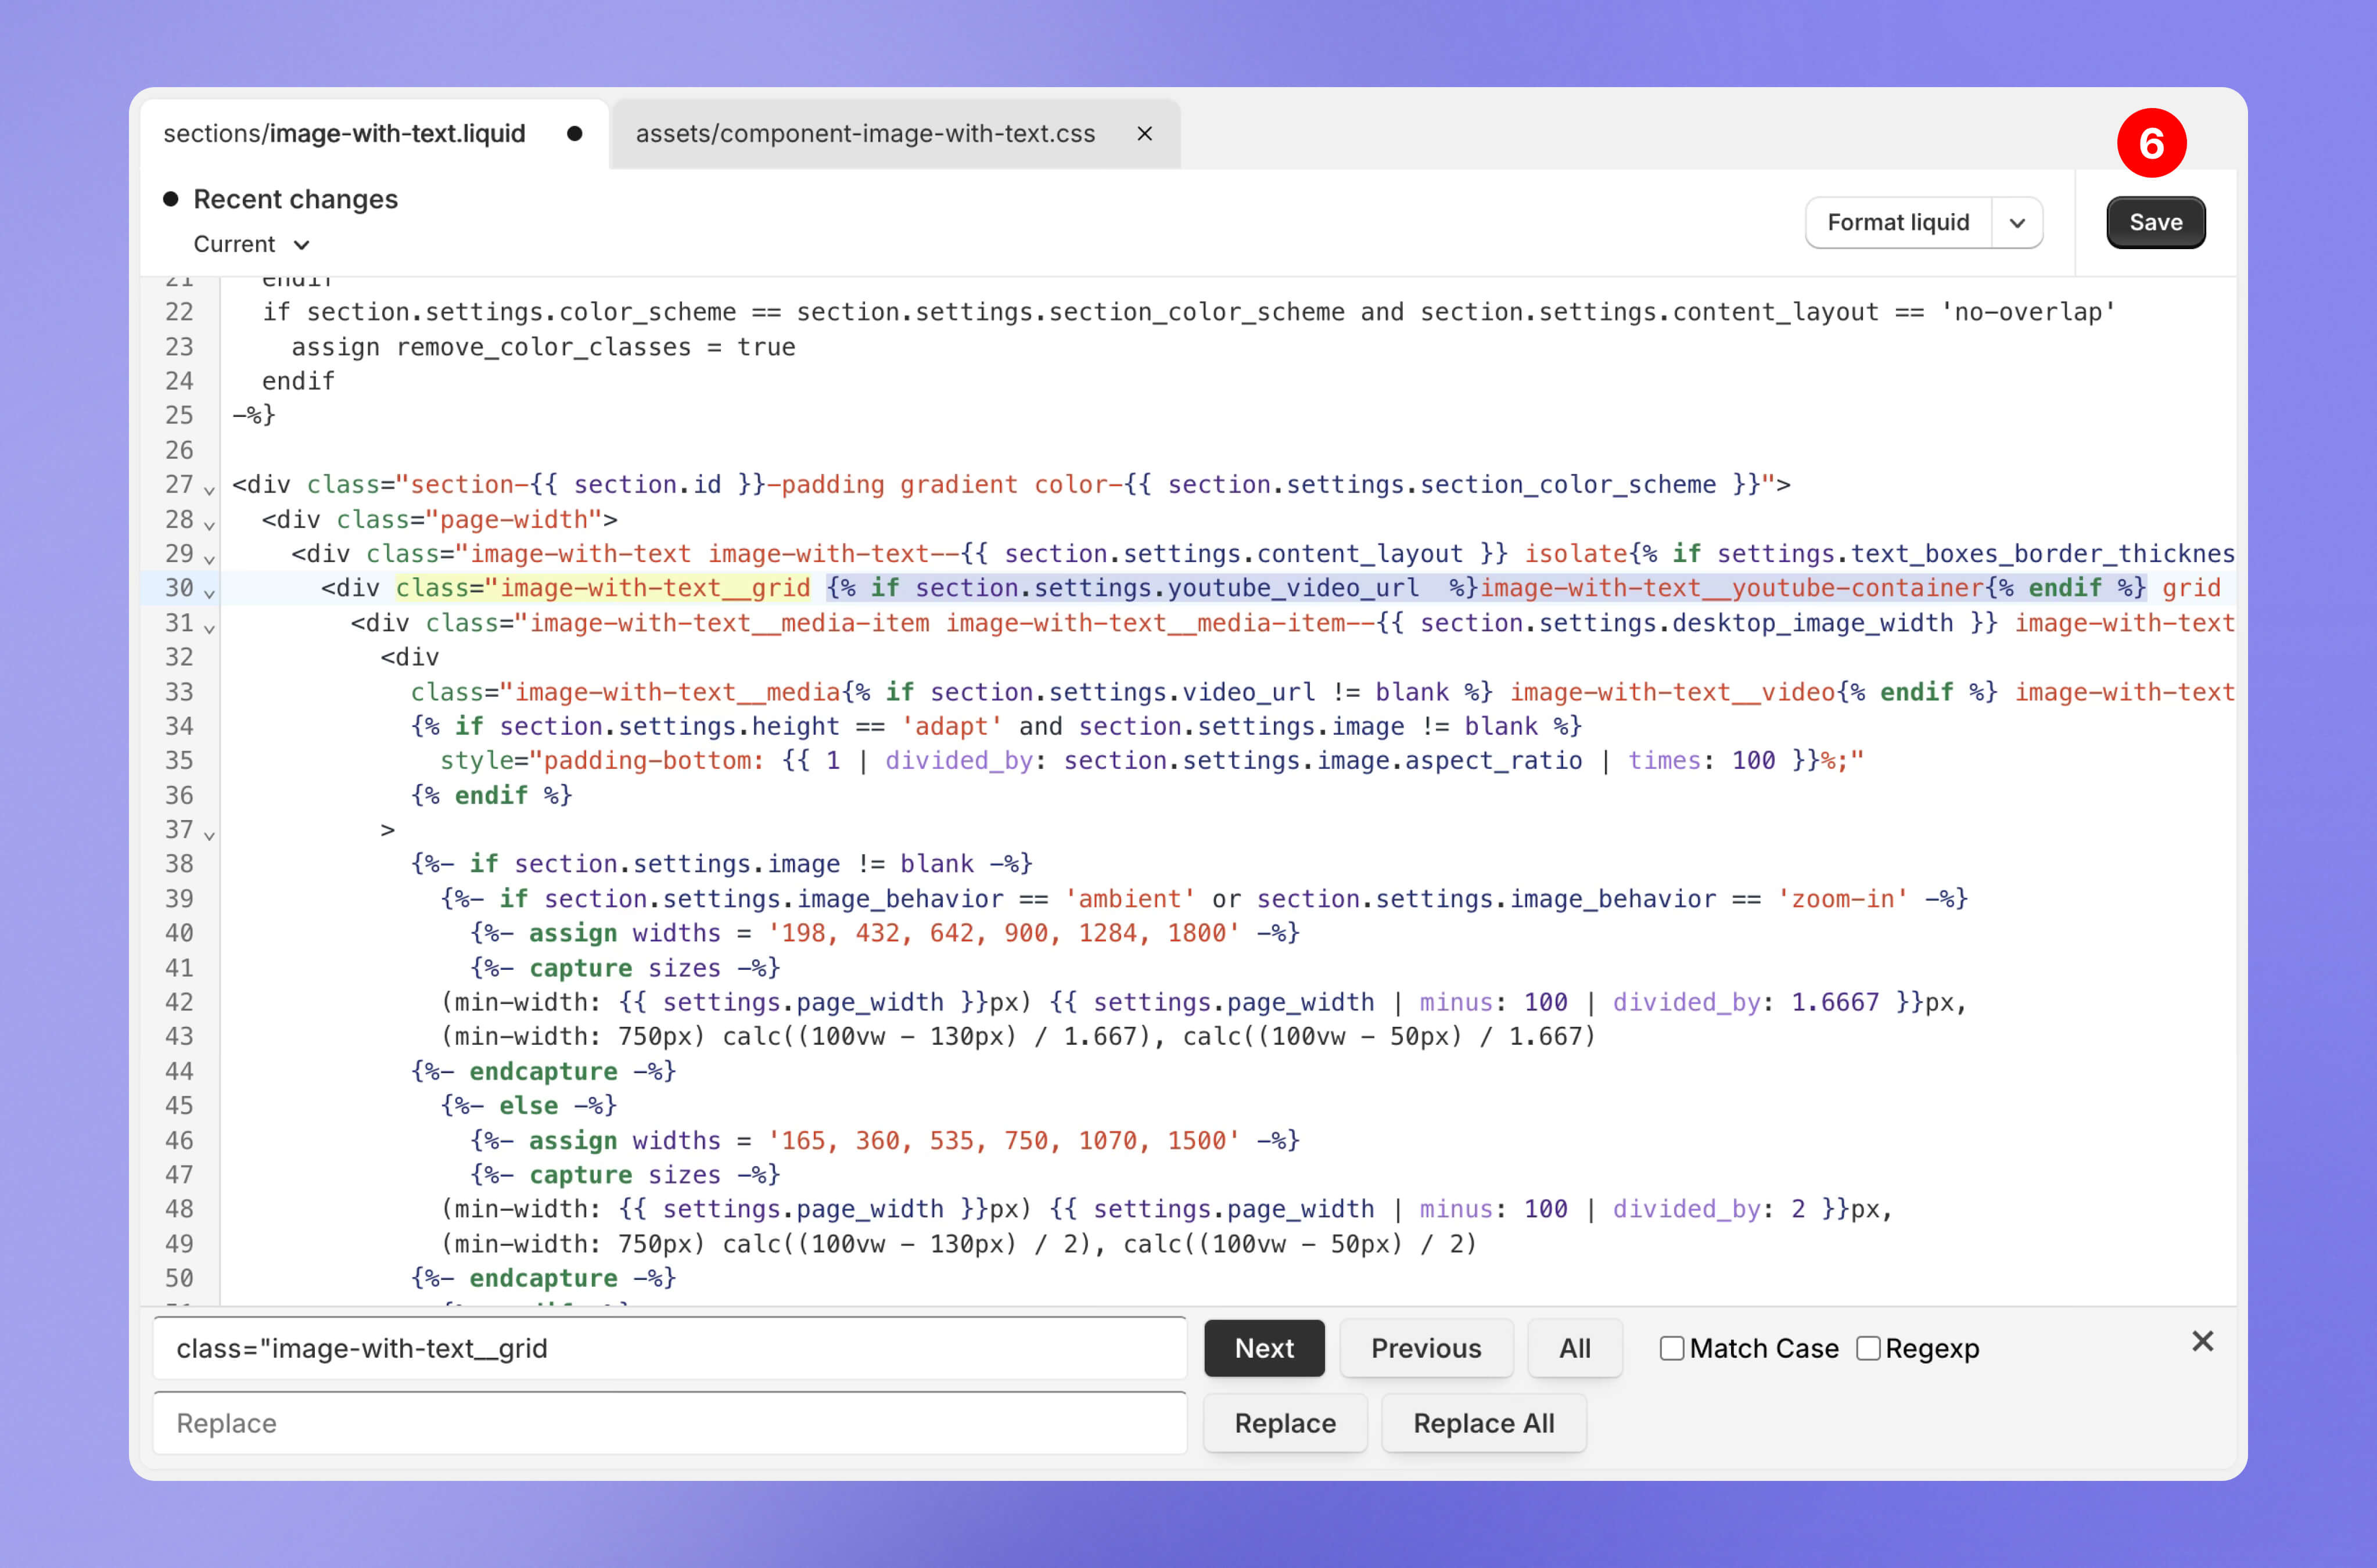
Find `class="image-with-text__grid"` and insert the code.

```
{% if section.settings.youtube_video_url  %}image-with-text__youtube-container{% endif %}
```

<figure><img src="https://755362860-files.gitbook.io/~/files/v0/b/gitbook-x-prod.appspot.com/o/spaces%2Fxa9ueiMPkj0LsrVay0aB%2Fuploads%2Ffgq93K2gCioY2610HxMu%2Fvecomlab-youtube-video-with-text-4.jpg?alt=media&amp;token=64fcf47b-05e2-4936-8834-19e4c362cafb" alt=""><figcaption></figcaption></figure>

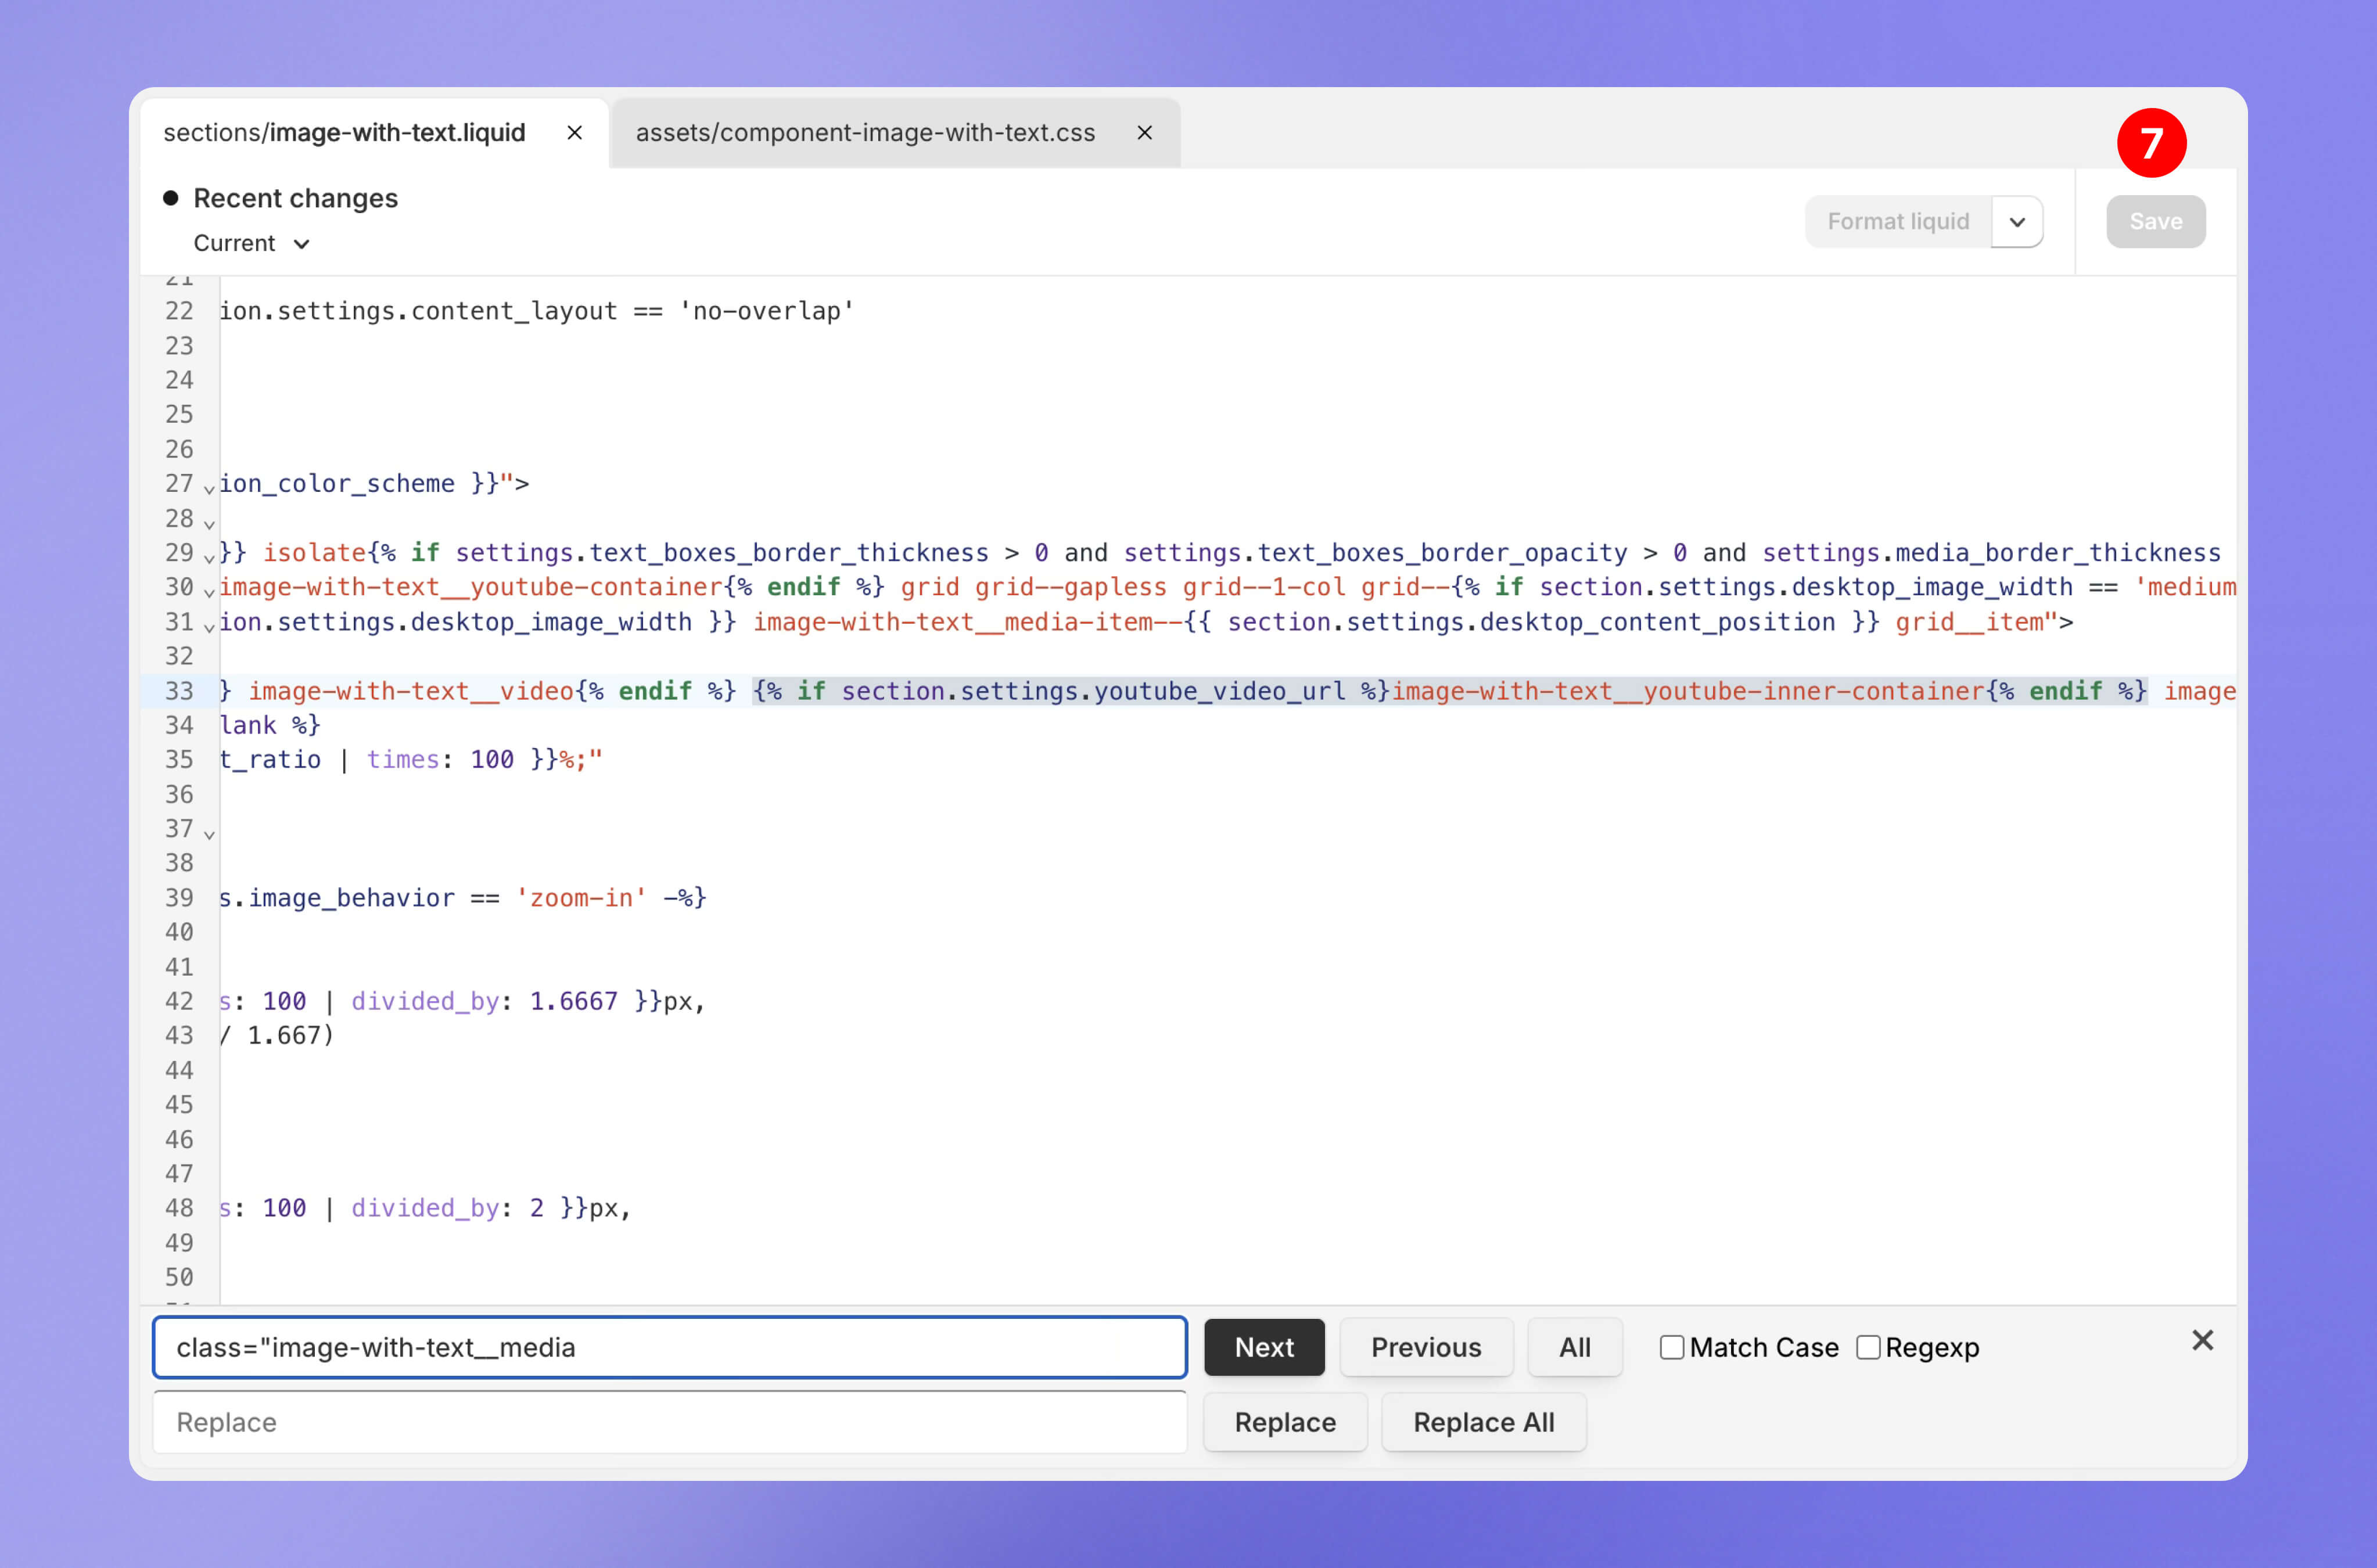
Find the line with `class="image-with-text__media"` and insert the code right after `image-with-text__video{% endif %}`.

```
{% if section.settings.youtube_video_url %}image-with-text__youtube-inner-container{% endif %}
```

If you have already completed these adjustments:

{% content-ref url="/pages/9hub7hdUk81xMITbPWFP" %}
[How to Add a Video (Video With Text)](/shopify-theme-setup/dawn/video-with-text)
{% endcontent-ref %}

### 3. Open the file `component-image-with-text.css` in the `assets` folder

<figure><img src="https://755362860-files.gitbook.io/~/files/v0/b/gitbook-x-prod.appspot.com/o/spaces%2Fxa9ueiMPkj0LsrVay0aB%2Fuploads%2FPQgTVRWQCX2VP88bhUzt%2Fvecomlab-youtube-video-with-text-5.jpg?alt=media&amp;token=a8f2e17b-ec25-4c70-9fae-d2961c7da0bc" alt=""><figcaption></figcaption></figure>

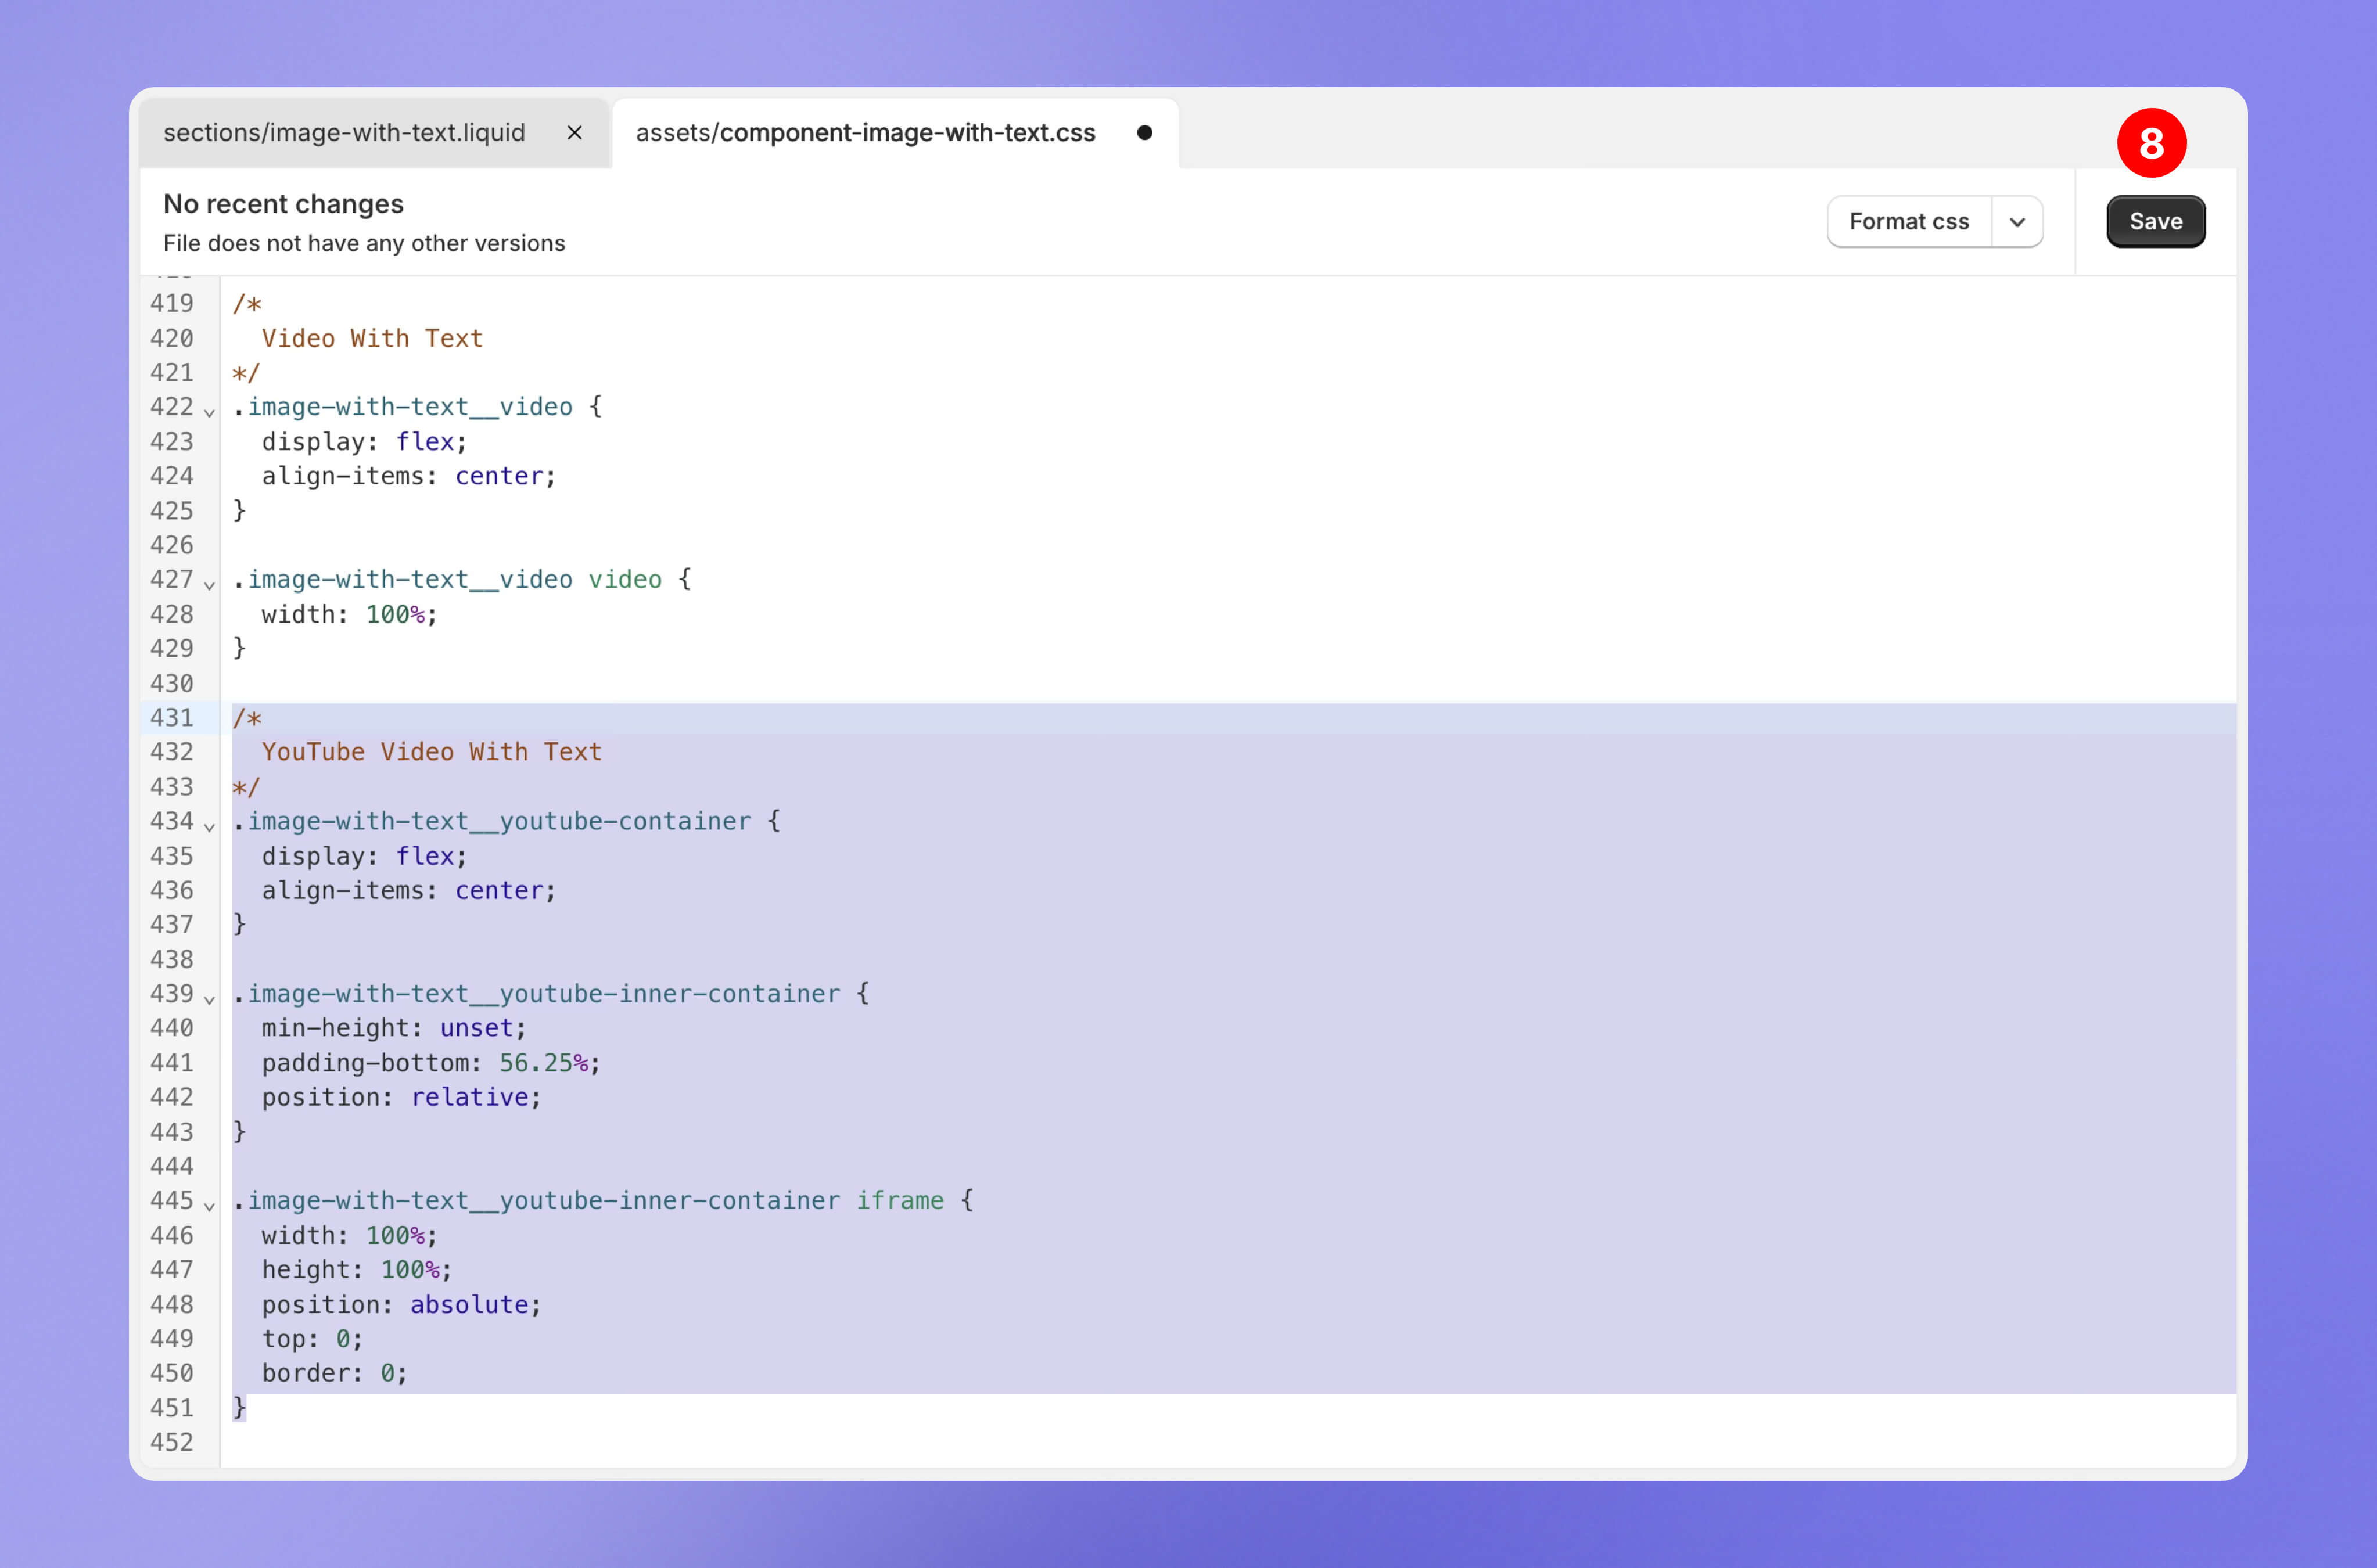
Paste the styles at the end of the file.

```
/*
  YouTube Video With Text
*/
.image-with-text__youtube-container {
  display: flex;
  align-items: center;
}

.image-with-text__youtube-inner-container {
  min-height: unset;
  padding-bottom: 56.25%;
  position: relative;
}

.image-with-text__youtube-inner-container iframe {
  width: 100%;
  height: 100%;
  position: absolute;
  top: 0;
  border: 0;
}
```

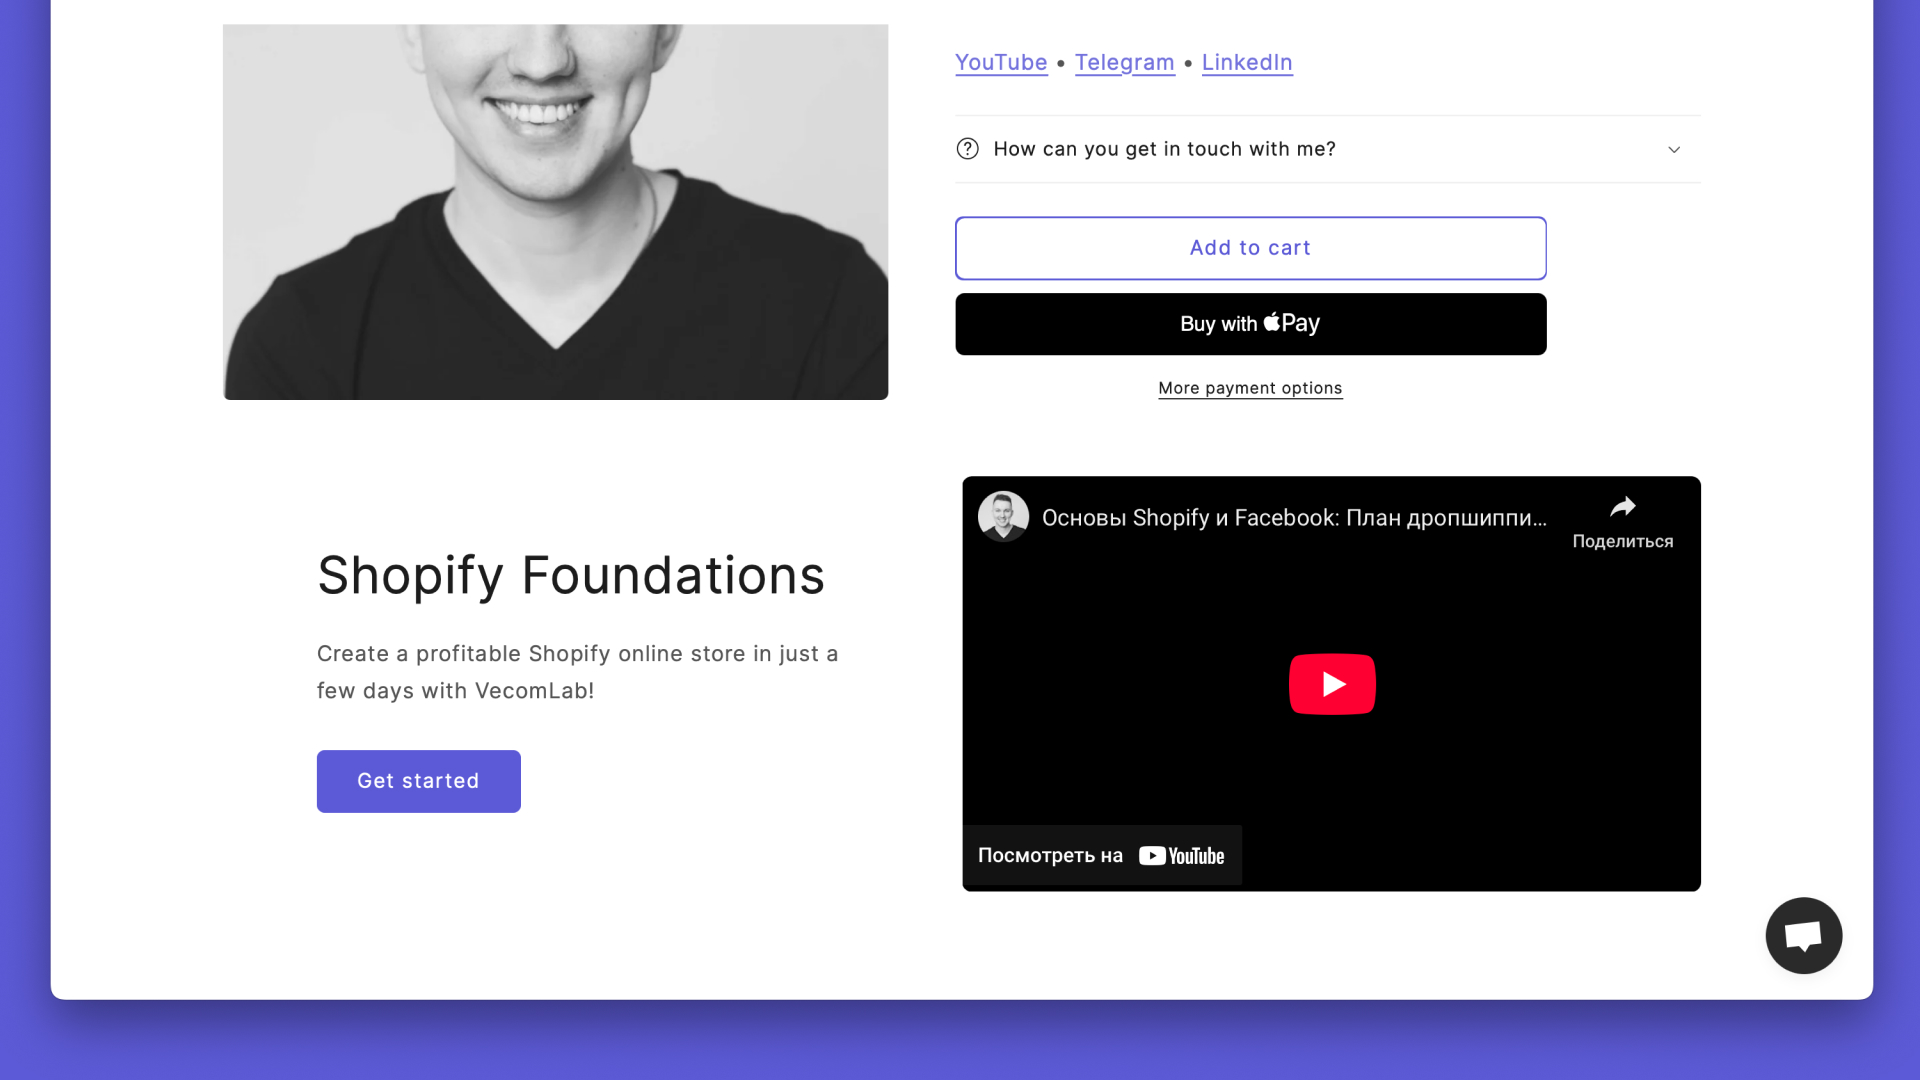
<div align="left"><figure><img src="https://755362860-files.gitbook.io/~/files/v0/b/gitbook-x-prod.appspot.com/o/spaces%2Fxa9ueiMPkj0LsrVay0aB%2Fuploads%2FIQyjwlwznNLdcZWGn0Ay%2Fvecomlab-youtube-video-with-text-6.jpg?alt=media&amp;token=e2c3f6fb-3784-460b-b28e-16cd8b2480b0" alt="" width="375"><figcaption></figcaption></figure></div>

Save the changes and add the video link in the theme settings.

***

*Need help with setup?* [*Contact us*](https://vecomlab.com/pages/contact) *— we’ll handle everything for you.*


# Horizon Theme Shopify


# Multiple Variant Images

Different images for variants in the Horizon theme from Shopify (without apps and without Shopify Plus). A free solution from VecomLab.

*Relevant for Horizon theme version 3.1.0*

***

{% hint style="info" %}
If you want to avoid coding, try the [Shrine](https://vecomlab.com/shrine) theme.

[Shrine](https://vecomlab.com/shrine) offers over 120 built-in features that help improve conversion rates and increase the average order value, without the need to configure additional apps or pay for subscriptions. Everything is customizable without code, saving you time and resources.

<a href="https://vecomlab.com/shrine" class="button primary" data-icon="torii-gate">Use Shrine − 15% OFF</a>

Your discount code: `VECOMLAB`
{% endhint %}

<figure><img src="https://755362860-files.gitbook.io/~/files/v0/b/gitbook-x-prod.appspot.com/o/spaces%2Fxa9ueiMPkj0LsrVay0aB%2Fuploads%2FquStxldSAt1lB5IgMap3%2Fvecomlab-multiple-variant-images-1.png?alt=media&amp;token=f951839b-8c88-407f-ab2b-0709975c6e0c" alt=""><figcaption></figcaption></figure>

### Problem description

By default, in the Shopify admin and in the Horizon theme settings, each variant can only be assigned one image — not several.

The platform partially solves this for stores on the Plus plan. You can also use third-party Shopify apps, but this is often unprofitable and inefficient: errors appear regularly and sometimes take months to fix via support.

You can solve this task using **Metafields and Metaobjects** for **Variants** and the theme code editor.

### Idea

* Each variant has a metafield **`custom.variant_gallery`** (list of files).
* We treat as “owned” all images whose file name **matches the stem** from the metafield or **starts with the stem + `_` or `-`**.
* On the server (Liquid) we pre-hide extra images for the **first frame**.
* On the client (JS) we read the “variant → files” map and **filter when the variant changes**.
* If none of the variants has the metafield — **nothing changes**, everything works as in the original theme.

### What’s new: zoom and quick add

1. The **zoom dialog** is now also filtered by variant: both thumbnails and large images.
2. **Mobile quick add (collection page modal)**: on mobile, the modal shows **only one** image — the featured image of the current variant (as in the standard Horizon), even if the variant has a whole series.

### Step 1. Variant metafield (once per store)

Settings → Metafields and metaobjects → Variants → Add definition

* **Name:** Variant Gallery
* **Namespace and key:** `custom.variant_gallery`
* **Type:** File → **List of files**
* **Validations:** Images only
* **Options:** enable **Storefront API access**
* **Save**

**Why this way:** this is the native way to link a variant with files in Shopify Files. The key matches what the code uses.

### Step 2. File name convention

In Files, give each series of photos for a variant a common **stem**:

```
ring-gold.jpg
ring-gold_2.jpg
ring-gold-3.jpg
```

In the variant metafield attach **one “anchor” file** from the series (for example, `ring-gold.jpg`). The rest will be picked up automatically by the stem.

### Step 3. Inserts in `_product-media-gallery.liquid`

Below is **exactly** what we added/changed, and why.

#### 3.1. JSON map variant → files (server → front)

**Insert before** `{%- if has_image_drop -%}`:

```
{%- comment -%} Map variant.id -> image basenames from metafield custom.variant_gallery {%- endcomment -%}
{%- liquid
  assign prod = product | default: selected_product
-%}
<script id="variant-galleries-json" type="application/json">
{
{%- for v in prod.variants -%}
  "{{ v.id }}": [
    {%- liquid
      assign mf_raw = v.metafields['custom']['variant_gallery']
      assign files = mf_raw.value | default: mf_raw | default: v.metafields.custom.variant_gallery
    -%}
    {%- if files != blank -%}
      {%- for f in files -%}
        {%- assign base = f | file_url | split:'?' | first | split:'/' | last | downcase -%}
        "{{ base }}"{% unless forloop.last %},{% endunless %}
      {%- endfor -%}
    {%- endif -%}
  ]{% unless forloop.last %},{% endunless %}
{%- endfor -%}
}
</script>
```

**Why:** the front receives ready JSON without parsing the DOM. We immediately normalize URLs to the **base file name**.

#### 3.2. Flags on `<media-gallery>`

In the tag attributes, **next to** `data-presentation` and `style`, add:

```
data-initial-variant-id="{{ selected_product.selected_or_first_available_variant.id }}"
data-vg-ready="0"
```

* `data-vg-ready="0"` — anti-flicker: while the script is running, images are hidden (CSS below).
* `data-initial-variant-id` — **optional**, for debugging/analytics; the script itself takes the variant id from the form.

{% hint style="info" %}
If you want things maximally “clean”, you can **remove** `data-initial-variant-id`. Functionality won’t change.
{% endhint %}

#### 3.3. `vg_list` for the first render

**Right after** `{{ block.shopify_attributes }}`:

```
{%- liquid
  assign v = selected_product.selected_or_first_available_variant
  assign mf_raw = v.metafields['custom']['variant_gallery']
  assign vg_list = mf_raw.value | default: mf_raw | default: v.metafields.custom.variant_gallery
-%}
```

**Why:** we need to know the current variant’s file list on the server in order to **pre-hide** extra images even before JS runs (correct first frame).

#### 3.4. Server-side pre-hide in slides (Carousel)

**Before you compute `class/style/attributes`** for each media:

```
{% assign prehide = false %}
{% if vg_list != blank and media.media_type == 'image' %}
  {% assign media_base = media.preview_image.src | split:'?' | first | split:'/' | last | downcase %}
  {% assign media_stem = media_base | split:'.' | first %}

  {% assign allowed = false %}
  {% for f in vg_list %}
    {% assign f_base = f | file_url | split:'?' | first | split:'/' | last | downcase %}
    {% assign f_stem = f_base | split:'.' | first %}
    {% assign prefix = media_stem | slice: 0, f_stem.size %}
    {% assign next   = media_stem | slice: f_stem.size, 1 %}
    {% if prefix == f_stem %}
      {% if next == '' or next == '_' or next == '-' %}
        {% assign allowed = true %}
        {% break %}
      {% endif %}
    {% endif %}
  {% endfor %}

  {% unless allowed %}
    {% assign prehide = true %}
  {% endunless %}
{% endif %}
```

Then **add** `vg-prehide` and `display:none`:

```
{% capture class %}
  {{ product_media_container_class }} product-media-container--{{ media.media_type }}{% if block.settings.zoom %} product-media-container--zoomable{% endif %}{% if forloop.index0 == lowest_aspect_ratio_index and block.settings.aspect_ratio == 'adapt' %} product-media-container--tallest{% endif %}{% if prehide %} vg-prehide{% endif %}
{% endcapture %}
{% if block_settings.aspect_ratio == 'adapt' %}
  {% capture style %}
    --media-preview-ratio: {{ media.preview_image.aspect_ratio | default: 1.0 }};{% if prehide %} display:none;{% endif %}
  {% endcapture %}
{% else %}
  {% capture style %}{% if prehide %}display:none;{% endif %}{% endcapture %}
{% endif %}
```

#### 3.5. Unified set of data attributes on each slide

**Before the block with `attributes`**:

```
{%- capture common_data_attrs -%}
  data-media-type="{{ media.media_type }}"
  {%- if media.media_type == 'image' -%}
    data-media-url="{{ media.preview_image.src }}"
    {%- if vg_list != blank -%}
      {%- if prehide -%}
        data-vg-prehide="1"
      {%- else -%}
        data-vg-allow="1"
      {%- endif -%}
    {%- else -%}
      data-vg-allow="1"
    {%- endif -%}
  {%- endif -%}
{%- endcapture -%}
```

And **replace** the `attributes` block with options that inject `{{- common_data_attrs -}}` (for `model` / `image` / “no zoom”).

**Before:**

```
{% if block_settings.zoom and media.media_type == 'model' %}
  {%- capture attributes -%}"{% if settings.transition_to_main_product and forloop.first %} data-view-transition-type="product-image-transition"{% endif %}{% endcapture -%}
    {% elsif block_settings.zoom %}
  {%- capture attributes -%}on:click="#zoom-dialog-{{ block.id }}/open/{{ forloop.index0 }}"{% if settings.transition_to_main_product and forloop.first %} data-view-transition-type="product-image-transition"{% endif %}{% endcapture -%}
{% endif %}
```

**After:**

```
{%- if block_settings.zoom and media.media_type == 'model' -%}
  {%- capture attributes -%}
    {{- common_data_attrs -}}
    {% if settings.transition_to_main_product and forloop.first %} data-view-transition-type="product-image-transition"{% endif %}
  {%- endcapture -%}
{%- elsif block_settings.zoom -%}
  {%- capture attributes -%}
    {{- common_data_attrs -}}
    on:click="#zoom-dialog-{{ block.id }}/open/{{ forloop.index0 }}"
    {% if settings.transition_to_main_product and forloop.first %} data-view-transition-type="product-image-transition"{% endif %}
  {%- endcapture -%}
{%- else -%}
  {%- capture attributes -%}
    {{- common_data_attrs -}}
    {% if settings.transition_to_main_product and forloop.first %} data-view-transition-type="product-image-transition"{% endif %}
  {%- endcapture -%}
{%- endif -%}
```

**Why:** the front needs the image **type** and **URL**. `data-vg-allow`/`data-vg-prehide` help CSS before JS initializes.

#### 3.6. Same logic — for the Grid

Inside `<ul class="media-gallery__grid">` before each `<li>` repeat the `prehide` logic:

```
{% assign prehide = false %}
{% if vg_list != blank and media.media_type == 'image' %}
  {% assign media_base = media.preview_image.src | split:'?' | first | split:'/' | last | downcase %}
  {% assign media_stem = media_base | split:'.' | first %}

  {% assign allowed = false %}
  {% for f in vg_list %}
    {% assign f_base = f | file_url | split:'?' | first | split:'/' | last | downcase %}
    {% assign f_stem = f_base | split:'.' | first %}
    {% assign prefix = media_stem | slice: 0, f_stem.size %}
    {% assign next   = media_stem | slice: f_stem.size, 1 %}
    {% if prefix == f_stem %}
      {% if next == '' or next == '_' or next == '-' %}
        {% assign allowed = true %}
        {% break %}
      {% endif %}
    {% endif %}
  {% endfor %}

  {% unless allowed %}
    {% assign prehide = true %}
  {% endunless %}
{% endif %}
```

And in the Grid `<li>` replace `class=""` and `style=""` with:

```
class="{{ product_media_container_class }} product-media-container--{{ media.media_type }}{% if prehide %} vg-prehide{% endif %}"
style="{% if block_settings.aspect_ratio == 'adapt' %} --media-preview-ratio: {{ media.preview_image.aspect_ratio | default: 1.0 }};{% endif %}{% if prehide %} display:none;{% endif %}"
```

Add data attributes:

```
{% if settings.transition_to_main_product and forloop.first %}
  data-view-transition-type="product-image-transition"
{% endif %}
  data-media-type="{{ media.media_type }}"
  {% if media.media_type == 'image' %}
    data-media-url="{{ media.preview_image.src }}"
    {% if vg_list != blank %}
      {% if prehide %}
        data-vg-prehide="1"
      {% else %}
        data-vg-allow="1"
      {% endif %}
    {% else %}
      data-vg-allow="1"
    {% endif %}
  {% endif %}
```

#### 3.7. Filtering **inside the zoom dialog** (Liquid)

**Zoom thumbnails (1)**

Inside the thumbnails block (buttons `.dialog-thumbnails-list__thumbnail`) add pre-hide logic, like we did for slides/grid:

```
{% assign prehide = false %}
{% if vg_list != blank and media.media_type == 'image' %}
  {% assign media_base = media.preview_image.src | split:'?' | first | split:'/' | last | downcase %}
  {% assign media_stem = media_base | split:'.' | first %}

  {% assign allowed = false %}
  {% for f in vg_list %}
    {% assign f_base = f | file_url | split:'?' | first | split:'/' | last | downcase %}
    {% assign f_stem = f_base | split:'.' | first %}
    {% assign prefix = media_stem | slice: 0, f_stem.size %}
    {% assign next   = media_stem | slice: f_stem.size, 1 %}
    {% if prefix == f_stem %}
      {% if next == '' or next == '_' or next == '-' %}
        {% assign allowed = true %}
        {% break %}
      {% endif %}
    {% endif %}
  {% endfor %}

  {% unless allowed %}
    {% assign prehide = true %}
  {% endunless %}
{% endif %}
```

In the `<button>` replace `class=""` and `style=""`:

```
class="button button-unstyled dialog-thumbnails-list__thumbnail{% if prehide %} vg-prehide{% endif %}"
style="--aspect-ratio: {{ aspect_ratio }}; --gallery-aspect-ratio: {{ aspect_ratio }};{% if prehide %} display:none;{% endif %}"
```

And add attributes:

```
data-media-type="{{ media.media_type }}"
{% if media.media_type == 'image' %}
  data-media-url="{{ media.preview_image.src }}"
  {% if vg_list != blank %}
    {% if prehide %}
      data-vg-prehide="1"
    {% else %}
      data-vg-allow="1"
    {% endif %}
  {% else %}
    data-vg-allow="1"
  {% endif %}
{% endif %}
```

**Large zoomed frames (2)**

For `<li>` inside `.dialog-zoomed-gallery` apply the same `prehide` check and the same data attributes.

Insert the check before `<li>`:

```
{% assign prehide = false %}
{% if vg_list != blank and media.media_type == 'image' %}
  {% assign media_base = media.preview_image.src | split:'?' | first | split:'/' | last | downcase %}
  {% assign media_stem = media_base | split:'.' | first %}

  {% assign allowed = false %}
  {% for f in vg_list %}
    {% assign f_base = f | file_url | split:'?' | first | split:'/' | last | downcase %}
    {% assign f_stem = f_base | split:'.' | first %}
    {% assign prefix = media_stem | slice: 0, f_stem.size %}
    {% assign next   = media_stem | slice: f_stem.size, 1 %}
    {% if prefix == f_stem %}
      {% if next == '' or next == '_' or next == '-' %}
        {% assign allowed = true %}
        {% break %}
      {% endif %}
    {% endif %}
  {% endfor %}

  {% unless allowed %}
    {% assign prehide = true %}
  {% endunless %}
{% endif %}
```

Replace `class=""` and `style=""` in `<li>`:

```
class="{{ product_media_container_class }} product-media-container--{{ media.media_type }}{% if media.media_type == 'image' %} product-media-container--zoomable{% endif %}{% if prehide %} vg-prehide{% endif %}"
style="{% if block_settings.aspect_ratio == 'adapt' %} --media-preview-ratio: {{ media.preview_image.aspect_ratio | default: 1.0 }};{% endif %}{% if prehide %} display:none;{% endif %}"
```

And add attributes:

```
data-media-type="{{ media.media_type }}"
{% if media.media_type == 'image' %}
  data-media-url="{{ media.preview_image.src }}"
  {% if vg_list != blank %}
    {% if prehide %}
      data-vg-prehide="1"
    {% else %}
      data-vg-allow="1"
    {% endif %}
  {% else %}
    data-vg-allow="1"
  {% endif %}
{% endif %}
```

Same idea: we ensure a “clean” first frame in zoom even before JS runs.

#### 3.8. Client script and mini CSS (after `</media-gallery>`)

**Script:**

```
<script>
(() => {
  // ---------- helpers ----------
  const stripSize = s =>
    (s || '').replace(
      /_(?:\d+x\d+|\d+x|x\d+|pico|icon|thumb|small|compact|medium|large|grande|master)(?=\.)/gi,
      ''
    );
  const canon = (u) => {
    try { const x = new URL(u, location.href); return stripSize((x.pathname.split('/').pop() || '')).toLowerCase(); }
    catch { return stripSize(String(u).split('?')[0].split('/').pop() || '').toLowerCase(); }
  };
  const stem = (s) => canon(s).replace(/\.[a-z0-9]+$/i, '');
  const pickUrl = (el) =>
    el.getAttribute('data-media-url') ||
    el.querySelector('img')?.currentSrc ||
    el.querySelector('img')?.getAttribute('src') || '';

  // ---------- scope ----------
  const THIS = document.currentScript;
  const galleryEl = () =>
    (THIS?.previousElementSibling?.tagName === 'MEDIA-GALLERY'
      ? THIS.previousElementSibling
      : document.querySelector('media-gallery'));

  // NEW: detect we are inside the quick add modal and on a mobile viewport
  const inQuickAdd = () => !!galleryEl()?.closest('#quick-add-modal-content, .quick-add-modal__content');
  const isMobile = () => window.matchMedia('(max-width: 749px)').matches;

  const getVariantId = () =>
    document.querySelector('form[action*="/cart/add"] [name="id"]')?.value ||
    document.querySelector('input[name="id"]')?.value ||
    document.querySelector('select[name="id"]')?.value || null;

  // ---------- read metafield map ----------
  let MAP = {};
  try { const el = document.getElementById('variant-galleries-json'); if (el) MAP = JSON.parse(el.textContent || '{}'); } catch {}
  const HAS_VG = Object.values(MAP).some((a) => Array.isArray(a) && a.length > 0);
  if (!HAS_VG) { galleryEl()?.setAttribute('data-vg-ready', '1'); return; }

  // ---------- accessors ----------
  const zoomRoot   = () => galleryEl()?.parentElement?.querySelector('zoom-dialog') || null;
  const slidesMain = () => Array.from(galleryEl()?.querySelectorAll(':scope > *:not(zoom-dialog) [data-media-type="image"]') || []);
  const slidesAll  = () => Array.from(galleryEl()?.querySelectorAll(':scope > *:not(zoom-dialog) [data-media-type]') || []);
  const dotsAll    = () => Array.from(galleryEl()?.querySelectorAll('slideshow-controls [ref="dots[]"]') || []);
  const slidesZoom = () => Array.from(zoomRoot()?.querySelectorAll('.dialog-zoomed-gallery [data-media-type="image"]') || []);
  const thumbsZoom = () => Array.from(zoomRoot()?.querySelectorAll('.dialog-thumbnails-list__thumbnail[data-media-type="image"]') || []);
  const allowStemsFor = (vid) => (MAP?.[String(vid)] || []).map(stem);

  // ---------- filtering ----------
  const applyList = (els, allow) => {
    const useFilter = allow.length > 0;
    let shown = 0;
    const limitToOne = inQuickAdd() && isMobile(); // In quick add (mobile), keep only the first image

    els.forEach((el) => {
      const base = stem(pickUrl(el));
      let show = !useFilter || (base && allow.some(a => base === a || base.startsWith(a + '_') || base.startsWith(a + '-')));
      if (show && limitToOne) { shown += 1; if (shown > 1) show = false; }
      el.toggleAttribute('data-vg-hidden', !show);
      el.style.display = show ? '' : 'none';
    });
  };

  const applyDots = (allow) => {
    // In quick add on mobile, hide dots entirely
    if (inQuickAdd() && isMobile()) {
      galleryEl()?.querySelectorAll('slideshow-controls').forEach(sc => sc.style.display = 'none');
      return;
    }
    const useFilter = allow.length > 0;
    const slides = slidesAll();
    const dots = dotsAll();
    if (!slides.length || !dots.length) return;

    dots.forEach((dotBtn, i) => {
      const slide = slides[i];
      if (!slide) return;
      const type = slide.getAttribute('data-media-type');
      let show = true;
      if (type === 'image') {
        const base = stem(pickUrl(slide));
        show = !useFilter || (base && allow.some(a => base === a || base.startsWith(a + '_') || base.startsWith(a + '-')));
      }
      dotBtn.toggleAttribute('data-vg-hidden', !show);
      (dotBtn.closest('li') || dotBtn).style.display = show ? '' : 'none';
    });

    const dotsNow = dotsAll();
    const current = dotsNow.find(d => d.getAttribute('aria-selected') === 'true');
    if (current && current.hasAttribute('data-vg-hidden')) {
      const firstVisible = dotsNow.find(d => !d.hasAttribute('data-vg-hidden'));
      if (firstVisible) firstVisible.click();
    }
  };

  const apply = (variantId) => {
    const allow = allowStemsFor(variantId);
    applyList(slidesMain(), allow);
    applyList(slidesZoom(), allow);
    applyList(thumbsZoom(), allow);
    applyDots(allow);
    galleryEl()?.setAttribute('data-vg-ready', '1');
    galleryEl()?.dispatchEvent(new CustomEvent('variantMediaFiltered', { bubbles: true, detail: { variantId } }));
  };

  // ---------- bindings ----------
  const onVariantChange = () => apply(String(getVariantId() || ''));
  ['change','input'].forEach(t => document.addEventListener(t, (e) => { if (e.target?.name === 'id') onVariantChange(); }, { capture:true, passive:true }));
  ['selectVariant','variant:change','variant:changed'].forEach(evt => document.addEventListener(evt, (ev) => { if (ev?.detail?.variant?.id) onVariantChange(); }, { passive:true }));
  new MutationObserver(() => onVariantChange()).observe(document.body, { childList:true, subtree:true });

  // ---------- init ----------
  const init = () => { galleryEl()?.setAttribute('data-vg-ready', '0'); onVariantChange(); };
  if (document.readyState !== 'loading') init(); else document.addEventListener('DOMContentLoaded', init, { once:true });
})();
</script>
```

* reads `#variant-galleries-json`;
* if the product has **no** variants with the metafield → sets `data-vg-ready="1"` and **exits** (changes nothing);
* otherwise filters `image` slides by the current variant; on variant change — repeats;
* at the end sets `data-vg-ready="1"` (anti-flicker off).

**CSS:**

```
<style>
  media-gallery [data-media-type="image"] * { transition:none!important; animation:none!important; }
  media-gallery:not([data-vg-ready="1"]) [data-media-type="image"] { display:none!important; }
  media-gallery:not([data-vg-ready="1"]) [data-media-type="image"][data-vg-allow="1"] { display:flex!important; }
  [data-vg-hidden], [data-vg-prehide] { display:none!important; }
  media-gallery:not([data-vg-ready="1"]) slideshow-controls .slideshow-controls__dots { display: none !important; }
</style>

<style>
  /* QUICK ADD (mobile): keep only the first allowed image before JS initialization */
  @media (max-width: 749px) {
    #quick-add-modal-content media-gallery:not([data-vg-ready="1"]) [data-media-type="image"][data-vg-allow="1"] ~ [data-media-type="image"][data-vg-allow="1"],
    .quick-add-modal__content  media-gallery:not([data-vg-ready="1"]) [data-media-type="image"][data-vg-allow="1"] ~ [data-media-type="image"][data-vg-allow="1"] {
      display: none !important;
    }
    /* also hide navigation controls in the modal */
    #quick-add-modal-content slideshow-controls,
    .quick-add-modal__content  slideshow-controls {
      display: none !important;
    }
  }
</style>
```

**Why:** completely removes “jitter/flicker” and intermediate states before everything is ready. We **don’t touch**thumbnails/arrows — in the “clean” version of this script we don’t even hide them.

**Why this is needed:**

* while `data-vg-ready="0"` is set, the modal doesn’t “flash” with a set of images;
* JS additionally guarantees that even after switching variants in the modal there will be **exactly one** image.

### What we deliberately **don’t touch** (remains “as in the theme”)

We’ll do this in future script versions:

* **Counter / arrows / thumbnails** of the carousel — we don’t configure or hide them with separate rules.

### Small audit of “extra stuff”

* `data-initial-variant-id` — **optional**, can be removed (won’t break the script).
* `MutationObserver` is currently attached to `document.body` for robustness with dynamic re-renders. You can narrow it to only watch `<media-gallery>`, but the current option is more reliable across themes/scripts.
* The duplicated logic “server-side pre-hide” + “client-side filter” is **intentional**: it gives an **ideal first frame** (no junk) and correct behavior on further switches. This is not redundant; it’s an anti-FOUC layer.

### Result

If a variant has the `Variant Gallery` metafield filled in, only its images are shown on the page (by file name). If there is no metafield — everything works as before. The first frame is clean and without flickering (server pre-hide), and when switching variants the gallery is updated by the script. No apps, conflicts, or slowdowns.

### Theme settings

The **Product media (Grid + Hint)** and **Grid + Dots** modes are supported. The “single image in Mobile quick add” behavior is enabled **only** inside the modal on screens ≤ 749 px; on the product page and on desktop you still have the full variant-based gallery.

<figure><img src="https://755362860-files.gitbook.io/~/files/v0/b/gitbook-x-prod.appspot.com/o/spaces%2Fxa9ueiMPkj0LsrVay0aB%2Fuploads%2F9E9WUonEX4olXmbd4GxT%2Fvecomlab-multiple-variant-images-2.png?alt=media&amp;token=9a82d54b-320c-4a3a-b096-5b3c545ee856" alt="" width="342"><figcaption></figcaption></figure>

### FAQ

<details>

<summary>What exactly do I need to configure in the admin?</summary>

Only one thing: create a variant metafield `custom.variant_gallery` of type **File → List of files** (Images only) and enable Storefront API access. Everything else is inserts into a single template, `_product-media-gallery.liquid`.

</details>

<details>

<summary>How many files should I attach to the variant metafield?</summary>

**One anchor** file from the series is enough. The rest will be picked up automatically by the name (by the “stem”) if they are called `stem.jpg`, `stem_2.jpg`, `stem-3.jpg`, etc.

</details>

<details>

<summary>How exactly should the file be named?</summary>

All photos of one modification should share a common **stem** (base of the file name):\
`ring-gold.jpg`, `ring-gold_2.jpg`, `ring-gold-3.jpg`.\
Matching goes by exact stem or stem with `_` / `-` suffix. Case and Shopify sizes (`_800x`) don’t matter — the script strips them.

</details>

<details>

<summary>What if the variant metafield is empty?</summary>

Then **all** product images are shown for that variant (as in the original theme). The logic only kicks in if at least one attached image is found for the variant.

</details>

<details>

<summary>What happens if none of the variants has the metafield?</summary>

The script detects this, **does nothing**, and immediately sets `data-vg-ready="1"`. The gallery works exactly as in the theme, with no extra work or performance impact.

</details>

<details>

<summary>Will images “flicker” on load or when switching variants?</summary>

No. We used a double protection:

* on the Liquid side — pre-hiding extra images for the first frame;
* on the JS side — filtering on variant switches + the `data-vg-ready` flag with mini CSS to avoid intermediate states on screen.

</details>

<details>

<summary>In the zoom dialog all photos are shown. Is that intentional?</summary>

**No, now zoom is also filtered.** Both thumbnails and large images in the dialog show only the current variant’s images (by the same stem rule). The first frame is clean thanks to Liquid pre-hide; then JS takes over.

</details>

<details>

<summary>Why didn’t you touch the carousel counter, arrows, thumbnails?</summary>

To keep the solution as compatible and minimally “invasive” as possible. We didn’t interfere with navigation elements, except for Dots — those can be customized later when there’s a specific need.

</details>

<details>

<summary>Does this work in both Grid and Carousel modes?</summary>

Yes. The pre-hide logic and data attributes are applied both to carousel slides and to grid `<li>` items.

</details>

<details>

<summary>In what cases might the script “not see” the variant id?</summary>

If the theme/app renders the variant form in a non-standard way. The script looks for `name="id"` in the add-to-cart form. If that field is renamed or missing, update the selector in `getVariantId()` or dispatch a custom `selectVariant`/`variant:change` event with `detail.variant.id`.

</details>

<details>

<summary>I have a “quick view” / product modal — will this work there?</summary>

Usually yes, because the script uses a `MutationObserver` on `document.body` and reapplies the filter. If the modal loads content dynamically, make sure the `#variant-galleries-json` block ends up inside its DOM.

</details>

<details>

<summary>What about performance?</summary>

* The JSON block is built once on the server;
* JS only walks visible gallery elements and uses simple string checks;
* If there are no metafields — the script effectively “turns off”.\
  There’s no overhead on pages without metafields.

</details>

<details>

<summary>Will SEO/alt texts/structured data be affected?</summary>

We **don’t remove** elements, we only add `display:none` to the initial state and toggle visibility. Alt texts and schema.org generated by the theme stay intact. The set of images in the DOM remains the same; some are just hidden when the variant is different.

</details>

<details>

<summary>Do I need to change the media order in the product itself?</summary>

Not necessarily. But for better UX, the “anchor” photo of each variant (that stem) should ideally sit near its series, so pre-hide and the first frame look visually logical.

</details>

<details>

<summary>What if different variants accidentally get the same stem?</summary>

Then both series will be considered “suitable” for both variants. Keep the naming strict (different stems for different variants) to avoid overlap.

</details>

<details>

<summary>Can I use spaces/Unicode in file names?</summary>

You can, but it’s better to avoid it. Shopify gives you a URL, and the script uses the base name from the URL. Recommendation: Latin letters, hyphens, and underscores.

</details>

<details>

<summary>What about videos and 3D models?</summary>

Filtering is applied only to `media_type="image"`. Videos/models stay as in the theme. If you want them to be variant-specific too, you can extend the matching logic using `data-media-type` and base names of posters/URLs.

</details>

<details>

<summary>What happens if I rename a file later in Files?</summary>

Matching is based on the **file name**. If you rename the “anchor” or the series, either update the “anchor” name in the metafield or revert the previous name — otherwise the series may be “detached” from the variant.

</details>

<details>

<summary>How do I roll back?</summary>

Remove the JSON block, the server inserts `vg_list`/`prehide`, the unified `common_data_attrs` block, the script, and the mini CSS. After that the theme returns to its original behavior.

</details>

<details>

<summary>Does this work across all languages/locales?</summary>

Yes. The logic does not depend on texts; only on attributes and file names.

</details>

<details>

<summary>Can this conflict with gallery apps?</summary>

If an app completely replaces the gallery markup, it probably ignores our data attributes. Then either disable the app on pages using this logic, or move the filtering into the app’s templates.

</details>

<details>

<summary>Is it safe to update the theme?</summary>

Major theme updates can overwrite `_product-media-gallery.liquid`. Keep git/Theme Download and run a **diff**: if Shopify changes the structure of this template, re-apply our inserts to the new version.

</details>

<details>

<summary>Can I attach all files in the series to the metafield instead of just the “anchor”?</summary>

You can, but there’s no need. The logic is built around **stems** so you don’t have to “poke” every file manually.

</details>

<details>

<summary>Can I remove the <code>data-initial-variant-id</code> attribute?</summary>

Yes. It’s optional and does not affect the filter.

</details>

<details>

<summary>What if there are multiple products on the page (recommended panel, custom sections, etc.)?</summary>

In its current form the script looks for the closest `<media-gallery>` next to itself. Place it **inside** the relevant product block. If you have several galleries on one page, add unique containers/initializations so that each script instance sits right after its own `<media-gallery>`.

</details>

<details>

<summary>Why is there only one photo in the quick add modal?</summary>

That’s by design: on mobile quick add you don’t want to overload the screen — we show the current variant’s featured image. On the PDP the full series remains.

</details>

<details>

<summary>What if a variant has no <code>Variant Gallery</code>?</summary>

Then it works like in the theme: all product images are shown; in the mobile quick add modal only the first (featured) one is shown, as in Horizon by default.

</details>


# Splitting product variants on collection pages

{% hint style="info" %}
This page is being updated. Want to be notified when it’s ready?

<a href="https://vecomlab.com/pages/sign-up-for-newsletter" class="button primary" data-icon="envelope">Join our newsletter</a>
{% endhint %}


# Setting Up Octo Browser for Safe Work with Facebook and Shopify

Step-by-step guide to setting up Octo Browser for safe work with Facebook, Instagram, and Shopify — without multi-accounting or account bans.

<figure><img src="https://755362860-files.gitbook.io/~/files/v0/b/gitbook-x-prod.appspot.com/o/spaces%2Fxa9ueiMPkj0LsrVay0aB%2Fuploads%2FX6woZPqhDojVQGo3KGrw%2Fvecomlab-octo-browser-1.jpg?alt=media&amp;token=a532b00e-6a9e-4928-a6dd-9ac6fcba13d5" alt=""><figcaption></figcaption></figure>

{% stepper %}
{% step %}

### Create an Account and Download Octo Browser

<a href="https://octobrowser.org/signup/?p=10301867" class="button primary" data-icon="octopus">Sign up</a>
{% endstep %}

{% step %}

### Purchase a Proxy from Proxy Seller

<a href="https://proxy-seller.com/" class="button primary" data-icon="link">Buy proxy</a>
{% endstep %}
{% endstepper %}

{% hint style="info" %}
Do not create profiles in Octo Browser until you have a proxy. An Octo Browser profile permanently remembers its environment. If you create a profile **without a proxy**, adding a proxy later will work worse.

First — proxy. Then — profiles.

Check your proxy using:

* <https://2ip.ru/whois/>
* <https://whoer.net/ru/checkwhois>
* [https://browserleaks.com](https://browserleaks.com/)
  {% endhint %}

### Important Before You Start

**Antidetect browsers may be considered a way to bypass platform rules**, especially when used for multi-accounting or misleading security systems. This may result in account restrictions or bans.

For this reason, in this guide Octo Browser is used exclusively to maintain geographic access consistency.

If you need Octo Browser **as a container for additional isolation**, not for multi-accounting, refer to the relevant instructions on this page.

### Guide Objective

To demonstrate a correct and safe configuration of **Octo Browser** for:

* stable access to **Facebook / Business Manager / Ads Manager**;
* working with **Instagram**;
* setting up **Shopify ↔ Meta integrations** (without abrupt environment changes that could trigger additional Facebook checks).

### What You’ll Need

* Installed and logged-in **Octo Browser**
* **One proxy** for the required geography (preferably ISP or residential)
* Access to **Facebook 2FA** (SMS / app / push notifications)

### Step 1. Adding a Proxy

1. In Octo Browser, open the **Proxies** tab
2. Add your proxy and run a check
3. Make sure the proxy:\
   \
   \- connects reliably;\
   \- matches the required country;\
   \- does not change between sessions.

{% hint style="info" %}
Recommendation: **one profile = one proxy**. Do not change the proxy after the first Facebook login.
{% endhint %}

### Step 2. Creating a Profile

1. Go to **Profiles → Create Profile**
2. In the **General** tab:\
   \
   \- **Profile name** — any name\
   \- **Proxy** — select the added proxy\
   \- Leave all other settings as default

### Step 3. Fingerprint (Critical Step)

In the **Fingerprint** tab, use only consistent and realistic values.

#### Base Parameters

* **Operating System:** macOS ARM
* **OS version:** version suggested by Octo
* **Screen Resolution:** standard Retina (e.g. `1440×900`)

{% hint style="info" %}
Do not use rare or exotic screen resolutions.
{% endhint %}

#### Geography and Language

* **Languages:** Based on IP
* **Timezone:** Based on IP
* **Geolocation:** Based on IP
* **WebRTC:** Based on IP

#### Hardware Parameters

* **CPU / RAM / Renderer:** Octo defaults (do not change)
* **Hardware Noise:** No

#### User Agent

* Use the **User Agent generated by Octo**
* Do not manually edit the UA unless absolutely necessary

{% hint style="info" %}
The main rule is **consistency between User Agent and operating system**, not having the “perfect” Chrome version.
{% endhint %}

### Step 4. Cookies, Security, and Extensions

* **Cookies:** no need to import anything
* **Security (password protection):** optional
* **Extensions:** add only if truly necessary

{% hint style="info" %}
The fewer unnecessary changes — the more stable the profile.
{% endhint %}

### Step 5. Create and Launch the Profile

* Click **Create Profile**
* Launch the profile using the **▶ Play** button

### Step 6. Check IP Before Logging into Facebook

Before logging in, open any IP check service (for example, BrowserLeaks).

Verify that:

* the IP matches the proxy;
* geolocation is correct;
* WebRTC does not reveal your real IP.

If something does not match — **do not log into Facebook** until the issue is fixed.

### Step 7. First Facebook Login

1. Open `facebook.com`
2. Change the page language if needed (e.g. to English)
3. Enter your login and password
4. Confirm login via **2FA**

This is a normal and expected step when logging in from a new environment.

### Step 8. Trust This Device

If Facebook asks:

{% hint style="info" %}
Trust this device?
{% endhint %}

It is recommended to click **Trust this device** if:

* the profile is used only by you;
* the proxy and environment will remain consistent.

This reduces the number of repeated security checks.

### Step 9. Verify Session Persistence

Close the Octo profile and open it again.

If Facebook opens **already logged in**, it means:

* cookies are saved correctly;
* the profile is stable;
* you can proceed with work.

### Where This Profile Can Be Used

* Facebook
* Facebook Business Manager
* Ads Manager
* Instagram
* Shopify (including Meta integrations)
* Installing extensions from the **Chrome Web Store** (inside the profile)

### Important Usage Rules

* ❌ do not change the proxy for the profile;
* ❌ do not edit the fingerprint after starting work;
* ❌ do not use the profile for multi-accounting;
* ✅ use the profile as a **stable working environment**.

### Frequently Asked Questions and Common Mistakes

<details>

<summary>Why use Octo Browser if I’m not violating any rules?</summary>

In this guide, Octo Browser is used **not to bypass restrictions**, but as an **environment container** to maintain:

* a stable IP,
* a consistent fingerprint,
* geographic access consistency.

This reduces the number of automated checks by Facebook when logging in from another country.

</details>

<details>

<summary>Can I use one Octo profile for Facebook, Instagram, and Shopify?</summary>

Yes.

This is a normal and expected scenario for a business owner:

* Facebook
* Instagram
* Business Manager / Ads Manager
* Shopify and Meta integrations

It is important that:

* there is **one profile**;
* there is **one stable proxy**;
* the fingerprint **does not change**.

</details>

<details>

<summary>Can I log into the same Facebook account from a regular browser?</summary>

**Not recommended**, especially during the first days after setup.

Parallel logins:

* from Octo,
* from a regular browser (different country),

may trigger additional checks or temporary restrictions.

</details>

<details>

<summary>Should I save the password in the browser?</summary>

No, not required.

This guide recommends:

* not saving the password in Chrome;
* relying on profile cookies and 2FA.

This approach is more stable for work accounts.

</details>

<details>

<summary>What if Facebook requests 2FA again?</summary>

This is **normal**, especially:

* on the first login,
* after a long break,
* after account security updates.

If:

* the IP hasn’t changed,
* the profile is the same,

— just confirm the login. This is **not a ban**.

</details>

<details>

<summary>Can I change the browser or Facebook language?</summary>

* **Before the first login** — yes.
* **After login** — **not recommended**.

Frequent language changes after login may look like an environment change.

</details>

<details>

<summary>Why does Chrome language reset after restarting the profile?</summary>

Octo Browser uses **Fingerprint → Languages (Based on IP)** as the priority source.

Settings in `chrome://settings/languages` may be overwritten — this is normal and not a bug.

</details>

<details>

<summary>Can I install extensions from the Chrome Web Store?</summary>

**Yes**, inside the Octo profile.

Recommendations:

* use only real, work-related extensions;
* do not install VPNs, proxy switchers, or anticaptcha tools.

The “cleaner” the profile — the more stable Facebook performance.

</details>

<details>

<summary>Do I need to log into Facebook every time after closing the profile?</summary>

**No**, if:

* cookies were not cleared,
* the proxy was not changed,
* the profile is the same.

If Facebook opens already logged in, it’s a sign of correct setup.

</details>

<details>

<summary>What is considered a mistake when using Octo Browser?</summary>

Most common mistakes:

* changing the proxy of an already used profile;
* manually editing the fingerprint after login;
* using one profile for multiple Facebook accounts;
* attempting to use antidetect browsers for multi-accounting.

</details>


# Overview

Creating a store, ads, and much more with VecomLab.

A step-by-step guide from VecomLab on creating and promoting a Shopify store.

<figure><img src="https://755362860-files.gitbook.io/~/files/v0/b/gitbook-x-prod.appspot.com/o/spaces%2Fxa9ueiMPkj0LsrVay0aB%2Fuploads%2FdjHjzxJ2lqxaDRCZPNJH%2Fvecom-lab-not-just-en.jpg?alt=media&amp;token=072a5853-4dfb-4eaf-a4f9-aa7d50cd2d63" alt="VecomLab"><figcaption></figcaption></figure>
But we'll help make it easy...

{% hint style="info" %}
You should complete the tasks carefully and in sequence, keeping in mind that all the videos are interconnected. The information is provided free of charge in a step-by-step format, with a detailed action plan necessary for properly setting up your store and advertising campaigns.
{% endhint %}

<table data-view="cards"><thead><tr><th></th><th></th><th data-hidden data-card-cover data-type="files"></th><th data-hidden data-card-target data-type="content-ref"></th></tr></thead><tbody><tr><td><strong>Business Registration</strong></td><td>Methods of company registration.</td><td><a href="https://content.gitbook.com/content/xa9ueiMPkj0LsrVay0aB/blobs/IC1vqNOXfXTVFCOrPSrl/vecom-lab-docs-gradient-business-registration.jpg">vecom-lab-docs-gradient-business-registration.jpg</a></td><td><a href="/ecom-foundations/business-registration">Business Registration</a></td></tr><tr><td><strong>Account Opening</strong></td><td>Options for opening an account.</td><td><a href="https://content.gitbook.com/content/xa9ueiMPkj0LsrVay0aB/blobs/NyTIEv7YRqPXYt9amezf/vecom-lab-docs-gradient-account-opening.jpg">vecom-lab-docs-gradient-account-opening.jpg</a></td><td><a href="/ecom-foundations/account-opening">Account Opening</a></td></tr><tr><td><strong>Product Selection</strong></td><td>Find the bestseller: a profitable product, selection criteria, and search method.</td><td><a href="https://content.gitbook.com/content/xa9ueiMPkj0LsrVay0aB/blobs/KtTfzG0iEyKcLgiBKAF7/vecom-lab-docs-gradient-product-selection.jpg">vecom-lab-docs-gradient-product-selection.jpg</a></td><td><a href="/ecom-foundations/product-selection">Product Selection</a></td></tr><tr><td><strong>Workspace</strong></td><td>Learn the secret to effective task management with Trello and Google Drive.</td><td><a href="https://content.gitbook.com/content/xa9ueiMPkj0LsrVay0aB/blobs/XYaU637ffAk4UYg7Bz8M/vecom-lab-docs-gradient-workspace.jpg">vecom-lab-docs-gradient-workspace.jpg</a></td><td><a href="/ecom-foundations/workspace">Workspace</a></td></tr><tr><td><strong>Store Creation</strong></td><td>Launch your store on Shopify: setup and readiness for sales.</td><td><a href="https://content.gitbook.com/content/xa9ueiMPkj0LsrVay0aB/blobs/BbI2SLJMmi56d3CGnroY/vecom-lab-docs-gradient-store-creation.jpg">vecom-lab-docs-gradient-store-creation.jpg</a></td><td><a href="/ecom-foundations/store-creation">Store Creation</a></td></tr><tr><td><strong>Social Media</strong></td><td>Create attractive social media profiles: unique and engaging.</td><td><a href="https://content.gitbook.com/content/xa9ueiMPkj0LsrVay0aB/blobs/qtlwazMHkVFoASrEZPCV/vecom-lab-docs-gradient-social-media.jpg">vecom-lab-docs-gradient-social-media.jpg</a></td><td><a href="/ecom-foundations/social-media">Social Media</a></td></tr><tr><td><strong>Ad Account</strong></td><td>Set up Meta Business Suite, the pixel, and the Ads Manager.</td><td><a href="https://content.gitbook.com/content/xa9ueiMPkj0LsrVay0aB/blobs/NuZeb4N0Ac3rkHI1vmjN/vecom-lab-docs-gradient-ad-account.jpg">vecom-lab-docs-gradient-ad-account.jpg</a></td><td><a href="/ecom-foundations/ad-account">Ad Account</a></td></tr><tr><td><strong>Apps</strong></td><td>Install apps that will increase your store's conversion rate.</td><td><a href="https://content.gitbook.com/content/xa9ueiMPkj0LsrVay0aB/blobs/FEgDy5wSU4Gq9mgRiOAA/vecom-lab-docs-gradient-apps.jpg">vecom-lab-docs-gradient-apps.jpg</a></td><td><a href="/ecom-foundations/apps">Apps</a></td></tr><tr><td><strong>Ads Strategy</strong></td><td>Achieve success on Facebook: an effective strategy.</td><td><a href="https://content.gitbook.com/content/xa9ueiMPkj0LsrVay0aB/blobs/bZ90dNTPgJ96ZxDjReeK/vecom-lab-docs-gradient-ad-strategy.jpg">vecom-lab-docs-gradient-ad-strategy.jpg</a></td><td><a href="/ecom-foundations/ad-strategy">Ads Strategy</a></td></tr><tr><td><strong>Business Management</strong></td><td>Set up the backend: ready-made spreadsheets and documents for accounting.</td><td><a href="https://content.gitbook.com/content/xa9ueiMPkj0LsrVay0aB/blobs/YoWqykbrJsjzdzdBQxsp/vecom-lab-docs-gradient-business-management.jpg">vecom-lab-docs-gradient-business-management.jpg</a></td><td><a href="/ecom-foundations/business-management">Business Management</a></td></tr><tr><td><strong>Customer Service</strong></td><td>Communicate with customers: response templates and order tracking.</td><td><a href="https://content.gitbook.com/content/xa9ueiMPkj0LsrVay0aB/blobs/RLUvhlYA3ru4j8qNZbIT/vecom-lab-docs-gradient-customer-service.jpg">vecom-lab-docs-gradient-customer-service.jpg</a></td><td><a href="/ecom-foundations/customer-service">Customer Service</a></td></tr></tbody></table>


# Quickstart

Starting a business on Shopify. Fast dropshipping, a complete guide, effective strategy, and Facebook advertising.

A complete step-by-step guide to creating an online store on the Shopify platform.

### Store examples <a href="#store-examples" id="store-examples"></a>

Two ready-made stores, created using this guide, are available for viewing at any time:

* [birdiekitty.myshopify.com](https://birdiekitty.myshopify.com/)
* [organkitty.myshopify.com](https://organkitty.myshopify.com)

{% hint style="info" %}
Password for viewing: **volkovecom**
{% endhint %}

### Benefit for you <a href="#your-benefits" id="your-benefits"></a>

The guide is based on real experience working with active online stores, which makes it valuable for specialists of all levels.

### Where to start <a href="#where-to-start" id="where-to-start"></a>

Before following the step-by-step guide, it's important to address key legal and financial issues:

* **Company Registration** — [Information](https://vecomlab.com/blogs/all/company-registration-uk)
* **Opening a Wise Bank Account** — [Guide](https://vecomlab.com/blogs/all/open-business-wise)

These steps will help you safely grow your business and complete the Facebook Business Manager verification. For verification, a registered company in your name is required (recommended).

* **Facebook Business Manager Verification** — [Guide](https://vecomlab.com/blogs/all/create-verify-business-manager-facebook)

### Your opportunities <a href="#your-opportunities" id="your-opportunities"></a>

* Sell any product or service on Shopify worldwide.
* Adapt the guide for use with WooCommerce.


# Dropshipping

What is dropshipping, how it works, and who it’s for. Discover the world of Shopify. For beginners and pros alike. A step towards a successful online business with VecomLab!

Dropshipping is a business model that allows you to sell products worldwide without holding inventory. No warehouses, no stock management. After a product is ordered from your store, you pay the supplier, who then ships the item directly to the customer. Today, dropshipping is a highly profitable e-commerce model with minimal expenses.

### How it works <a href="#how-it-works" id="how-it-works"></a>

* The customer places an order and immediately pays for it on your Shopify store;
* You forward the order with the customer’s details to a supplier on Aliexpress and pay for the product;
* The supplier ships the order to your customer’s address;
* Your customer receives the package, and you earn your profit.

### What is Shopify <a href="#what-is-shopify" id="what-is-shopify"></a>

Shopify is a leading e-commerce platform that simplifies the creation of online stores. It’s easy to use, making it ideal for beginners without experience or large investments.

Dropshipping is an optimal business model with minimal investment, and Shopify is the perfect platform for implementing it. A great combination!

### Skills <a href="#skills" id="skills"></a>

* Finding successful products;
* Creating high-conversion stores on the Shopify platform;
* Effectively launching profitable Facebook ads;
* Automating business processes.

### Who is it for <a href="#whom-it-suits" id="whom-it-suits"></a>

For you, if you are:

* A beginner entrepreneur;
* An entrepreneur on platforms like Amazon, eBay, Etsy;
* A specialist in Facebook, Google, TikTok advertising, and more;
* An online store owner.

Wishing you success in your dropshipping journey!


# Business Registration

Methods of company registration.

There are many ways to register a company for an e-commerce business.

### 1st Formations <a href="#company-1st-formations" id="company-1st-formations"></a>

Open company → <https://vecomlab.com/1st-formations>

The company Vecom Lab Limited was first registered through [1st Formations](https://vecomlab.com/1st-formations). The registration process was quick and cost-effective.

* **Company Registration** — [Information](https://vecomlab.com/blogs/all/company-registration-uk)

[1st Formations](https://vecomlab.com/1st-formations) will not help you [open a business bank account](/ecom-foundations/account-opening).


# Account Opening

Options for opening an account.

Now that you have a [company](/ecom-foundations/business-registration), you need to open a business bank account.

### Wise <a href="#wise" id="wise"></a>

Open account → <https://vecomlab.com/wise-for-business>

[Wise](https://vecomlab.com/wise-for-business) is a popular choice for opening a business account, but there are some nuances.

* **Opening a Wise Business Account** — [Guide](https://vecomlab.com/blogs/all/open-business-wise)


# Product Selection

Find the bestseller: a profitable product, selection criteria, and search method.


# Task #1: Product Research

A free strategy for finding trending products for your Shopify store. Research competitors on Facebook using MyAdFinder and AdSpy.

### Purpose <a href="#purpose" id="purpose"></a>

Find a successful product to sell → <https://vecomlab.com/adspy>

{% hint style="info" %}
**AdSpy** is the only **spy app** we actively use. That's why we're offering you a **free trial** and a **$50 discount on the first month**.

* Registration: <https://vecomlab.com/adspy>
* Promocode: VECOMLAB

<img src="https://content.gitbook.com/content/xa9ueiMPkj0LsrVay0aB/blobs/Al2KhSJxG2YMqaUb1eVO/vecom-lab-info-ru-product-search-adspy.jpg" alt="VecomLab AdSpy" data-size="original">
{% endhint %}

{% embed url="<https://youtu.be/JHsPiau1-Aw>" %}

The video tutorial provides a detailed explanation of the strategy for finding successful products for your Shopify store. You will learn about the free method that our team actively uses.

### Description <a href="#description" id="description"></a>

* What problem does the product solve
* Link to a successful competitor's website
* Link to the competitor's ad library on Facebook
* Link to the product on AliExpress
* Meeting the key criteria outlined below

### Documents <a href="#documents" id="documents"></a>

* [Table for product search](https://docs.google.com/spreadsheets/d/1Ios-Yew8_NzukCxpcc_0APp_kpR88spsWFOXsUEgcFk/edit?usp=sharing)

### Product selection criteria <a href="#criteria-for-choosing-a-product" id="criteria-for-choosing-a-product"></a>

* The product is **unique** (WOW)
* The product **solves a problem**
* The product is for a **wide audience**
* The product is in **high demand** (High sales volume on AliExpress)
* The product is of **low availability** (Not sold in traditional stores)
* The product is of **high quality** (Reliable supplier, photo/video content)
* The product **complies with Facebook advertising policies**
* The product has **successful competitors** with online stores on the Shopify platform
* The product has **high margin** or **markup** - **(MarkUp) from 250% to 300%**. The **Product Cost** on AliExpress is **from $5 to $10**. Additionally, the possible **Price Range** on the website is **from $25 to $30**
* **We like** the product
* There is **content** (video, images)

### Where and how to find a winning product? <a href="#product-search" id="product-search"></a>

* Facebook [Ad Library](https://web.facebook.com/ads/library/?active_status=all\&ad_type=all\&country=RU)

### Method #1: MY AD FINDER <a href="#method-1-my-a-d-finder" id="method-1-my-a-d-finder"></a>

1. Install the [Google Chrome Extension "MY AD FINDER"](https://chrome.google.com/webstore/detail/my-ad-finder/jdelodjlpgkjenhcongcfdcocmjgjbci)
2. Set up [Ad Preferences](https://web.facebook.com/adpreferences/advertisers/)
3. Find and Analyze a **Winning Product on Facebook**
4. Find and Analyze a **Winning Product on AliExpress**

### Prompt for ChatGPT <a href="#promt-for-chatgpt" id="promt-for-chatgpt"></a>

To come up with a brand name.

> You sell '---'. Come up with 10 unique brand name ideas in English for an online store. No more than two words, including the word '---'.


# Workspace

Learn the secret to effective task management with Trello and Google Drive.


# Task #2: Trello and Google Drive + Accesses

Mastering dropshipping on Shopify with Trello and Google Drive. Efficient workspace management.

### Purpose <a href="#purpose" id="purpose"></a>

Prepare Trello, Google Drive + Accesses for work.

{% embed url="<https://youtu.be/fXivcWQY1e8>" %}

The video tutorial thoroughly covers the method of effectively organizing the workspace and successfully running a dropshipping business on the Shopify platform. You will learn how to create profitable online stores and efficiently manage project development.

### Description <a href="#description" id="description"></a>

* Browser for work - Google Chrome
* Tasks and checklists in Trello
* Folder with files and spreadsheets in Google Drive
* Access (logins and passwords) in MacPass or KeePass

### Instruction <a href="#instructions" id="instructions"></a>

1. [Download](https://www.google.com/intl/ru/chrome/) Google Chrome
2. Install Google Chrome
3. [Create](https://www.google.com/intl/ru/gmail/about/) a Google Email
4. Create a Google Profile
5. Sign in to Google Account
6. Enable Sync
7. [Create](https://trello.com/) a Trello Account (mandatory if you don't have one)
8. Create a workspace (e.g., Dropshipping)
9. Copy the board to the created workspace
10. Copy the folder to your Google Drive
11. Rename the copied folder (for example, name it like a domain — in this case, the folder name could be "birdiekitty.com" or "organkitty.com")
12. To proceed to the next task, you need: Product, Google Chrome browser, Google Email, Board in Trello, Folder in Google Drive, and Access in MacPass, KeePass, or Google Spreadsheet (an example of such a table can be found at the [link](https://docs.google.com/spreadsheets/d/1kEDhCyoAmMzd6BVWBcC8y8jtw6uokyZdPsFwIh9GO2Y/edit?usp=sharing)).

### Actions <a href="#actions" id="actions"></a>

Create a Google Account, for example, <thebirdiekitty@gmail.com>, if the option <birdiekitty@gmail.com> is already taken. Or <theorgankitty@gmail.com>, if the option <organkitty@gmail.com> is already taken.

Save the login and password in the **MacPass** or **KeePass** app in a new group.

It would be great if the domain [birdiekitty.com](http://birdiekitty.com/) or [organkitty.com](https://organkitty.com/) is available on the website <https://namecheap.com> (it's better to check right away if the domain is available).

The brand name **Birdie Kitty** was generated by the ChatGPT service based on the request: "Come up with a store name in English for selling a cat toy 'Flying Parrot'."

The brand name **Organ Kitty** was created by Evgenii during the creation of the guide.


# Store Creation

Launch your store on Shopify: setup and readiness for sales.


# Task #3: Favicon & Logo Site & Logo Social & Social sharing image

Strengthen your brand by creating a logo, favicon, and content for your Shopify store. Grab customers attention!

### Purpose <a href="#purpose" id="purpose"></a>

Create Favicon & Logo Site & Logo Social & Social Sharing Image.

{% embed url="<https://youtu.be/m36jjPjFgsA>" %}

The video tutorial shows how to create a favicon and logo for the website and social media. These elements will help increase your store's brand recognition and attract customers.

### Description <a href="#description" id="description"></a>

* Which colors to choose for your website (this is important)
* Design everything in Figma or ask a designer for help
* Pay special attention to colors

### Instruction <a href="#instructions" id="instructions"></a>

1. Favicon
2. Logo Site
3. Logo Social
4. Social sharing image

### Actions <a href="#actions" id="actions"></a>

* [Example of the Birdie Kitty project in Figma](https://www.figma.com/file/89NLY6wJyGF4HynLQSsRbE/%D0%A0%D0%B0%D0%B7%D1%80%D0%B0%D0%B1%D0%BE%D1%82%D0%BA%D0%B0-%D0%BC%D0%B0%D0%B3%D0%B0%D0%B7%D0%B8%D0%BD%D0%B0-Birdie-Kitty---birdiekitty.com?type=design\&node-id=0%3A1\&mode=design\&t=5FaEY5Ft1hkwvuWN-1)
* [Example of the Organ Kitty project in Figma](https://www.figma.com/file/Uq14HEchd2o3CzRH6xntrn/%D0%A0%D0%B0%D0%B7%D1%80%D0%B0%D0%B1%D0%BE%D1%82%D0%BA%D0%B0-%D0%BC%D0%B0%D0%B3%D0%B0%D0%B7%D0%B8%D0%BD%D0%B0-Organ-Kitty---organkitty.com?type=design\&node-id=5%3A26\&mode=design\&t=EG5DhEEJeChr5DPh-1)


# Task #4: Shopify Account

Create a Shopify store for just $1! Registration, setup, and access for everyone. Simple and profitable!

### Purpose <a href="#purpose" id="purpose"></a>

Create a Shopify Account → <https://vecomlab.com/shopify>

{% embed url="<https://youtu.be/5_UJ99Nr5Pw>" %}

The video tutorial shows how to create an online store on the Shopify platform for just $1. You will learn how to register a Shopify account, verify your Google account, add store information, choose a Shopify plan, and disable the password so that the store is accessible to everyone.

### Description <a href="#description" id="description"></a>

* Create a Shopify Account using the created Google Account

### Instructions <a href="#instructions" id="instructions"></a>

1. Create a Shopify Account
2. Verify Google Account
3. Add Store Information
4. Choose a Shopify Plan
5. Disable Password

### Actions <a href="#actions" id="actions"></a>

Before choosing a Shopify plan, go to **Settings - Store details**, and configure the following:

* Profile (Store name, Phone, and Store email)
* Billing information (Legal business name, Country/region, Address, Apartment, suite, etc., Postal code, City)
* Store currency (USD)
* Time zone (GMT-05:00) Eastern Time (US & Canada)

Now, you can select a Shopify plan.


# Task #5: Domain

Choose and set up a domain for Shopify with NameCheap, paying with cryptocurrency. Start your business with minimal costs!

### Purpose <a href="#purpose" id="purpose"></a>

Buy and Set Up a Domain → <https://vecomlab.com/namecheap>

{% embed url="<https://youtu.be/xUCSBm7OKk0>" %}

The video tutorial shows where to buy a domain at a good price using Shopify as an example and how to set it up. NameCheap is a great option as it allows you to pay for domains with cryptocurrency. Additionally, the platform offers competitive prices, which reduces initial costs for launching a store and testing products. There are other, more cost-effective methods, but their setup is more complex.

### Description <a href="#description" id="description"></a>

* It's better to use NameCheap for this
* A domain with the .com extension

### Instruction <a href="#instructions" id="instructions"></a>

1. Buy a domain on [namecheap.com](https://www.namecheap.com/)
2. Add the domain to Shopify
3. Add the domain to Yandex.Connect (also known as Yandex 360 for Business)
4. Verify the domain in Yandex.Connect using DNS from namecheap.com or a Code in Shopify
5. Set up the MX record using DNS in [namecheap.com](https://www.namecheap.com/)

### Actions <a href="#actions" id="actions"></a>

To add a domain to Shopify, in the settings of <http://namecheap.com>, you need to choose the DNS template "Shopify" and save it.

**Question**: Why add the domain to Yandex.Connect?\
**Answer**: To set up corporate email, for example, <support@birdiekitty.com> or <support@organkitty.com>.

It is not necessary to use Yandex.Connect, as there are other solutions available.


# Task #6: Corporate Email with Yandex

Create a corporate email on your own domain using Yandex 360 for Business. Increase customer trust and communication efficiency!

### Purpose <a href="#purpose" id="purpose"></a>

Create a Corporate Email with Yandex → <https://vecomlab.com/yandex-360-for-business>

{% embed url="<https://youtu.be/1Pr5MBKRGVo>" %}

The video tutorial provides a detailed guide on how to easily create a corporate email for your project and set it up on your own domain using Yandex 360 for Busines**s**. With this email, you can send newsletters and communicate effectively with customers. Store visitors tend to trust corporate emails more, which can, in turn, increase the number of purchases.

### Description <a href="#description" id="description"></a>

* It is essential to use a corporate email for support

### Instruction <a href="#instructions" id="instructions"></a>

1. Create a Corporate Email in Yandex.Connect
2. Add a Profile Image for the Email

### Auto reply <a href="#auto-response" id="auto-response"></a>

Thank you for contacting **\[Your Project]**'s Customer Success Team.

Our team is available in the office from **9:00 am to 5:00 pm PST Monday through Friday**.

We look forward to promptly addressing your request.

We will respond to you as soon as possible.

Sincerely, The **\[Your Project]** Customer Success Team

> Change **\[Your Project]** to the name of your project/brand. And write any convenient time when you plan to respond to your clients. When they write to you via email, they will receive an automatic reply, where you will promise to look into the issue as soon as possible. You need to make it clear to the customer that you’ve received their inquiry and their problem will be resolved. Try to respond quickly to customer questions — this will lead to fewer returns and negative comments under your promotional posts (tested)! Use your imagination; this automatic reply can look different, and you can even include detailed information about how your delivery works and how to track an order. And all this will be sent to your customers automatically in a simple way.

### Actions <a href="#actions" id="actions"></a>

For example, create an email <support@birdiekitty.com> or <support@organkitty.com>.


# Task #7: DSers Account

Maximize your potential with the DSers integration on Shopify. Start your business right now with an efficient step-by-step setup!

### Purpose <a href="#purpose" id="purpose"></a>

Add a Product to Shopify → <https://vecomlab.com/dsers>

{% embed url="<https://youtu.be/gpKK1B1fPbE>" %}

The video tutorial provides a detailed guide on how to integrate the DSers app with Shopify. You will learn where to find the DSers app, how to create an account, set up basic settings, add products even if they are out of stock with the supplier, and publish them in your Shopify online store.

### Description <a href="#description" id="description"></a>

* DSers is perfect for a quick start

### Instructions <a href="#instructions" id="instructions"></a>

1. Add the DSers App to Shopify
2. Create a DSers Account
3. For the start, choose the Basic Free Plan
4. Create an AliExpress Account (if you don't have one)
5. Connect the AliExpress Account to DSers
6. Set up your DSers Account (not the final profile setup)
7. Add and Set up a Product in DSers
8. Add the Product to Shopify

### Actions <a href="#actions" id="actions"></a>

**Set up the DSers Account (not the final profile setup)**

1. Open Settings
2. In **Settings**, the only thing you can change is the **Time zone (GMT-05:00) Eastern Time (US & Canada)**
3. In **Staff**, you don't need to add anyone if there are no employees
4. In **Supplier**, leave everything as default
5. In **Stores**, check that **Currencies** is set to **USD**
6. In **Product**, leave everything as default
7. In **Pricing Rule**, leave everything as default
8. In **Shipping**, configure Global, which depends on the specific product's shipping methods (e.g., **AliExpress Selection Standard**)
9. In **Order**, set up the message that the supplier will see after the order is paid
10. In **Package Tracking**, leave everything as default
11. In **Notification**, select everything
12. In **Synchronization**, choose Set quantity to zero on Shopify and Update to Shopify Automatically

*I'm dropshipping. Please DO NOT put any invoices, QR codes, promotions or your brand name logo in the shipments. Please ship as soon as possible for repeat business. Thank you!*

**Add a Product to Shopify**

1. Publish in **Online Store**
2. Enable **International** Market

*We will set up the markets later, so don't get distracted by that for now!*

When the **International** Market is enabled, Shopify automatically activates localization apps for the store. You need to open this app and disable the localization feature.


# Task #8: Copywriting

Create an effective product page text using a complete copywriting strategy. Bring your ideas to life with ChatGPT!

### Purpose <a href="#purpose" id="purpose"></a>

Prepare Product Description, Company Profile Description, Product Images, Product Description Images, Homepage Banner, Product Reviews, Review Photos.

### How to write text for a website + ChatGPT <a href="#how-to-write-a-text" id="how-to-write-a-text"></a>

{% embed url="<https://youtu.be/bkJShNKqGrY>" %}

In the video tutorial, you will find detailed information on how to write effective text for a product page. This is a complete copywriting strategy suitable for any online store on Shopify or another platform. With ChatGPT, your possibilities are only limited by your imagination.

### Part Two: Creating Content for the Website <a href="#website-content" id="website-content"></a>

{% embed url="<https://youtu.be/lNXoT2H6MRs>" %}

The video tutorial shows how to find and create content for an online store on platforms like Shopify and WooCommerce, especially if you're doing dropshipping. You will learn how to contact a supplier on AliExpress, create videos using CapCut, and design images with Figma. Additionally, you will learn how to translate text for your store using ChatGPT.

{% hint style="info" %}
The DSers app works not only with Shopify but also with WooCommerce, making the video tutorials relevant for both platforms.
{% endhint %}

### Description <a href="#description" id="description"></a>

* Prepare all the necessary information

### Instructions <a href="#instructions" id="instructions"></a>

1. Product Description + Company Profile Description
2. Product Images (800x800 .jpg) + Compress via <https://tinypng.com/>
3. Product Description Images (800x800 .jpg) + Compress via <https://tinypng.com/>
4. Homepage Banner (1920x680 .jpg) + Compress via <https://tinypng.com/>
5. Product Reviews + Review Photos

### Actions <a href="#actions" id="actions"></a>

Gather all the information into one Google Document.


# Task #9: Manage Account

Optimize account management in Shopify: steps, demonstration, store setup. Details in the video!

### Purpose <a href="#purpose" id="purpose"></a>

Set up Manage Account.

{% embed url="<https://youtu.be/0kr-veOu0sc>" %}

The video tutorial shows how to set up Manage Account in Shopify.

### Description <a href="#description" id="description"></a>

* Select the correct time zone

### Instructions <a href="#instructions" id="instructions"></a>

1. Upload Photo - Logo Social
2. Change First and Last Name
3. Timezone - (GMT-05:00) Eastern Time (US & Canada)

### Actions <a href="#actions" id="actions"></a>

Customize it to suit your needs.


# Task #10: Settings - Store details

Effective store language setup in Shopify: steps, demonstration, and real-time setup. Details in the video!

### Purpose <a href="#purpose" id="purpose"></a>

Set up Settings - Store details.

{% embed url="<https://youtu.be/SHe9B9vNPlM>" %}

The video tutorial shows how to set up Store Languages in Shopify.

### Description <a href="#description" id="description"></a>

* Company Information

### Instructions <a href="#instructions" id="instructions"></a>

1. Profile
2. Billing information
3. Store currency - USD
4. Standards and formats - (GMT-05:00) Eastern Time (US & Canada)

### Actions <a href="#actions" id="actions"></a>

Fill in with real data.


# Task #11: Settings - Payments

Accept cryptocurrency in Shopify with NOWPayments: setup, demonstration. Find all the details in our video!

### Purpose <a href="#purpose" id="purpose"></a>

Set up Settings - Payments.

{% embed url="<https://youtu.be/0tZJep-rKLg>" %}

The video tutorial shows how to set up cryptocurrency payments in Shopify through NOWPayments.

### Description <a href="#description" id="description"></a>

* Connect Stripe or Shopify Payments

### Instructions <a href="#instructions" id="instructions"></a>

1. Disable PayPal
2. Set up payment processing

### Actions <a href="#actions" id="actions"></a>

This task may depend on various factors, such as citizenship, place of residence, and so on. Without this, the model will not work.


# Task #12: Settings - Notifications

Automating notifications in Shopify: keep customers informed about their order status. An important step for successful sales!

### Purpose <a href="#purpose" id="purpose"></a>

Set up Settings - Notifications.

{% embed url="<https://youtu.be/UNSw_InXaXY>" %}

The video tutorial shows how to set up automated notifications in Shopify. This is important for informing customers about the status of their order after payment. It's not the final setup, but an essential step that needs to be completed.

### Description <a href="#description" id="description"></a>

* According to the [document](https://docs.google.com/document/d/1DI6vOMEFISVHZxsxF0vxulciGNvT2wNc6lmgCJ9QCyQ/edit?usp=sharing)

### Instructions <a href="#instructions" id="instructions"></a>

1. Customize email templates - Logo & Color
2. Sender email (for example, <support@birdiekitty.com> or <support@organkitty.com>)
3. Orders - Order confirmation
4. Shipping - Shipping confirmation
5. Shipping - Shipping update
6. Shipping - Out for delivery
7. Shipping - Delivered

### Actions <a href="#actions" id="actions"></a>

Settings for your case may vary.


# Task #13: Settings - Store languages

Shopify language setup: steps, demonstration, and store design. Find all the details in our video!

### Purpose <a href="#purpose" id="purpose"></a>

Set up Settings - Store languages.

{% embed url="<https://youtu.be/SnL9pEH4KDs>" %}

The video tutorial shows how to set up store languages in Shopify!

### Description <a href="#description" id="description"></a>

* According to the [document](https://docs.google.com/document/d/1cVeV_J0LlmeuHzbyUC_--JjdMUpCwbMSchPAlUB5djE/edit?usp=sharing)

### Instructions <a href="#instructions" id="instructions"></a>

1. Default language - English
2. Language - Cart
3. Language - Products
4. Language - Checkout & system

### Actions <a href="#actions" id="actions"></a>

The settings for your case may differ.


# Task #14: Settings - Checkout

Shopify payment page setup: steps, demonstration, and store design. Find all the details in our video!

### Purpose <a href="#purpose" id="purpose"></a>

Set up Settings - Checkout.

{% embed url="<https://youtu.be/k3kn1_FCCWI>" %}

The video tutorial shows how to set up the checkout process in Shopify.

### Description <a href="#description" id="description"></a>

* There are a few settings on the checkout page if the store's primary language is English

### Instructions <a href="#instructions" id="instructions"></a>

1. Checkout style
2. Customer contact method
3. Customer information
4. Tipping
5. Order processing
6. Marketing options
7. Abandoned checkout emails - OFF (set up in another app)
8. Order status page
9. Checkout language - English

### Actions <a href="#actions" id="actions"></a>

The settings for your case may differ.


# Task #15: Settings - Shipping and delivery

Setting up markets and shipping zones in Shopify: steps, demonstration, and store design. Find all the details in our video!

### Purpose <a href="#purpose" id="purpose"></a>

Set up markets and shipping zones.

{% embed url="<https://youtu.be/pWuSnV97reI>" %}

The video tutorial shows how to set up "Shipping and delivery" in Shopify!

### Description <a href="#description" id="description"></a>

* First, configure the markets, then set up the shipping zones

### Instructions <a href="#instructions" id="instructions"></a>

1. Markets
2. Shipping zones

### Actions <a href="#actions" id="actions"></a>

United States, United Kingdom, Canada, Australia, New Zealand, Singapore, Belgium, Netherlands, Germany, Austria, Sweden, Denmark, Finland, Norway, France, Spain, Poland, Luxembourg, Ireland, Italy, Greece, Portugal, Hungary

### List of countries we recommend avoiding <a href="#list-of-countries" id="list-of-countries"></a>

India, Nepal, Myanmar (Burma), Guam, Lebanon, Afghanistan, Malaysia, US Virgin Islands, Mexico, Bhutan, Pakistan, Saudi Arabia, Central African Republic, Somalia, South Africa, Turkey,Israel, Indonesia, Philippines, Kuwait, Colombia, Bangladesh, Sri Lanka, Morocco, Egypt, Qatar, Tunisia, Mauritius, Algeria


# Task #16: Settings - Policies

Shipping and Return Policy setup in Shopify: SEO, useful pages. Find all the details in our video!

### Purpose <a href="#purpose" id="purpose"></a>

Set up Settings - Policies.

{% embed url="<https://youtu.be/X4kh7JbClns>" %}

The video tutorial shows how to set up the shipping and return policy in Shopify. It also covers important pages for customers. Additionally, you will learn about indexing and SEO optimization.

### Description <a href="#description" id="description"></a>

* Set up the terms pages and /pages

### Instructions <a href="#instructions" id="instructions"></a>

1. Written return and refund policy
2. Privacy policy
3. Terms of service
4. Shipping policy
5. Contact information
6. Legal notice
7. Payments
8. FAQ (FREQUENTLY ASKED QUESTIONS)
9. Contact
10. About us

### Actions <a href="#actions" id="actions"></a>

Be sure to check the correctness of all links on the website.

Data is in the [document](https://docs.google.com/document/d/1QwGx3_vIaoroNmL2_JzLscHMbnpdhdOfr9bATmaYUGg/edit?usp=sharing).


# Task #17: Online Store - Preferences

Setting up Preferences in Shopify: Google Analytics, discount codes. Find all the details in our video!

### Purpose <a href="#purpose" id="purpose"></a>

Set up Online Store - Preferences.

{% embed url="<https://youtu.be/BgJgybrXO3Y>" %}

The video tutorial shows how to set up Preferences in Shopify. You'll also learn how to configure the new Google Analytics 4 tool and create discount codes for customers in Shopify.

### Description <a href="#description" id="description"></a>

* Specify the brand name and a short description

### Instructions <a href="#instructions" id="instructions"></a>

1. Homepage title
2. Homepage meta description
3. Social sharing image preview
4. Code "5NEW"
5. Set up Google Analytics

### Actions <a href="#actions" id="actions"></a>

**The Homepage meta description can be:**

*Creating Happy Moments for Your Kitty's Playtime! USE CODE '5NEW' AT CHECKOUT FOR AN EXTRA $5 OFF YOUR ORDER. FREE & FAST SHIPPING WORLDWIDE. NEW USERS ONLY!*

In **Discounts**, you need to create the code **5NEW**.


# Task #18: Online Store - Navigation

Setting up the menu in a Shopify online store: steps, demonstration. Learn more in our video!

### Purpose <a href="#purpose" id="purpose"></a>

Set up Online Store - Navigation.

{% embed url="<https://youtu.be/VIP2tuoE0J8>" %}

The video tutorial shows how to set up the menu in a Shopify online store.

### Description <a href="#description" id="description"></a>

* Setting up the menu

### Instructions <a href="#instructions" id="instructions"></a>

1. Main menu
2. Footer menu
3. Help menu

### Actions <a href="#actions" id="actions"></a>

The menu can be customized in different ways.


# Task #19: Online Store - Customize

Shopify Store Setup Guide: Free Dawn Theme, Step by Step with Helpful Tips.

### Purpose <a href="#purpose" id="purpose"></a>

Set up the Dawn theme.

{% embed url="<https://youtu.be/6w1ywHlC9_s>" %}

A detailed guide to setting up and designing a Shopify store! The video tutorial demonstrates the process step by step with helpful tips.

### Description <a href="#description" id="description"></a>

* Homepage, product page, and checkout

### Instructions <a href="#instructions" id="instructions"></a>

1. Homepage
2. Product Page
3. Checkout

### Actions <a href="#actions" id="actions"></a>

All stores in this guide are built on the basic Dawn theme from Shopify. Examples can be found at the following links: [birdiekitty.myshopify.com](https://birdiekitty.myshopify.com/) and [organkitty.myshopify.com](https://organkitty.myshopify.com/) (password: volkovecom).

### How to change the text color of a button <a href="#button-text-color" id="button-text-color"></a>

<div><figure><img src="https://content.gitbook.com/content/xa9ueiMPkj0LsrVay0aB/blobs/OoZXy9YF9RNfjhqwhEXk/vecom-lab-info-ru-customize-1.jpg" alt="VecomLab Shopify Colors"><figcaption></figcaption></figure> <figure><img src="https://content.gitbook.com/content/xa9ueiMPkj0LsrVay0aB/blobs/AZ6xQVF5PISDltAdI5OL/vecom-lab-info-ru-customize-2.jpg" alt="VecomLab Shopify Colors"><figcaption></figcaption></figure></div>


# Task #20: Online Store - Discounts

Creating and setting up promo codes: convenient discounts for customers on Shopify. Automatic discount application.

### Purpose <a href="#purpose" id="purpose"></a>

Set up Online Store - Discounts.

{% embed url="<https://youtu.be/INSVWfvUQsI>" %}

The video tutorial shows how to create and configure a promo code. It also covers a helpful feature that simplifies the customer's journey and conveniently offers them a discount.

### Description <a href="#description" id="description"></a>

* Create bonus codes for customers

### Instructions <a href="#instructions" id="instructions"></a>

1. Create code 5NEW - $5 discount
2. Create code 15NEW - 15% discount

### Actions <a href="#actions" id="actions"></a>

Promocodes can be anything.


# Task #21: Online Store - Edit Code

Shopify Store Optimization: Forum, Code, Design, Payments. Dawn Theme. Key steps in the video tutorial!

### Purpose <a href="#purpose" id="purpose"></a>

Customize Online Store - Edit Code.

{% embed url="<https://youtu.be/jliPQL2EpSY>" %}

The video tutorial shows how to set up a store on the Shopify platform. You'll learn how to open a Shopify forum, interact with support chat, edit the Dawn theme code, configure the display of design elements, add payment system icons to the footer, and much more.

### Description <a href="#description" id="description"></a>

* The Dawn theme requires additional code customization

### Instructions <a href="#instructions" id="instructions"></a>

1. Remove the search icon from the site
2. Resize the image
3. Center the heading for the Multicolumn block
4. Add a video to the Image with text block
5. Change the product price text color to red
6. Display payment system icons
7. Align the selector and add to cart button on the same level

### Actions <a href="#actions" id="actions"></a>

**Remove the search icon from the site:**

```
.header__icon--search {
    display: none;
}
```

**Resize the image:**

```
.image-with-text__media img {
    object-fit: contain;
}
```

**Center the heading for the Multicolumn block:**

```
.multicolumn [class^='title']{
    text-align: center !important;
    align-items: center !important;
    justify-content: center !important;
}
```

**Change the product price text color to red:**

```
.price .price-item {
    color: #FA4545;
}
```

**Display payment system icons:**

{% embed url="<https://help.shopify.com/en/manual/online-store/themes/themes-by-shopify/vintage-themes/customizing-vintage-themes/add-credit-card-icons>" %}

**Align the selector and add to cart button on the same level:**

```
@media (min-width: 380px) {
    .product-form {
        position: relative
    }
    
    .product-form .product-form__buttons {
        position: absolute;
        left: 148px;
        top: -72px;
    }
}
```

**Add a video to the Image with text block:**

{% embed url="<https://www.youtube.com/watch?v=qzYp0MlrCDg>" %}

### Remove the currency selector from the mobile menu <a href="#remove-currency-selector" id="remove-currency-selector"></a>

Source: <https://community.shopify.com/c/shopify-design/how-to-remove-currency-selector-in-hamburger-menu-in-dawn-mobile/td-p/2183077>

If you're using the **Dawn** theme, add the code at the end of the **base.css** file.

```
@media only screen and (max-width: 989px){
  .menu-drawer__localization.header-localization {
    display: none;
  }
}
```

<div><figure><img src="https://content.gitbook.com/content/xa9ueiMPkj0LsrVay0aB/blobs/98y8VeCfeSml08aCf91j/vecom-lab-info-ru-edit-code-1.jpg" alt="VecomLab Shopify Menu"><figcaption></figcaption></figure> <figure><img src="https://content.gitbook.com/content/xa9ueiMPkj0LsrVay0aB/blobs/Zc4DpKm7g9kwOhoFihpS/vecom-lab-info-ru-edit-code-2.jpg" alt="VecomLab Shopify Menu"><figcaption></figcaption></figure></div>


# Task #22: Products

Shopify Store Optimization: Products, Test Purchases with Cryptocurrency, Supplier Management in DSers.

### Purpose <a href="#purpose" id="purpose"></a>

Set up the Product.

{% embed url="<https://youtu.be/97C-G7M4qLM>" %}

The video tutorial shows how to set up product variants, change the price, perform a test purchase with cryptocurrency, and complete the payment. You will also learn about some drawbacks of accepting payments through NOWPayments and how to use the matching feature in DSers to easily switch suppliers.

### Description <a href="#description" id="description"></a>

* For this task, you need to use a document with copywriting

### Instructions <a href="#instructions" id="instructions"></a>

1. Title
2. Description
3. Media
4. Pricing
5. Variants
6. Search engine listing preview


# Social Media

Create attractive social media profiles: unique and engaging.


# Task #23: Facebook Page

Manage your business page on Facebook: creation, verification, and setup in Business Manager.

### Purpose <a href="#purpose" id="purpose"></a>

Create and set up a Facebook page.

{% embed url="<https://youtu.be/V_eu426Wdco>" %}

The video tutorial shows how to manage a business page on Facebook. You'll learn how to create a Business Manager, verify your account, create a page, set it up, and add it to Business Manager.

### Description <a href="#description" id="description"></a>

* Basic setup of a Facebook page

### Instructions <a href="#instructions" id="instructions"></a>

1. Create a Facebook Page
2. Add a Logo
3. Add the page to Business Manager
4. Set up the "Shop Now" button
5. Fill in the Information
6. Disable posts from other people
7. Link Instagram Account to Facebook Page
8. Content


# Task #24: Instagram Account

Create an Instagram account, link it to Facebook and Business Manager, and publish through Meta Business Suite.

### Purpose <a href="#purpose" id="purpose"></a>

Create and set up an Instagram account.

{% embed url="<https://youtu.be/PsRyffkm1SE>" %}

The video tutorial shows how to create an Instagram account from scratch and make it as informative and appealing as possible for your audience. You'll learn how to add a profile picture, link the account to your Facebook page, integrate it into Business Manager, and quickly and easily publish high-quality content on Instagram and Facebook through Meta Business Suite. Additionally, you’ll discover how to add a link to your Instagram profile on Shopify and Facebook, as well as how to add a description and link to your Instagram account.

### Description <a href="#description" id="description"></a>

* Basic setup of an Instagram account

### Instructions <a href="#instructions" id="instructions"></a>

1. Create an Instagram Account
2. Add a Logo
3. Website
4. Information
5. Corporate email - confirm the email
6. Link Instagram Account to Facebook Page
7. Add Instagram Business Tools


# Ad Account

Set up Meta Business Suite, the pixel, and the Ads Manager.


# Task #25: Facebook Ad Account

Create an ad account on Facebook, add the domain to Business Manager, and set up the pixel and app in Shopify.

### Purpose <a href="#purpose" id="purpose"></a>

Create a Facebook Ad Account.

{% embed url="<https://youtu.be/2N885B6HdvU>" %}

The video tutorial shows how to create and set up a Facebook ad account from scratch. You'll learn how to add and verify a domain, link it to your page, create a pixel, and properly configure permissions. Additionally, you’ll discover how to set up the Facebook & Instagram app for integration with Shopify, as well as how to set up ad account columns for analyzing and optimizing ad campaigns.

### Description <a href="#description" id="description"></a>

* Basic setup of a Facebook Ad Account

### Instructions <a href="#instructions" id="instructions"></a>

1. Add and Verify Domain
2. Create an Ad Account
3. Add Payment Method
4. Create Pixel
5. Link Pixel to Ad Account
6. Link Pixel to Shopify Store
7. Enable "Automatic Advanced Matching"
8. Set up API Conversions
9. Properly configure metrics (columns) for ad optimization

### Actions <a href="#actions" id="actions"></a>

Setting up columns:

Delivery, Impressions, Reach, Amount spent, CPM (cost per 1,000 impressions), Video average play time, Outbound CTR (click-through rate), Cost per outbound click, Cost per content view, Cost per add to cart, Cost per checkout initiated, Cost per add of payment info, Cost per result, ATC, Purchase ROAS (return on ad spend), Purchases conversion value, Outbound clicks, Content views, Adds to cart, Checkouts Initiated, Adds of payment info, Results, Engagement rate ranking, Conversion rate ranking, Quality ranking.


# Apps

Install apps that will increase your store's conversion rate.


# Task #26: Loox or Judge.me Product Reviews

Optimize your site with Loox for Shopify: installation, pricing, integration, and review management.

### Purpose <a href="#purpose" id="purpose"></a>

Install the Loox review app → <https://vecomlab.com/loox>

{% hint style="info" %}
**Loox** is a great review app. We suggest you install the app using our link and enjoy all the benefits for **30 days for free**. By default, the free trial period is 14 days.

* Install: <https://vecomlab.com/loox>

If you initially selected the **Beginner** plan but later decide you need the **Scale** plan with more features, simply switch the plan – the free trial period will still be preserved. The Scale plan offers many **advantages**, one of which is the ability to **add 100 reviews from AliExpress at once** for your product. This will greatly speed up and simplify your work.

<img src="https://content.gitbook.com/content/xa9ueiMPkj0LsrVay0aB/blobs/Xh9092JpKQYFv2ey97dq/vecom-lab-info-ru-loox-1.jpg" alt="VecomLab Shopify App Loox" data-size="original">
{% endhint %}

{% embed url="<https://youtu.be/KxVL0mVeKz4>" %}

The video tutorial shows how to use the Loox app for Shopify: installation, selecting a plan, theme integration, setting up the review widget, language, color scheme, feedback requests, discounts for photo reviews, and managing reviews.

### Description <a href="#description" id="description"></a>

* Add as many reviews as possible to the product page

### Read more <a href="#learn-more" id="learn-more"></a>

App menu (Home, Reviews, Referrals, Upsell, General). Set up Referrals and Upsell as desired.

<figure><img src="https://content.gitbook.com/content/xa9ueiMPkj0LsrVay0aB/blobs/DwIK6mCufQGrgFqg9ytd/vecom-lab-info-ru-loox-2.jpg" alt="VecomLab Shopify App Loox"><figcaption></figcaption></figure>

App menu **General** (Branding, Integrations, Orders, Settings).

<figure><img src="https://content.gitbook.com/content/xa9ueiMPkj0LsrVay0aB/blobs/1hNj6MUMB4gPZpts90GP/vecom-lab-info-ru-loox-3.jpg" alt="VecomLab Shopify App Loox"><figcaption></figcaption></figure>

In **Settings**, configure the display format of the name.

<figure><img src="https://content.gitbook.com/content/xa9ueiMPkj0LsrVay0aB/blobs/AnDmectEo22f6kbH5mOq/vecom-lab-info-ru-loox-4.jpg" alt="VecomLab Shopify App Loox"><figcaption></figcaption></figure>

In **Branding**, customize the font, colors, and optionally add a logo.

<div><figure><img src="https://content.gitbook.com/content/xa9ueiMPkj0LsrVay0aB/blobs/0WwX9sm3v91atyeU4QM8/vecom-lab-info-ru-loox-5.1.jpg" alt="VecomLab Shopify App Loox"><figcaption></figcaption></figure> <figure><img src="https://content.gitbook.com/content/xa9ueiMPkj0LsrVay0aB/blobs/qqVObYoIjz4NDwBdyusT/vecom-lab-info-ru-loox-5.2.jpg" alt="VecomLab Shopify App Loox"><figcaption></figcaption></figure></div>

Set up the styles and banner for the email you send requesting feedback from customers. You can:

1. Disable the banner (1)
2. Switch the styles to Custom (2)
3. Customize the colors (3, 4)
4. View the preview (5)

<div><figure><img src="https://content.gitbook.com/content/xa9ueiMPkj0LsrVay0aB/blobs/1TBsC0Iw1a881AbNmoAR/vecom-lab-info-ru-loox-6.1.jpg" alt="VecomLab Shopify App Loox"><figcaption></figcaption></figure> <figure><img src="https://content.gitbook.com/content/xa9ueiMPkj0LsrVay0aB/blobs/IA19hPi8RSPVANmexiEt/vecom-lab-info-ru-loox-6.2.jpg" alt="VecomLab Shopify App Loox"><figcaption></figcaption></figure> <figure><img src="https://content.gitbook.com/content/xa9ueiMPkj0LsrVay0aB/blobs/zGEiyjTMwkBnoRUOgXdO/vecom-lab-info-ru-loox-6.3.jpg" alt="VecomLab Shopify App Loox"><figcaption></figcaption></figure></div>

Set up r**eview collection rules (Collect reviews)** in **Reviews**. For **Auto-publish new reviews**, for example, choose to automatically publish reviews with a rating of 4 and above. Reviews with a rating lower than 4 will be published after 14 days. Don't leave negative reviews unattended. Set up **email notifications for reviews (Review notifications)** when users leave a review. If you've followed all the steps from the first video, as shown, you can leave this field setting to the default. For **Add onsite reviewers to Shopify Customers list**, leave it as default if you want to save everyone who leaves a review to the **Customers list (this list is located in the Shopify admin under the "Customers" section on the left menu)**.

<div><figure><img src="https://content.gitbook.com/content/xa9ueiMPkj0LsrVay0aB/blobs/Js7mu6JzU9GB7OZzbpvK/vecom-lab-info-ru-loox-7.1.jpg" alt="VecomLab Shopify App Loox"><figcaption></figcaption></figure> <figure><img src="https://content.gitbook.com/content/xa9ueiMPkj0LsrVay0aB/blobs/4I6CQlwXyU8axWoxH09v/vecom-lab-info-ru-loox-7.2.jpg" alt="VecomLab Shopify App Loox"><figcaption></figcaption></figure> <figure><img src="https://content.gitbook.com/content/xa9ueiMPkj0LsrVay0aB/blobs/ZiEkK9NUVHbpfzk0uhvc/vecom-lab-info-ru-loox-7.3.jpg" alt="VecomLab Shopify App Loox"><figcaption></figcaption></figure></div>

Set up **Review request timing** — this determines when you send an email requesting feedback. As an example, we will disable this email. This means that when someone purchases a product from your store, they will not receive an email asking them to leave a review.

<div><figure><img src="https://content.gitbook.com/content/xa9ueiMPkj0LsrVay0aB/blobs/8ROx1vfiAcurcrhCNaIU/vecom-lab-info-ru-loox-8.1.jpg" alt="VecomLab Shopify App Loox"><figcaption></figcaption></figure> <figure><img src="https://content.gitbook.com/content/xa9ueiMPkj0LsrVay0aB/blobs/Ljl7rZTGbxeYgFHnKnK7/vecom-lab-info-ru-loox-8.2.jpg" alt="VecomLab Shopify App Loox"><figcaption></figcaption></figure></div>

The video shows how to manually add a review to the product page. When adding a review, you can upload a photo and receive a promo code. This feature can be disabled or customized. As an example, we will disable it.

<div><figure><img src="https://content.gitbook.com/content/xa9ueiMPkj0LsrVay0aB/blobs/hrWrT7XgUzzRuq1IzrmB/vecom-lab-info-ru-loox-9.1.jpg" alt="VecomLab Shopify App Loox"><figcaption></figcaption></figure> <figure><img src="https://content.gitbook.com/content/xa9ueiMPkj0LsrVay0aB/blobs/wQGfghNzcEaNZlDTZLu8/vecom-lab-info-ru-loox-9.2.jpg" alt="VecomLab Shopify App Loox"><figcaption></figcaption></figure> <figure><img src="https://content.gitbook.com/content/xa9ueiMPkj0LsrVay0aB/blobs/lZRwuOwTTk1dYZ1OGI7J/vecom-lab-info-ru-loox-9.3.jpg" alt="VecomLab Shopify App Loox"><figcaption></figcaption></figure></div>

* **Manual review requests** – Request a review manually.
* **Video reviews** – Set up collection and display of video reviews (in the example, the basic plan is used, but this feature is available on the Scale plan).
* **Emails** – Customize the text of elements and emails (for the example, we will leave everything as default).
* **Review Form** – Customize the review collection form.
* **Custom questions** – Create custom questions for the form (this feature is available only on the Scale plan).

{% hint style="danger" %}
With this link <https://vecomlab.com/loox>, you’ll get 30 days of free access to any plan from the VecomLab project. This means you can choose the Scale plan and test all features to the fullest!
{% endhint %}

<figure><img src="https://content.gitbook.com/content/xa9ueiMPkj0LsrVay0aB/blobs/N7U6pgbW2quHOerh4NJh/vecom-lab-info-ru-loox-10.jpg" alt="VecomLab Shopify App Loox"><figcaption></figcaption></figure>

Configure **Display reviews** on the page to determine how reviews will be displayed on your website.

<figure><img src="https://content.gitbook.com/content/xa9ueiMPkj0LsrVay0aB/blobs/S1f4xpFyIKpmnqISThxm/vecom-lab-info-ru-loox-11.1.jpg" alt="VecomLab Shopify App Loox"><figcaption></figcaption></figure>

On the **Manage reviews** page, manage your reviews.

<figure><img src="https://content.gitbook.com/content/xa9ueiMPkj0LsrVay0aB/blobs/UgdnewfKfDdDxw2GJZfK/vecom-lab-info-ru-loox-11.2.jpg" alt="VecomLab Shopify App Loox"><figcaption></figcaption></figure>

On the **Import reviews** page, you have three options to add reviews to your site. The first option, using AliExpress, is explained in the video. We recommend exploring the other methods on your own.

<figure><img src="https://content.gitbook.com/content/xa9ueiMPkj0LsrVay0aB/blobs/3vYwE6lFXs63YZLc6Y5o/vecom-lab-info-ru-loox-12.jpg" alt="VecomLab Shopify App Loox"><figcaption></figcaption></figure>

As an example, I will disable the **Reviews Sidebar Widget** in **Display reviews**.

<div><figure><img src="https://content.gitbook.com/content/xa9ueiMPkj0LsrVay0aB/blobs/bTCVS047NhDYoxYgvLFU/vecom-lab-info-ru-loox-13.1.jpg" alt="VecomLab Shopify App Loox"><figcaption></figcaption></figure> <figure><img src="https://content.gitbook.com/content/xa9ueiMPkj0LsrVay0aB/blobs/RI3c6IqGeSKeVTqCHRFk/vecom-lab-info-ru-loox-13.2.jpg" alt="VecomLab Shopify App Loox"><figcaption></figcaption></figure> <figure><img src="https://content.gitbook.com/content/xa9ueiMPkj0LsrVay0aB/blobs/PvGJMyNizbsvOQ33CrXd/vecom-lab-info-ru-loox-13.3.jpg" alt="VecomLab Shopify App Loox"><figcaption></figcaption></figure> <figure><img src="https://content.gitbook.com/content/xa9ueiMPkj0LsrVay0aB/blobs/2sJDsb2GcWwZbauovbj8/vecom-lab-info-ru-loox-13.4.jpg" alt="VecomLab Shopify App Loox"><figcaption></figcaption></figure></div>

You can hide the review date in the **Product Reviews Widget** under **Display reviews**.

<div><figure><img src="https://content.gitbook.com/content/xa9ueiMPkj0LsrVay0aB/blobs/znZhWiptfMw5eIP9M4xE/vecom-lab-info-ru-loox-14.1.jpg" alt="VecomLab Shopify App Loox"><figcaption></figcaption></figure> <figure><img src="https://content.gitbook.com/content/xa9ueiMPkj0LsrVay0aB/blobs/1RMEuYSIvm0K8defOS9m/vecom-lab-info-ru-loox-14.2.jpg" alt="VecomLab Shopify App Loox"><figcaption></figcaption></figure> <figure><img src="https://content.gitbook.com/content/xa9ueiMPkj0LsrVay0aB/blobs/mgu89iosMVucqqTD8Jd4/vecom-lab-info-ru-loox-14.3.jpg" alt="VecomLab Shopify App Loox"><figcaption></figcaption></figure></div>

You can add a verification badge for each review in **Manage reviews**.

<div><figure><img src="https://content.gitbook.com/content/xa9ueiMPkj0LsrVay0aB/blobs/dFiNZ7oKAV9L2NsIXEYt/vecom-lab-info-ru-loox-15.1.jpg" alt="VecomLab Shopify App Loox"><figcaption></figcaption></figure> <figure><img src="https://content.gitbook.com/content/xa9ueiMPkj0LsrVay0aB/blobs/ZFz5NjyX2IeOzudERu4c/vecom-lab-info-ru-loox-15.2.jpg" alt="VecomLab Shopify App Loox"><figcaption></figcaption></figure> <figure><img src="https://content.gitbook.com/content/xa9ueiMPkj0LsrVay0aB/blobs/l4pQgM6PbMacWACTTfq6/vecom-lab-info-ru-loox-15.3.jpg" alt="VecomLab Shopify App Loox"><figcaption></figcaption></figure> <figure><img src="https://content.gitbook.com/content/xa9ueiMPkj0LsrVay0aB/blobs/6uIYwkVrePCw66mlWUJU/vecom-lab-info-ru-loox-15.4.jpg" alt="VecomLab Shopify App Loox"><figcaption></figcaption></figure></div>

There is a **Help** button at the bottom right.

<figure><img src="https://content.gitbook.com/content/xa9ueiMPkj0LsrVay0aB/blobs/oIrdlKh1VQfxRgITQsnB/vecom-lab-info-ru-loox-16.jpg" alt="VecomLab Shopify App Loox"><figcaption></figcaption></figure>

And all the performance data is in **Home**.

<figure><img src="https://content.gitbook.com/content/xa9ueiMPkj0LsrVay0aB/blobs/DQee5OJLNRlwGIHn9jAL/vecom-lab-info-ru-loox-17.jpg" alt="VecomLab Shopify App Loox"><figcaption></figcaption></figure>

We’ve shown just a small part of the features of the Loox app. Start with this and enhance the functionality as needed.

### Instructions <a href="#instructions" id="instructions"></a>

1. Install the app in Shopify
2. Set up the app
3. Add reviews

### Actions <a href="#actions" id="actions"></a>

Example of a [table](https://docs.google.com/spreadsheets/d/1JG-l9wSzPKBHSZT54qBidIm-jZ5nlH3jZcxMD-xh99o/edit?usp=sharing) for collecting reviews, if applicable.


# Task #27: Klaviyo

Increase sales in Shopify with Klaviyo: bring back warm customers and boost profits for free.

### Purpose <a href="#purpose" id="purpose"></a>

Set up Klaviyo → <https://vecomlab.com/klaviyo>

{% hint style="info" %}
**Klaviyo** is the only app we use for email marketing and many other tasks, working not only with Shopify. After registration, you will have the opportunity to send 500 emails per month for free.

* Create an account: <https://vecomlab.com/klaviyo>
  {% endhint %}

{% embed url="<https://youtu.be/A3cu6lftX3k>" %}

This free method will help you bring back your warm customers who have already added items to their cart and started the checkout process. This will significantly increase your sales and profits.

### DMARC <a href="#dmarc" id="dmarc"></a>

{% embed url="<https://youtu.be/VugKwXpLu98>" %}

### Video notes <a href="#video-addition" id="video-addition"></a>

After successful registration, create a **list (1)**, set up the **pop-up (2)**, and configure the **abandoned cart email flow (3)**.

* [**Abandoned checkouts (browsed carts)**](https://help.shopify.com/en/manual/orders/abandoned-checkouts) - website visitors who started the checkout process, entered their details, but did not complete the purchase.

<figure><img src="https://content.gitbook.com/content/xa9ueiMPkj0LsrVay0aB/blobs/SX2Imb2oLtpnhWi70oKK/vecom-lab-info-ru-klaviyo-2.jpg" alt="VecomLab Shopify App Klaviyo"><figcaption></figcaption></figure>

After recording the video, we continued setting up the app. The results are available on the website. To check them, begin the checkout process and close the page as shown in the video. You will receive a relevant email in your inbox. You can test the pop-up by opening the site in incognito mode.

In the **Popup** list settings, you can disable **Double opt-in (recommended)** so that users do not receive the **"Confirm your subscription"** email. Do the same for the other lists. Don’t forget to save the changes.

<div><figure><img src="https://content.gitbook.com/content/xa9ueiMPkj0LsrVay0aB/blobs/N3upK7gAn6nEAeylElhz/vecom-lab-info-ru-klaviyo-3.1.jpg" alt="VecomLab Shopify App Klaviyo"><figcaption></figcaption></figure> <figure><img src="https://content.gitbook.com/content/xa9ueiMPkj0LsrVay0aB/blobs/OA00bDc4NqHCOrOFBzL1/vecom-lab-info-ru-klaviyo-3.2.jpg" alt="VecomLab Shopify App Klaviyo"><figcaption></figcaption></figure> <figure><img src="https://content.gitbook.com/content/xa9ueiMPkj0LsrVay0aB/blobs/WOXKLYYJ0EpqrMDfI8XR/vecom-lab-info-ru-klaviyo-3.3.jpg" alt="VecomLab Shopify App Klaviyo"><figcaption></figcaption></figure> <figure><img src="https://content.gitbook.com/content/xa9ueiMPkj0LsrVay0aB/blobs/po90BlbpfLYZQ0V9NgoZ/vecom-lab-info-ru-klaviyo-3.4.jpg" alt="VecomLab Shopify App Klaviyo"><figcaption></figcaption></figure></div>

Here’s an example of a pop-up and its possible implementation. You can develop your own version or get inspired by competitors. There are many ways to configure a pop-up. The current setup is completely free.

If you wish to remove branding from the pop-up and build even more trust with your customers, upgrade to a paid Klaviyo plan.

<div><figure><img src="https://content.gitbook.com/content/xa9ueiMPkj0LsrVay0aB/blobs/qKDAjGX0xHNGir8DvSXC/vecom-lab-info-ru-klaviyo-4.1.jpg" alt="VecomLab Shopify App Klaviyo"><figcaption></figcaption></figure> <figure><img src="https://content.gitbook.com/content/xa9ueiMPkj0LsrVay0aB/blobs/xUUbXo3WeKsK0ieeGVY0/vecom-lab-info-ru-klaviyo-4.2.jpg" alt="VecomLab Shopify App Klaviyo"><figcaption></figcaption></figure></div>

To prevent your emails from ending up in spam, I recommend referring to the Klaviyo guide available at the following link: <https://help.klaviyo.com/hc/en-us/articles/12034571748251>.

You should aim to keep the **unsubscribe rate** for each email campaign **below 0.3%**.

<div><figure><img src="https://content.gitbook.com/content/xa9ueiMPkj0LsrVay0aB/blobs/P1sgDqOu2WPLGijaRVCf/vecom-lab-info-ru-klaviyo-5.1.jpg" alt="VecomLab Shopify App Klaviyo"><figcaption></figcaption></figure> <figure><img src="https://content.gitbook.com/content/xa9ueiMPkj0LsrVay0aB/blobs/2sOlfJVp5OOFchwCXSvX/vecom-lab-info-ru-klaviyo-5.2.jpg" alt="VecomLab Shopify App Klaviyo"><figcaption></figcaption></figure></div>

The link in the newsletter depends on the promo code. If the promo code is static, such as 15NEW, the link will look like this:

* {{ event.extra.checkout\_url }}\&discount=15NEW
* Information: <https://help.klaviyo.com/hc/en-us/articles/115005253088>

Thanks to this link format, when the user clicks on the link from the email, they are directly taken to the checkout page with the discount already applied.

Example of an email. In the **Subject line** and the body of the email, we use the code to address the customer by their name:

```
{{ first_name|default:'there' }}
```

<div><figure><img src="https://content.gitbook.com/content/xa9ueiMPkj0LsrVay0aB/blobs/n1tQGXnj67TrbNSWJDvS/vecom-lab-info-ru-klaviyo-6.1.jpg" alt="VecomLab Shopify App Klaviyo"><figcaption></figcaption></figure> <figure><img src="https://content.gitbook.com/content/xa9ueiMPkj0LsrVay0aB/blobs/defE4762bZbVICEjr3xP/vecom-lab-info-ru-klaviyo-6.2.jpg" alt="VecomLab Shopify App Klaviyo"><figcaption></figcaption></figure></div>

<figure><img src="https://content.gitbook.com/content/xa9ueiMPkj0LsrVay0aB/blobs/c24GMYsmwHPRbVZQI4Vo/vecom-lab-info-ru-klaviyo-7.jpg" alt="VecomLab Shopify App Klaviyo"><figcaption></figcaption></figure>

Check the settings to update your organization’s information and switch to a different plan when 500 free emails per month are no longer sufficient.

With the right approach, this will definitely pay off and bring you many sales that you could have otherwise lost.

<div><figure><img src="https://content.gitbook.com/content/xa9ueiMPkj0LsrVay0aB/blobs/HBZEImQNsE7VD1I4PKTT/vecom-lab-info-ru-klaviyo-8.1.jpg" alt="VecomLab Shopify App Klaviyo"><figcaption></figcaption></figure> <figure><img src="https://content.gitbook.com/content/xa9ueiMPkj0LsrVay0aB/blobs/NcsyeYWj7PMemYjdAdtR/vecom-lab-info-ru-klaviyo-8.2.jpg" alt="VecomLab Shopify App Klaviyo"><figcaption></figcaption></figure></div>

Test, create, and share engaging promotions with your customers. For this, we use Klaviyo!

### Description <a href="#description" id="description"></a>

* Set up an automatic email campaign for those who did not complete their purchase

### Instructions <a href="#instructions" id="instructions"></a>

1. Add the app to Shopify (create an account)
2. Use the corporate support email for sending newsletters
3. Enable website tracking
4. Set up the organization profile and change the time zone to America/Chicago
5. Create a Popup list
6. In the Popup list settings, enable Single opt-in
7. Enable Single opt-in for all lists
8. Create Sign-up forms and name it Popup
9. Create and set up Flows - Abandoned Cart

### Actions <a href="#actions" id="actions"></a>

Add the app to your Shopify store and set it up.


# Task #28: Tracktor By ShopPad

Set up order tracking in Shopify: automatic notifications about the order status sent to the customer's email.

### Purpose <a href="#purpose" id="purpose"></a>

Set up the app for tracking deliveries.

{% embed url="<https://youtu.be/NMUIG5zAZkw>" %}

The Tracktor by ShopPad app will help your customers track their order status directly in the store. Additionally, you can set up convenient notifications that will be automatically sent to the customer's email every time the order status changes.

### Description <a href="#description" id="description"></a>

* The Tracktor by ShopPad app will be suitable

### Instructions <a href="#instructions" id="instructions"></a>

1. Add the app to the store
2. Use Google Mail
3. Set to Enabled
4. Choose the Starter Plan
5. Set up the Tracking Page Editor
6. Configure the Settings

### Actions <a href="#actions" id="actions"></a>

The settings may vary, but you can always ask support to check the settings and provide them access to the store.

Use this website to check the order status: <https://parcelsapp.com>

### Custom CSS <a href="#custom-css" id="custom-css"></a>

If **Customizable** is selected in **Layouts**, the theme will be **Light**.

<figure><img src="https://content.gitbook.com/content/xa9ueiMPkj0LsrVay0aB/blobs/SG7C98xRAVIhbB5KrDeL/vecom-lab-info-ru-tracktor-1.jpg" alt="VecomLab Shopify App Tracktor By ShopPad"><figcaption></figcaption></figure>

```
/* Tracktor CSS */
#tracktorOrderForm {
  text-align: center;
  padding-bottom: 30px;
}

#tracktorOrderForm input {
  width: 100%;
  max-width: 300px;
  height: 40px;
  border-radius: 5px;
  border: 1px solid black;
  padding-left: 10px;
  font-size: 16px;
}

#tracktorOrderForm label {
  text-align: center;
  font-size: 18px;
}

#tracktor { padding-bottom: 0 !important; } 
@media only screen and (max-width: 1250px) {
  #tracktorOrderForm,
  #tracktorResponseContainer {
    padding-right: 20px;
    padding-left: 20px;
  }
}

.field.recaptcha > div {
  margin: 0 auto;
}

#tracktorOrderForm input[type="text"]:focus {  
  box-shadow: none !important;
  outline: unset !important;
}
```


# Task #29: Buy Me ‑ Sticky Buy Button

Add a fixed "Add to Cart" button on the product page using the Buy Me - Sticky Buy Button app in Shopify.

### Purpose <a href="#purpose" id="purpose"></a>

Set up Buy Me - Sticky Buy Button.

{% embed url="<https://youtu.be/JwpV7rvgtB0>" %}

Set up the free app Buy Me - Sticky Buy Button on the product page and the homepage to increase add-to-cart actions and purchases.

### Description <a href="#description" id="description"></a>

* So that it’s easier for customers to add items to their cart and quickly proceed to checkout

### Instructions <a href="#instructions" id="instructions"></a>

1. Add the app to the store
2. Leave and configure only the Sticky Buy Me Widget Settings

### Setting up the button on the homepage <a href="#home-setup" id="home-setup"></a>

This app is used only for setting up:

* Sticky Buy Me Widget
* Sticky URL Based ATC (the settings will be pulled from the first one)

<div><figure><img src="https://content.gitbook.com/content/xa9ueiMPkj0LsrVay0aB/blobs/qkoKtzphqyIaPVoYx6d5/vecom-lab-info-ru-buy-me-1.jpg" alt="VecomLab Shopify App Buy Me Sticky Buy Button"><figcaption></figcaption></figure> <figure><img src="https://content.gitbook.com/content/xa9ueiMPkj0LsrVay0aB/blobs/vphj2TzjFeQKvCnH95gI/vecom-lab-info-ru-buy-me-2.jpg" alt="VecomLab Shopify App Buy Me Sticky Buy Button"><figcaption></figcaption></figure></div>


# Ads Strategy

Achieve success on Facebook: an effective strategy.


# Task #30: Preparation and Launch of Test Advertising Campaign

Launch a test advertising campaign on Facebook with ad creation formulas. Examples of tables and strategies for a successful start!

### Purpose <a href="#purpose" id="purpose"></a>

Prepare and launch a test advertising campaign on Facebook.

{% embed url="<https://youtu.be/iSERFqVSya0>" %}

{% embed url="<https://youtu.be/F2XyRP3Rtd0>" %}
Free video
{% endembed %}

How to set up an advertising campaign on Facebook? This guide is intended for those who want to test and identify profitable interests and creatives. The campaign budget largely depends on the learning phase. It’s important to avoid both too large and too small budgets, as well as an excessive number of ad sets. And of course, your product, creatives, and landing page should be prepared!

### Description <a href="#description" id="description"></a>

* Prepare materials for testing on Facebook

### Instructions <a href="#instructions" id="instructions"></a>

1. Prepare the text for the main ad
2. Prepare the text for retargeting
3. Select 5 broad or direct interests (you can start testing with broad interests)
4. Set up UTM tags (install Google Analytics or Yandex.Metrica on your store - it's easy to do; Shopify has an app for this)
5. Prepare two video creatives (video is a must)
6. Create an attractive preview image for the video
7. Prepare two images for retargeting with a promo code
8. Create the advertising campaign and submit it for approval, set the start for the next day at 12:00 AM

### Actions <a href="#actions" id="actions"></a>

Once your ad campaign passes the review, the display will begin.

Example of a [table](https://docs.google.com/spreadsheets/d/1GH-FtJ64fP8bE4NXbkQYoqnKqSzJjVNrdOVrxfqS5pA/edit?usp=sharing).

### Example of two ad copy formulas <a href="#creative-flow-chart" id="creative-flow-chart"></a>

{% embed url="<https://docs.google.com/presentation/d/1YcBUA24GZqZSJFxKC0HMI5fBSvOw82AiDUvqaVJZrE0/edit?usp=sharing>" %}


# Business Management

Set up the backend: ready-made spreadsheets and documents for accounting.


# Task #31: Management

Effective management of orders and profits with our spreadsheets and instructions. BECPP and TCPP calculations.

### Purpose <a href="#purpose" id="purpose"></a>

Prepare spreadsheets to count profits and expenses - this is a rough reconciliation of the comings and goings of your business.

{% embed url="<https://youtu.be/a5jByl4Vd-E>" %}

How to process the order and send it to the customer? How to calculate the profit and what price of goods to put on the site? How to determine the breakeven cost of a BECPP purchase? How to calculate the target purchase cost of TCPP based on the desired net profit?

### Description <a href="#description" id="description"></a>

* Showing what we use in our projects.

<div data-full-width="true"><figure><img src="https://content.gitbook.com/content/xa9ueiMPkj0LsrVay0aB/blobs/uL5C7lK7knL7A0GnHYfW/vecom-lab-info-ru-p-and-l-pf-ads-cogs.jpg" alt="VecomLab Business Management"><figcaption></figcaption></figure></div>

### Instructions <a href="#instructions" id="instructions"></a>

1. [Terminology](https://docs.google.com/document/d/12a9zQ9YlJJR_cKy7Hvg4JfqiQGa4MKWC2EzpcHX51gA/edit?usp=sharing)
2. [P\&L](https://docs.google.com/spreadsheets/d/1BkjRuyDI23CyQr4Wx53iXQl33LRyRHgGU1UjUn_VtXQ/edit?usp=sharing)
3. [COGS](https://docs.google.com/spreadsheets/d/19MI1xVB2ajlLheFj_bfF5Ovp72U40Xs5w13TrkMw9JU/edit?usp=sharing)
4. [PF Ads](https://docs.google.com/spreadsheets/d/17-zhcMyqXMb5qADg2JpUz7yfF-r1u-R_6PZaW_pGVBs/edit?usp=sharing)

### Actions <a href="#actions" id="actions"></a>

Real examples of tables that we actively use in our projects. They may change slightly, but in general their logic remains the same. These tables will need to be slightly adapted depending on tax rates, payment provider commissions and other factors.

### Order processing <a href="#order-processing" id="order-processing"></a>

When the supplier ships the order, the buyer will receive a notification in the mail.

{% hint style="warning" %}
<https://youtu.be/Xe7O9fMaIrY>
{% endhint %}

You, as the store owner, will see this in the Shopify admin, it will all happen automatically.

{% hint style="warning" %}
<https://youtu.be/7lGL-XuObWY>
{% endhint %}

You can find more information at DSers and AliExpress.

{% hint style="warning" %}
<https://youtu.be/IohRM66G3VA>
{% endhint %}


# Customer Service

Communicate with customers: response templates and order tracking.


# Task #32: FAQ's and CS Templates

Optimize your support team's work with Google Docs and response templates. Improve communication efficiency!

### Purpose <a href="#purpose" id="purpose"></a>

Make a list of answers to frequently asked questions.

{% embed url="<https://youtu.be/qOl1zMmG2m8>" %}

Google Document with response templates for your customer support team.

### Description <a href="#description" id="description"></a>

* Depends on product and business model

### Instructions <a href="#instructions" id="instructions"></a>

1. Tracking Inquiries
2. Return & Refund Requests
3. Modify/Cancel Order

### Actions <a href="#actions" id="actions"></a>

Example in the [document](https://docs.google.com/document/d/1UY5-KCdTSFDqSNPG74f6yaMWepzVhe6xiOM8qxPNCZw/edit?usp=sharing).